Hi all. I am somewhat new to the forums here and have been lurking for a couple weeks now. I am a new proud owner of a 2005 Tahoe LT 5.3 and have thoroughly enjoyed the truck so far. I just wanted to share my experience with a HID Projector retrofit as an FYI for anyone looking to do this mod. A little background on myself, I have done a couple different retrofits on my previous ride, a 2002.5 VW GTI VR6 (much less room to work with and much more involved that this). Anyways, on with the DIY:
Parts:
Morimoto Mini H1 Projectors from the Retrofit Source (Highly recommend this for all HID needs, very friendly and knowledgeable staff with fast shipping)
4300K bulbs (personal preference, but the most usable light output)
Morimito 3five ballasts and harness
Mini Gatling Gun Shroud (comes with the below kit)
***headlight re-sealing glue ($10 from TRS at the time of this posting)
All of the above can be purchased as a package called the "Morimoto Mini H1 Stage III Kit"
Donor Headlights
***There is another DIY on here that uses clear lense Reflector headlights as donors. I tried this message and destroyed a new set of Sonor branded headlights attempting to take them apart. Not recommended
Depo Projector Headlights are used in this retro (much easier, no lense removal necessary, about the same cost)
Pictures Below, I apologize about some missing steps, I did not think to take pictues until halfway through this....
Steps:
1. Remove the mounting hardware from the back of the Depo Projectors (fairly self explanatory, just remove the phillips screws and the plastic bracket comes off)
2. Bake the headlights individually in the oven to heat up the glue surrounding the stock Depo projector. 275 degrees for 15 minutes worked for me. ( a heat gun may also work
3. Remove the stock Depo projector. Patience and finesse are key here. Resist the urge to pry with a screwdriver, the hot plastic will crack and you will kick yourself if you break a set of headlights at this step on the process. Make sure to mark what is level with a sharpie by eyeballing the projector shield on the headlight backing for reference later. Basically the middle of the sides of the projector. You will thank yourself later when you have this for reference.
4. Cut out the remaining shroud in the headlight, no way around this- it will not be able to be removed without cutting. I used just a set of wire cutters to minimize dust
5. Mount the shroud to the projector that comes in the kit. 4 small phillips screws included
6. Set the projector with the shroud mounted in the hole the stock depo projector left
7. Line up the cutoff line in the new projector with the marks you made on the headlight to ensure a straight beam pattern
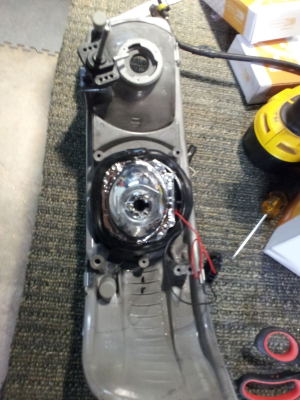
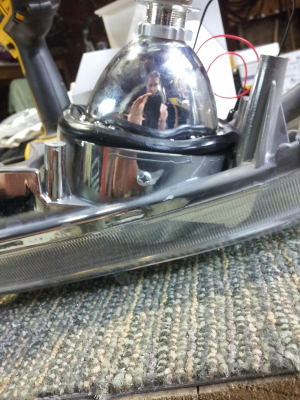
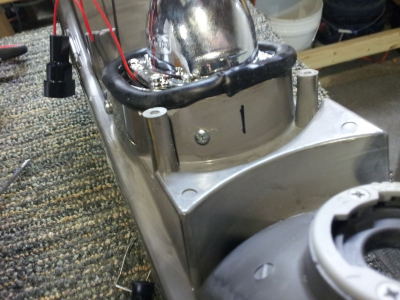
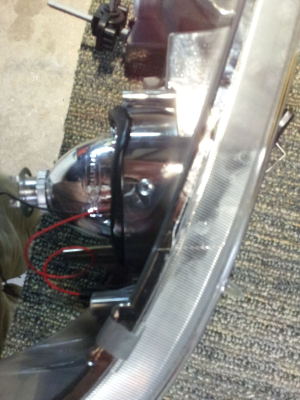
8. I drilled 3 small pilot holes on the top, bottom, and side as seen in the pictures and used small stainless screws to mount the new projector and shroud in the Depo housing
9. Using the Headlight resealing "glue" I just stuffed this putty-like substance in the back surrounding the new projector anywhere you think water may be able to enter the housing. You want to make sure you do a thorough job here, moisture is you enemy in your headlight.
10. Mount the headlight to make sure everything looks straight, adjust and enjoy
11. I left out the wiring of the harness and bi-xenon section. Refer to TRS for this. You will need to do the 4-hi mod for the bi-xenon part to work. Cost is $1 and takes about 10 minutes from Radio Shack.
This entire process took me about 1.5 hours, but was a bit exploratory. You may be able to do it quicker. Take your time lining up the projector. You will appreciate a straight cutoff line down the road.
Pics of the process below:
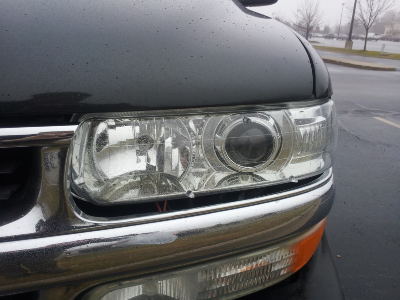
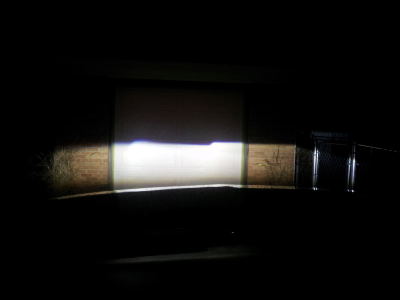
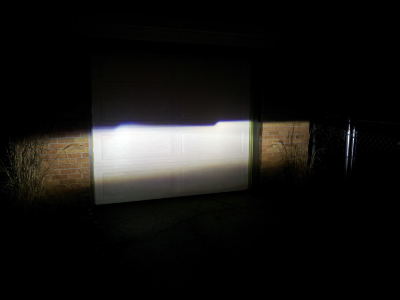
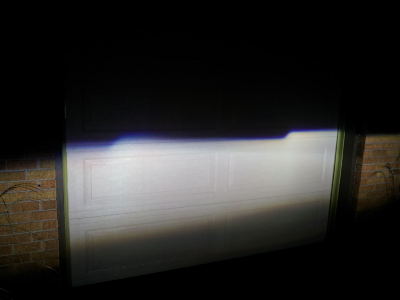
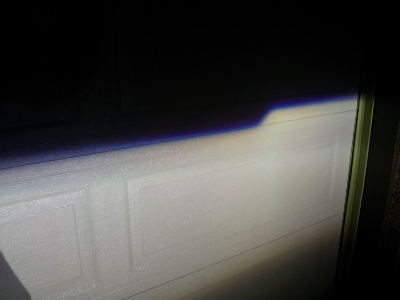
Headlights are very bright and colorful in person, and this is exaggerated at a distance. Very much enjoy and recommend this mod to anyone. Let me know if you have any questions-
Parts:
Morimoto Mini H1 Projectors from the Retrofit Source (Highly recommend this for all HID needs, very friendly and knowledgeable staff with fast shipping)
4300K bulbs (personal preference, but the most usable light output)
Morimito 3five ballasts and harness
Mini Gatling Gun Shroud (comes with the below kit)
***headlight re-sealing glue ($10 from TRS at the time of this posting)
All of the above can be purchased as a package called the "Morimoto Mini H1 Stage III Kit"
Donor Headlights
***There is another DIY on here that uses clear lense Reflector headlights as donors. I tried this message and destroyed a new set of Sonor branded headlights attempting to take them apart. Not recommended
Depo Projector Headlights are used in this retro (much easier, no lense removal necessary, about the same cost)
Pictures Below, I apologize about some missing steps, I did not think to take pictues until halfway through this....
Steps:
1. Remove the mounting hardware from the back of the Depo Projectors (fairly self explanatory, just remove the phillips screws and the plastic bracket comes off)
2. Bake the headlights individually in the oven to heat up the glue surrounding the stock Depo projector. 275 degrees for 15 minutes worked for me. ( a heat gun may also work
3. Remove the stock Depo projector. Patience and finesse are key here. Resist the urge to pry with a screwdriver, the hot plastic will crack and you will kick yourself if you break a set of headlights at this step on the process. Make sure to mark what is level with a sharpie by eyeballing the projector shield on the headlight backing for reference later. Basically the middle of the sides of the projector. You will thank yourself later when you have this for reference.
4. Cut out the remaining shroud in the headlight, no way around this- it will not be able to be removed without cutting. I used just a set of wire cutters to minimize dust
5. Mount the shroud to the projector that comes in the kit. 4 small phillips screws included
6. Set the projector with the shroud mounted in the hole the stock depo projector left
7. Line up the cutoff line in the new projector with the marks you made on the headlight to ensure a straight beam pattern
8. I drilled 3 small pilot holes on the top, bottom, and side as seen in the pictures and used small stainless screws to mount the new projector and shroud in the Depo housing
9. Using the Headlight resealing "glue" I just stuffed this putty-like substance in the back surrounding the new projector anywhere you think water may be able to enter the housing. You want to make sure you do a thorough job here, moisture is you enemy in your headlight.
10. Mount the headlight to make sure everything looks straight, adjust and enjoy
11. I left out the wiring of the harness and bi-xenon section. Refer to TRS for this. You will need to do the 4-hi mod for the bi-xenon part to work. Cost is $1 and takes about 10 minutes from Radio Shack.
This entire process took me about 1.5 hours, but was a bit exploratory. You may be able to do it quicker. Take your time lining up the projector. You will appreciate a straight cutoff line down the road.
Pics of the process below:


Headlights are very bright and colorful in person, and this is exaggerated at a distance. Very much enjoy and recommend this mod to anyone. Let me know if you have any questions-


 . Thorough or not, it's still interesting to see other's projects and mods.