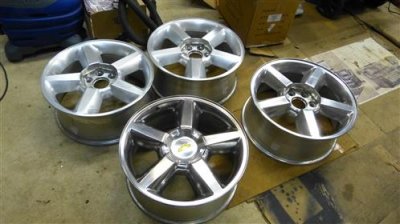
I picked up a set of Rims with studded snow tires mounted. The rims are the late model LTZ 20" wheels I've been ******* after for my '92 Blazer, but corroded from road salt. The tires I'll sell next year at the start of winter; I should be able to get very nearly what I paid for everything.
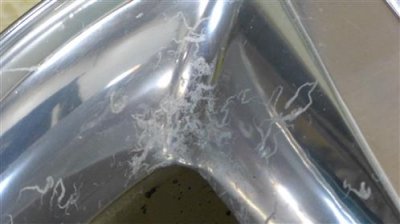
Lots of corrosion, but not too deep. I've played around with a few different techniques & read up on refinishing wheels. This is my first ever attempt at wheel refinishing and/or polishing. If I can do it, so can you. Here's what I've learned so far:
Acid cleaner is no help until after the first sanding.
Step one: Aircraft Paint Remover from O'Reillys. This stuff does a great job of stripping the factory clear coat. (Don't even think of sanding the clear coat off. Trust me.) You'll need to do at least two coats, maybe three. You wash off the stuff with water between strips. Make sure the wheels are bone dry before you start the second strip. Water tends to remain at low spots and prevent the stripper from stripping the last little bit of paint. I thought I'd just sand off the little bits of paint left... Bad idea. The paint is really hard and you'll be sanding forever just to get little bits of paint. Dry the wheel thoroughly--overnight if possible. Then do a second coat mainly where you see the little bits of paint left. You'll get the hang of it after the first wheel. I needed 2 1/2 cans to do 4 wheels. I might have gotten by with less if I had let the wheels dry thoroughly for coat 2.
Step two. Sanding: Start with 240 grit for the corroded spots. If you have very heavy corrosion, you may need to start with a courser grit; or better yet take them to a pro to get them bead blasted. These wheels had a lot of corrosion, but nothing very deep where pits were showing.
STEP Three. Now spray with an acid wash made for aluminum. You can pick it up at an auto paint store or at most marine (boat) supply stores. I got mine at West Marine. Spray it on, rinse it off five minutes later. This will help get rid of any dark stains from the corrosion.
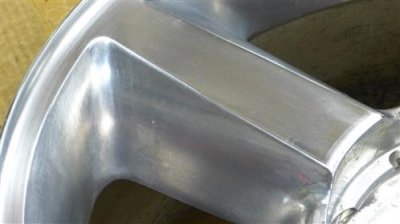
Step Four. Once I got rid of the corrosion I went over it with 320 then finally 400. They look better after final sanding with 400 grit, but still a ways to go.
Step Five. Tripoli polishing compound. (Tripoli is the grit.) A 4.5" or 5" wheel on a drill is great. Full speed on the drill may be too fast. If you start leaving bits of polish on the wheel, you either have too much compound on the buff, or your drill speed is too fast. Keep the buff moving and don't use excessive pressure.
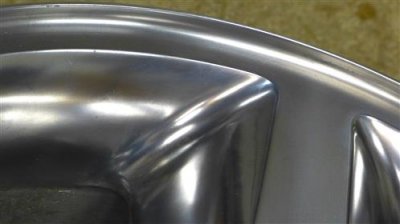
Step Six. Rouge, then Jeweler's Rouge compound. (Again, these specify the grit.) Many videos only show using the rouge. You'll want to use the Jeweler's Rouge as well to get a really deep finish.
DO NOT USE STEEL WOOL. You'll see some videos recommending steel wool, and you'll be able to get an incredible shine with steel wool. HOWEVER, steel wool will leave microscopic bits of steel in the aluminum which will end up causing lots of nasty corrosion. Maybe it would be OK for a show car where the wheels never get wet, I don't know. For a car exposed to the elements, steel wool and aluminum don't mix. I know this from painting outdrives on boats... Looks great initially. Looks like hell in a year.
The close ups show the same section in various stages of refinishing. The pic showing all four wheels also shows wheels in various stages, with the one in the foreground being complete.
If you end up with a "hazy" finish, you may be using too high a speed on your drill, or you may be failing to use the Tripoli compound enough. At least that was my problem.
Be extremely careful not to let the chuck of the drill touch the wheel. The scratch will be deep enough that you may need to use 120 grit sandpaper to get rid of it, if you even can.
Use a respirator with dust cartridges. Aluminum dust is known to cause Alzheimer's. DO NOT screw with this!!! A simple dust mask is not enough, as dust can get in from the side. Trust me, you do not want to get Alzheimer's. Don't even get this stuff on your skin. Use good gloves, a respirator and a face shield.
All I had was mild surface corrosion. If your wheel has deep corrosion, you probably want to take it to a pro to get it bead blasted. Even my wheels were a lot of work. I enjoyed learning how to do this, but to do it again I'd probably get the wheels bead blasted then do the polishing myself. Figure I spent about three to four hours a wheel getting them ready to polish. Maybe 30 minutes spent polishing.
I'm still undecided what to do for a protective coat; I've seen wildly divergent opinions. I'm leaning towards a two part clear, but I am considering a wipe on coating that you re-apply every five or six months. There are pros and cons to both... Also, I'm going to paint the inside of the wheels black so that brake grease and dust doesn't show up so bad on the interior. More yet to come.


Last edited:
