What did you do to your NNBS GMT900 Tahoe/Yukon Today?

Disclaimer: Links on this page pointing to Amazon, eBay and other sites may include affiliate code. If you click them and make a purchase, we may earn a small commission.

Project Workshop

Supporting Member
Joined
Nov 17, 2021
Posts
57
Reaction score
150
whatcha think about those fox shocks over the stock?

I have been thinking about a set for the Jeep (when I eventually lift it), I didn't know they were an option for the tahoe!
I've really enjoyed the Fox 2.0's the last couple of years. The tuned 2.5's are an even firmer ride on road, but I enjoy that. It all depends what you are looking for. Offroad the 2.0's rode great, I'll be testing the 2.5's soon.
 

iamdub

Full Access Member
Joined
Apr 23, 2016
Posts
20,821
Reaction score
44,943
Location
Li'l Weezyana
Did nothing to the Denali this weekend. Instead, I took the wife car shopping. She bought a new 2023 Lincoln Nautilus. Only has 7 miles on the OD. Hopefully with it being white not red, it won’t attack any deer. *(see even the website knew what I really meant and autocorrected the word attract to attack).

I finished up another Big 3/4. I’m wondering if it’s time to do another thread on this so we can do a sticky. Then I can list what’s needed for the 6.2l with the battery mounted fuse vs. the firewall mount. That way folks know the p/n for the alternator (if they upgrade or replace with new), what gauge and lengths they need, which ends (straight, 90°, 45°) to buy so they can solder and crimp them, the tools necessary for the project and what goes where.

Or we can continuing to repeat ourselves in new threads. Although it’s probably easier to just reference them to a sticky and they can have at ‘er.

I know there are one or two out there already, but I think they may have other stuff in their thread build, as opposed to just a Big 3/Big 4 upgrade. Thoughts?

I like the idea of one with the newer style with the battery-mounted fuse. I might be doing another like mine (firewall-mounted fuse), but I don't know when. I'll be sure to document the steps. I kinda did with the one in my build thread but it's broken up and not a clean how-to. I also used a hydraulic crimper versus a hammer or "pliers" style that most anyone else would use.


Actually, since they'd be the same otherwise, you could do your write-up and cop my pics to add in to show the alternate routing for those with the firewall-mounted fuse. It requires an additional wire made to go from the battery + to the fuse- maybe a 2' length at most.
 

alpha_omega

Full Access Member
Joined
Mar 15, 2017
Posts
704
Reaction score
1,347
Location
Michigan
Actually, since they'd be the same otherwise, you could do your write-up and cop my pics to add in to show the alternate routing for those with the firewall-mounted fuse. It requires an additional wire made to go from the battery + to the fuse- maybe a 2' length at most.
Exactly, but like you mentioned maybe this will help as a “go-to” quick reference without any extra digging through anyone’s build. I’m guessing there are more than just a couple out there within some of the crews build pages.

Good idea on the double reference. This way there’s no confusion for those guys. I should have take photos when I did the cables on my 02’ 5.3lt.

I’m guessing the 6.0 for the NNBS is the same setup? I know my 2002 is a little different than any of you with a 5.3, but if I had taken photos before selling it I could have added them to the thread as well.
 

RooTBeeRthe1st

Full Access Member
Joined
Jul 11, 2018
Posts
1,087
Reaction score
2,470
Finally ran it til needle was all the way down to the empty mark, fuel light was on for probably 15 MI
And then the low fuel level readout finally popped on for about 5 MI
The sucker finally took over 20 gallons (22 to be exact)
Ran 197mi on that tank so, should still have 4gal left... Guess I just had been gun shy for so long I was filling up when I got down to a 3/⁵ tank(because it was losing pressure in long hard turns) but now I was still sort of doing the same thing when in reality I should actually be running it till the empty mark.
 

iamdub

Full Access Member
Joined
Apr 23, 2016
Posts
20,821
Reaction score
44,943
Location
Li'l Weezyana
Exactly, but like you mentioned maybe this will help as a “go-to” quick reference without any extra digging through anyone’s build. I’m guessing there are more than just a couple out there within some of the crews build pages.

Good idea on the double reference. This way there’s no confusion for those guys. I should have take photos when I did the cables on my 02’ 5.3lt.

I’m guessing the 6.0 for the NNBS is the same setup? I know my 2002 is a little different than any of you with a 5.3, but if I had taken photos before selling it I could have added them to the thread as well.

The GMT800s have it cheap and easy as far as the Big 3 goes. The battery and alternator are all near each other.

I don't think there are any differences for the engine sizes in the GMT900s. AFAIK, there are just the two fuse locations, requiring that extra positive cable on the earlier versions.
 

iamdub

Full Access Member
Joined
Apr 23, 2016
Posts
20,821
Reaction score
44,943
Location
Li'l Weezyana
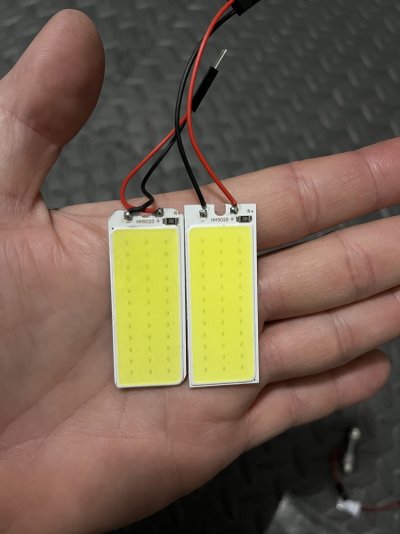
Was a few days ago, but I made some LED puddle lights for my mirrors. Yes, they have some plug-and-play for ~$25 but I like COB LEDs and got a pair of these COB panels for $6.

The white part is an aluminum plate. They come with foam double-sided mounting tape on the back, which I peeled off. I used a flap disc on a grinder to shave off the length and corners so they'd fit in the housings:

IMG_8635.JPG


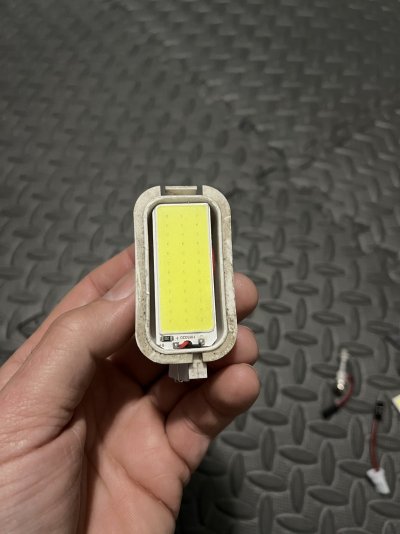
This was a spare housing used for test-fitting. The original housings and lenses were soaking in hot water and dish detergent in a Ziploc bag so they would clean up more easily:

IMG_8631.JPG


I haven't had an opportunity to take comparison pics yet. But, they work great. Cost me $6 and few drops of super glue. I'm not so poor that I couldn't afford the extra $19 for the pre-fabbed ones. I just wanted these LEDs over SMDs for this particular purpose and it was a small and easy project to occupy my mind and hands for a couple hours.
 

Tonyrodz

Resident Resident
Joined
Feb 16, 2012
Posts
31,598
Reaction score
47,089
Location
Central Jersey
Was a few days ago, but I made some LED puddle lights for my mirrors. Yes, they have some plug-and-play for ~$25 but I like COB LEDs and got a pair of these COB panels for $6.

The white part is an aluminum plate. They come with foam double-sided mounting tape on the back, which I peeled off. I used a flap disc on a grinder to shave off the length and corners so they'd fit in the housings:

View attachment 414868


This was a spare housing used for test-fitting. The original housings and lenses were soaking in hot water and dish detergent in a Ziploc bag so they would clean up more easily:

View attachment 414867


I haven't had an opportunity to take comparison pics yet. But, they work great. Cost me $6 and few drops of super glue. I'm not so poor that I couldn't afford the extra $19 for the pre-fabbed ones. I just wanted these LEDs over SMDs for this particular purpose and it was a small and easy project to occupy my mind and hands for a couple hours.
Something so simple to make it yours. Nice work.
 

Forum statistics

Threads
132,312
Posts
1,865,783
Members
96,904
Latest member
Nix409
Top