Ok, so here's how it all went. The first part is finding some decent projector housings that you can take apart. A lot of the aftermarket ones are forever glued together. What you are looking for is one that is sealed with some sort of silicone or heat-compound.
I went with DEPO Denali headlights. You can find them all over the web for a wide range of prices. Saw them for as much as $300/pair, but got mine from here on Ebay for $128: http://cgi.ebay.com/ebaymotors/YUKON-DENALI-XL-01-06-BLACK-PROJECTOR-HEADLIGHTS-SIERRA_W0QQitemZ400082298294QQcmdZViewItemQQimsxZ20091030?IMSfp=TL0910301810008r20217
The next thing you need to do is decide what projector you want to use. There are a couple of things to keep in mind when choosing: 1) Projector lens and bowl must fit in the frame of the headlight, and 2) If it is too deep it won't fit into the truck because there are things behind the headlights that get in the way.
I chose TSX projectors because of their relatively small size and high-quality. S2000's would also probably work, but the best bet might be some Bosch ECE (aka E46) as they are smaller and shorter. From a pure fitment standpoint, those would probably be the easiest to work with.
From there you can save money and get a PNP kit, or go high-quality and build your own kit. This is what I did. I got Matsushita ballasts, which are OEM on Infinit/Nissan vehicles with HID's. They are long-lasting and sturdy, basically built to last as long as you own the car. I also got Morimoto 4300k D2S bulbs. Another standard for Japanese cars.
Ok, down to business, and pics. 99% of the work was done by my friend Sonny. When I say "we" in this context, it really means "Sonny did....and I might have watched or held a flashlight for him" If you're interested in contacting him, PM me.
The first step is removing the DEPO projector. Simply unscrew the bracket, then take the holding screws out of the projector. It will still be attached by the silicone, but you can take a knife or small screw-driver or something and scrape it out around the edges. Just keep working it, and eventually the projector will come off.

The one thing I really didn't get good pictures of was shaving the mounting bracket to fit the TSX projector. It's pretty basic, though. The projector was a little big to fit in the existing hole, so we had to grind parts of the bracket to make it fit. Once that was done, we attached the TSX projector to the housing, which fit pretty well as it was so there was no cutting or drilling into the housing itself at all. We used the screw holes from the original projectors, which also served as the guide for leveling them. Then we used some foil tape to fill in the few gaps there were and applied a coat of Bondo on top of that.

Applied a coat of JB Weld on top of that, let dry, and added primer.

Then paint:

Continued in next post....
---------- Post added at 02:59 PM ---------- Previous post was at 02:59 PM ----------
---------- Post added at 03:38 PM ---------- Previous post was at 02:59 PM ----------
The next step was putting the mounting bracket back on. Pretty straight-forward, screw things back together job. Then we put the bulbs in, and attached the ignitors/ballasts. This is what the final product looks like from the back:

And final product from the front:

The wiring portion of the install was pretty simple, as it's basically plug and play. Used a wiring harness, which you hook directly to the battery terminals, then plug into your lights.
Now came the tricky part. With the new projectors and bulbs with ignitors attached, the light is about an inch deeper then designed, so on the driver's side it would not seat. The back of it hit the windshield wiper reservoir, and there really is no easy way to move that. Sonny had the ingenious idea of using his heatgun on the reservoir to "mold" it around the light, and it worked like a charm. We were both worried we weren't going to be able to get that light in. Passenger side went right in as nothing is directly behind it.
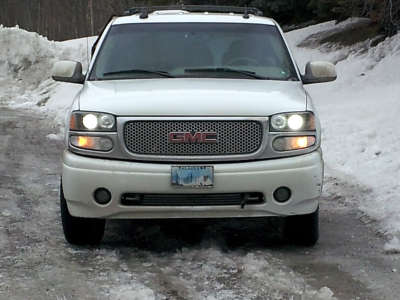
Here's the final install look:

Yes, I know I need to color match the DRL lens/reflector, although the look is growing on me.....
Night shot of the front:

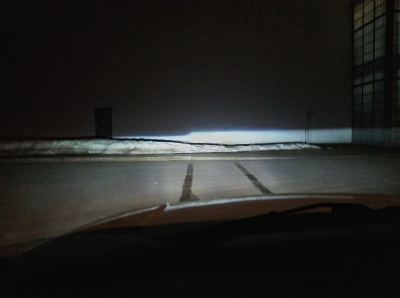
Output and cutoff:


ETA 5/12 to add pics of new Osram Xenarc CBI bulbs with 50w Morimoto ballasts:


6-High Mod: STRONGLY recommend this, because if you have HID lows and are driving for a bit with your highs on, then switch back to lows, you will have several seconds of darkness while they warm up. Not good at highway speeds.
This keeps the HID's on and will eliminate that problem.

Sonny did a great job and we got great, typical TSX results with a sharp cutoff and some "flicker" in the lights. I got all of my parts other then the headlights from here, and he'll discount the price if you're ordering parts for an entire build:
http://store.theretrofitsource.com/index.php
You take full responsibility for any modifications done to any equipment on your vehicle.
Updated pics:
I noticed a cool side-effect of the HID's. The light from the low-beam reflects off the headlight lens back into the high-beam reflector, and then back out the front again, giving it a self-illuminated look. Also now HID's in the fogs. Take a look:


And just another shot of the lights:

I went with DEPO Denali headlights. You can find them all over the web for a wide range of prices. Saw them for as much as $300/pair, but got mine from here on Ebay for $128: http://cgi.ebay.com/ebaymotors/YUKON-DENALI-XL-01-06-BLACK-PROJECTOR-HEADLIGHTS-SIERRA_W0QQitemZ400082298294QQcmdZViewItemQQimsxZ20091030?IMSfp=TL0910301810008r20217
The next thing you need to do is decide what projector you want to use. There are a couple of things to keep in mind when choosing: 1) Projector lens and bowl must fit in the frame of the headlight, and 2) If it is too deep it won't fit into the truck because there are things behind the headlights that get in the way.
I chose TSX projectors because of their relatively small size and high-quality. S2000's would also probably work, but the best bet might be some Bosch ECE (aka E46) as they are smaller and shorter. From a pure fitment standpoint, those would probably be the easiest to work with.
From there you can save money and get a PNP kit, or go high-quality and build your own kit. This is what I did. I got Matsushita ballasts, which are OEM on Infinit/Nissan vehicles with HID's. They are long-lasting and sturdy, basically built to last as long as you own the car. I also got Morimoto 4300k D2S bulbs. Another standard for Japanese cars.
Ok, down to business, and pics. 99% of the work was done by my friend Sonny. When I say "we" in this context, it really means "Sonny did....and I might have watched or held a flashlight for him" If you're interested in contacting him, PM me.
The first step is removing the DEPO projector. Simply unscrew the bracket, then take the holding screws out of the projector. It will still be attached by the silicone, but you can take a knife or small screw-driver or something and scrape it out around the edges. Just keep working it, and eventually the projector will come off.

The one thing I really didn't get good pictures of was shaving the mounting bracket to fit the TSX projector. It's pretty basic, though. The projector was a little big to fit in the existing hole, so we had to grind parts of the bracket to make it fit. Once that was done, we attached the TSX projector to the housing, which fit pretty well as it was so there was no cutting or drilling into the housing itself at all. We used the screw holes from the original projectors, which also served as the guide for leveling them. Then we used some foil tape to fill in the few gaps there were and applied a coat of Bondo on top of that.

Applied a coat of JB Weld on top of that, let dry, and added primer.

Then paint:

Continued in next post....
---------- Post added at 02:59 PM ---------- Previous post was at 02:59 PM ----------
---------- Post added at 03:38 PM ---------- Previous post was at 02:59 PM ----------
The next step was putting the mounting bracket back on. Pretty straight-forward, screw things back together job. Then we put the bulbs in, and attached the ignitors/ballasts. This is what the final product looks like from the back:

And final product from the front:

The wiring portion of the install was pretty simple, as it's basically plug and play. Used a wiring harness, which you hook directly to the battery terminals, then plug into your lights.
Now came the tricky part. With the new projectors and bulbs with ignitors attached, the light is about an inch deeper then designed, so on the driver's side it would not seat. The back of it hit the windshield wiper reservoir, and there really is no easy way to move that. Sonny had the ingenious idea of using his heatgun on the reservoir to "mold" it around the light, and it worked like a charm. We were both worried we weren't going to be able to get that light in. Passenger side went right in as nothing is directly behind it.
Here's the final install look:

Yes, I know I need to color match the DRL lens/reflector, although the look is growing on me.....
Night shot of the front:

Output and cutoff:


ETA 5/12 to add pics of new Osram Xenarc CBI bulbs with 50w Morimoto ballasts:


6-High Mod: STRONGLY recommend this, because if you have HID lows and are driving for a bit with your highs on, then switch back to lows, you will have several seconds of darkness while they warm up. Not good at highway speeds.
This keeps the HID's on and will eliminate that problem.

Sonny did a great job and we got great, typical TSX results with a sharp cutoff and some "flicker" in the lights. I got all of my parts other then the headlights from here, and he'll discount the price if you're ordering parts for an entire build:
http://store.theretrofitsource.com/index.php
You take full responsibility for any modifications done to any equipment on your vehicle.
Updated pics:
I noticed a cool side-effect of the HID's. The light from the low-beam reflects off the headlight lens back into the high-beam reflector, and then back out the front again, giving it a self-illuminated look. Also now HID's in the fogs. Take a look:


And just another shot of the lights:

Last edited:

