2013 Tahoe luggage rack rails

Disclaimer: Links on this page pointing to Amazon, eBay and other sites may include affiliate code. If you click them and make a purchase, we may earn a small commission.

PG01

Supporting Member
Joined
Nov 6, 2016
Posts
14,856
Reaction score
18,189
Location
Up here to the right
Hmm... but except for some 'thin' sheet metal, there is nothing in there that you can epoxy to. From what I see on that Suburban, and what the nut/fastener looks like it seems that the nut/fastener expands, sorta like a rivet. if it was in there epoxy-ed, I would wonder if a good gust of wind could actually pull it off.
Cant see that hex nut expanding or even crushing, if the hole in roof is hex shaped... not sure...
 
OP
OP
Ron C

Ron C

Full Access Member
Joined
Nov 4, 2017
Posts
727
Reaction score
173
Location
Los Alamos, NM
Cant see that hex nut expanding or even crushing, if the hole in roof is hex shaped... not sure...


Me neither, but "parts drawings" show the nut/fastener goes in from the top, The suburban pic also shows the flange of that fastener, and you can't see the hex-hole. I think the hole is hex shaped, so the fastener doesn't turn when you put the screw in.
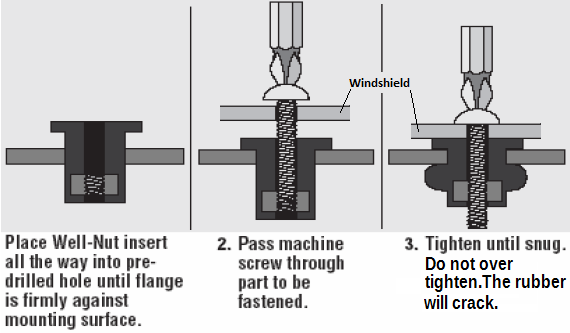
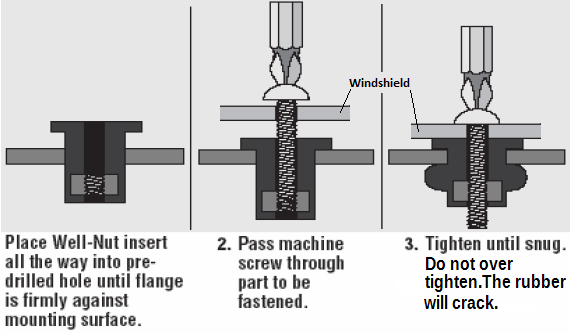
I'm not positive, but for some reason I was thinking they used well nuts...

WellNuts.png

https://www.google.com/search?q=wel...n5LYAhWEG5AKHQyTBa8Q_AUICygC&biw=1920&bih=888

That is exactly what I was thinking (the name 'well nut" I couldn't remember). That would make sense, and actually be better than epoxying it. The screws I saw are machine screws.
 

PG01

Supporting Member
Joined
Nov 6, 2016
Posts
14,856
Reaction score
18,189
Location
Up here to the right
Didnt think epoxy would hold it, i know i was missing something, i guess that ‘well nut’, crush nut looks lead-ish...meh ya learn something new everyday.... i’d epoxy it anyway, a little added holding power plus waterproofing... :)
 
OP
OP
Ron C

Ron C

Full Access Member
Joined
Nov 4, 2017
Posts
727
Reaction score
173
Location
Los Alamos, NM
Didnt think epoxy would hold it, i know i was missing something, i guess that ‘well nut’, crush nut looks lead-ish...meh ya learn something new everyday.... i’d epoxy it anyway, a little added holding power plus waterproofing... :)

I have tried that (epoxy) with mounting an antenna on my Jeep CJ, if it just moved a little, it rips the paint off. (but silicone might be a good idea). That would make sense, if the well nut is lead or some sort of lead alloy. We'll see, next week I might pick up a complete luggage rack, buy some nuts online and see where it goes.

I just received a message from a GM dealer, these nuts are called rivnuts, and they may need a special tool for installation(but also there are different 'techniques' to install one

I was told the thread size is: M6 x 1 x 16 I wonder if I indeed need a rivnut tool, or if the screw will crush them correctly by itself
 
Last edited:

MidwestMike

Full Access Member
Joined
Jul 14, 2017
Posts
181
Reaction score
66
Location
Southwest Michigan
Rivnut, I was close... :)

Basically an all metal version of the well nut.
I was thinking rubber instead of metal for a better chance of sealing against water.

It would be nice to have the holes marked up there like others reported, I would have to start from scratch on mine.
 
OP
OP
Ron C

Ron C

Full Access Member
Joined
Nov 4, 2017
Posts
727
Reaction score
173
Location
Los Alamos, NM
Rivnut, I was close... :)

Basically an all metal version of the well nut.
I was thinking rubber instead of metal for a better chance of sealing against water.

It would be nice to have the holes marked up there like others reported, I would have to start from scratch on mine.

Well, once I have these rivnuts installed, I'll probably put a dab of silicone on there before I put the bolt in.

I think that is what "G63: PROVISIONS LUGGAGE CARRIER, ROOF" is, holes in the right places. I am still thinking (and searching). Since the rivnuts have a hex shaft, maybe they don't need the install but just tightening the bolt while keeping the rails down. The rivnut tools I see are more for versions that are round instead of hex, but also, I think you can go either way.

Ron
 
OP
OP
Ron C

Ron C

Full Access Member
Joined
Nov 4, 2017
Posts
727
Reaction score
173
Location
Los Alamos, NM
This just looks too easy to install rivnuts, I'll attach a video link below:


PG01

Supporting Member
Joined
Nov 6, 2016
Posts
14,856
Reaction score
18,189
Location
Up here to the right
Ya know what ive used them, they came with the bu/air deflector for my hood just use a reg ratchet and the crush easily.
 
OP
OP
Ron C

Ron C

Full Access Member
Joined
Nov 4, 2017
Posts
727
Reaction score
173
Location
Los Alamos, NM
Ya know what ive used them, they came with the bu/air deflector for my hood just use a reg ratchet and the crush easily.

Oh I would definitely try that, IF I was able to get a mess up fixed. Once the rivnut is in, there is no real way to get it out. I might do a few test runs on a piece of scrap metal (the rivnuts are only 0.99)

Of course there are several options.
Dealer: but they will only sell the new rack to you, and it takes 2 people (according to them) to do it, that's $800+ rack and 4hrs labor (2hrs times 2), that's just a little stuff.

DIY-1: with just crushing the rivnut with a bolt and to nuts, or a cheap tool, Definitely cheapast, but easy to mess up.

DIY-2: get the 'right' tool, practice a few rounds til you get the hang of it and go for it. Yeah the tool is a lot more expensive ($50-$70) and you only use it for 10 rivnuts, BUT still a whole heck of a lot cheaper than the dealer option.

I think it would look good though, a luggage rack on it.

Ron
 

Forum statistics

Threads
132,200
Posts
1,863,866
Members
96,723
Latest member
Abdey2002
Top