Can the middle row be moved backwards?

Disclaimer: Links on this page pointing to Amazon, eBay and other sites may include affiliate code. If you click them and make a purchase, we may earn a small commission.

BigDaddy13440

Full Access Member
Joined
Aug 20, 2009
Posts
942
Reaction score
558
Location
Rome, NY
I've seen it done on here. Gonna have to do a search. The person fabbed his own brackets.

That'd be me.

Pretty easy, actually. I just bought some 1/4" thick by 2" wide bar stock, and cut the pieces to 3 1/2" long. Then I drilled holes 2 1/2" apart, and ran a bolt, washer and nut through one hole. Flipping it so that the bolt faced up, I then bolted it onto the studs coming up from the floor. Essentially, all I did was relocate the studs back 2 1/2", and bolted the seats back down.

I did have to take a 5lb sledge hammer to the inside floorboard, behind where the seat release is on the passenger side. Didn't break any welds or bust any seams, just made a nice little dent, giving me enough room to slip my fingers behind and flip the lever. If you have different seats (like my older '01 Suburban), and don't have the lever, you might be able to get 3 1/2 - 4" more room than stock, but certainly no more, unless you plan on cutting up your floorboard and relocating everything backward.

FWIW, it might have taken me 2 hours to do, with no help. The hardest thing to do was to wrestle the seats in and out, just heavy and bulky. Well worth the effort though, as my 15 yr old son and 13 yr old daughter don'tt have to chew on their knees with the front seats all the way back - I'm 6'7 and 320 lbs, my daughter is 6' and she sits behind me. My wife is only 5'7 and has the seat up about 2 inches, but my son sits behind her, he's pushing 6'3 and 360 lbs. They both have plenty of room.
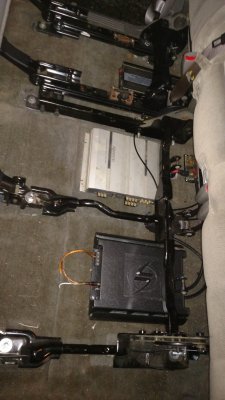
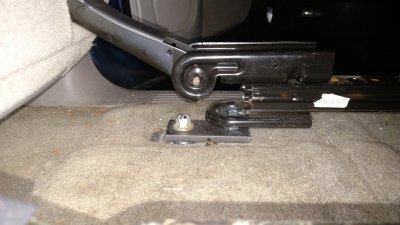
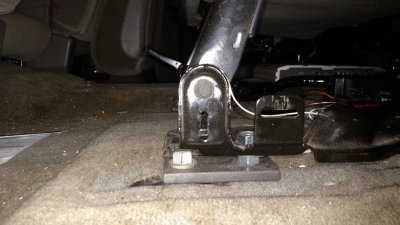
Amps and Inverter.jpg Brackets 2.jpg Brackets 1.jpg

You can see where I added washers under the bracket where it bolts to the floor, the same thickness as the head of the bolt. If I didn't, tightening the bracket down would've bent the studs.
 
OP
OP
TURNz

TURNz

Full Access Member
Joined
Jan 30, 2012
Posts
168
Reaction score
27
That'd be me.

Pretty easy, actually. I just bought some 1/4" thick by 2" wide bar stock, and cut the pieces to 3 1/2" long. Then I drilled holes 2 1/2" apart, and ran a bolt, washer and nut through one hole. Flipping it so that the bolt faced up, I then bolted it onto the studs coming up from the floor. Essentially, all I did was relocate the studs back 2 1/2", and bolted the seats back down.

I did have to take a 5lb sledge hammer to the inside floorboard, behind where the seat release is on the passenger side. Didn't break any welds or bust any seams, just made a nice little dent, giving me enough room to slip my fingers behind and flip the lever. If you have different seats (like my older '01 Suburban), and don't have the lever, you might be able to get 3 1/2 - 4" more room than stock, but certainly no more, unless you plan on cutting up your floorboard and relocating everything backward.

FWIW, it might have taken me 2 hours to do, with no help. The hardest thing to do was to wrestle the seats in and out, just heavy and bulky. Well worth the effort though, as my 15 yr old son and 13 yr old daughter don'tt have to chew on their knees with the front seats all the way back - I'm 6'7 and 320 lbs, my daughter is 6' and she sits behind me. My wife is only 5'7 and has the seat up about 2 inches, but my son sits behind her, he's pushing 6'3 and 360 lbs. They both have plenty of room.


View attachment 78222 View attachment 78223 View attachment 78224

You can see where I added washers under the bracket where it bolts to the floor, the same thickness as the head of the bolt. If I didn't, tightening the bracket down would've bent the studs.
Very nice. What about the rear bolts?


Sent from my SM-G935V using Tapatalk
 

BigDaddy13440

Full Access Member
Joined
Aug 20, 2009
Posts
942
Reaction score
558
Location
Rome, NY
Very nice. What about the rear bolts?


Sent from my SM-G935V using Tapatalk
Same thing, brackets to move the rear "studs" back. The first pic with the amps, if you look at the lower rear corner (driver's side rear seat), you see the bolt and washer. I don't have a nut holding it down, didn't realize until after I had everything in that it was a metric bolt with some funny thread. Sooner or later, I've got to either find the correct nut, or swap out the bolt.
 
OP
OP
TURNz

TURNz

Full Access Member
Joined
Jan 30, 2012
Posts
168
Reaction score
27
Ok, I see that now. And why is the seat bracket sandwiched between two nuts on top of the adapter plate?

Sent from my SM-G935V using Tapatalk
 

BigDaddy13440

Full Access Member
Joined
Aug 20, 2009
Posts
942
Reaction score
558
Location
Rome, NY
Ok, I see that now. And why is the seat bracket sandwiched between two nuts on top of the adapter plate?

Sent from my SM-G935V using Tapatalk
You have to put a nut between to elevate the frame of the seat up above the nut holding the bracket to the stock studs.

Each new relocated "stud" is as follows, from top to bottom:

nut
washer
frame of seat
fender washers (to spread the load evenly, in case the hole is about the same size as the nut)
nut
bracket
bolt

And, correspondingly, on the original studs, from top to bottom:

nut
washer
bracket
fender washers
stud

As I said, I stacked fender washers so that the bracket is spaced off the floor enough so that the head of the relocated "stud" bolt has clearance, and the bracket sits flat. Additional fender washers are under the frame of the seat to lift it high enough to clear the top nut on the original stud. All told, it probably lifts the rear seat up about 3/4 of an inch.
 
OP
OP
TURNz

TURNz

Full Access Member
Joined
Jan 30, 2012
Posts
168
Reaction score
27
Got it, thanks. I guess I have a project for next weekend.

Sent from my SM-G935V using Tapatalk
 

BigDaddy13440

Full Access Member
Joined
Aug 20, 2009
Posts
942
Reaction score
558
Location
Rome, NY
Got it, thanks. I guess I have a project for next weekend.

Sent from my SM-G935V using Tapatalk
My recommendation is to unbolt the seats, then leave them loose, and push them back as far as you can. Check for interference (like I had with the release lever), and modify (meaning: beat and/or bend) whatever needs be to get your maximum room. Set the seats back in, measure the distance from the holes in the seat frame to the studs, and fab the brackets up.
 

BigDaddy13440

Full Access Member
Joined
Aug 20, 2009
Posts
942
Reaction score
558
Location
Rome, NY
Do you have any pictures of it finished?
It would look just the same as without being moved back, except the trim panels would be up off the carpet a bit, and the brackets would stick out from underneath. Me, I wasn't worried about the trim plastics, they just get in the way - I carry an expandable 5 foot long snow brush, I slide it in under the rear seats.
 

BigDaddy13440

Full Access Member
Joined
Aug 20, 2009
Posts
942
Reaction score
558
Location
Rome, NY
I thought of something today.... Mine is a Yukon XL, with the full rear doors. The floor in the rear is even with the wheelwells, the whole frame of my seats is in front of the "shelf" of the rear floor. I don't know if the regular Yukon or Tahoe has the same type of brackets - I know my OBS '96 Tahoe had brackets that were vertical, and mounted up against the "shelf", with the backs of the seats hinging from the "shelf". If your rear seat does this, about the only option you have to move the seats back would be to get a third row seat, go to a junkyard and cut the recessed mounts out of the floor of a wrecked vehicle, and cut/fabricate/install those mounts as far forward in the rear cargo area as you can. If you wanted to go through all that trouble, you'd have about 12-15" more legroom for the rear passengers, and the same amount less in the rear cargo area.

If yours looks like this, then you're SOL.....

tahoe.jpg

My bad.
 
Last edited:

Forum statistics

Threads
132,760
Posts
1,873,758
Members
97,590
Latest member
lgksser777

Latest posts

Top