ashelm
Member
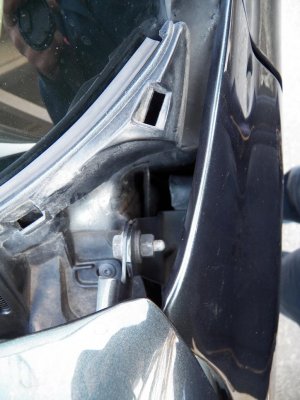
4 hours later its perfect. I started out by removing the plastic trim at the base of the cowl on the pass. side to see how GM did it and came up with this. 1 x 1/16 by 8 in. piece of strap iron bent in a z shape and fitted around the conture of the cowl and relieved around the hood hinge. Ok that took some time and the second piece fit real nice. One piece of scrap, not bad. Now to drill and tape the hole in the cowl for a 1/4 x 20 bolt and lock washer. Very sharp drill bit made that a snap. Pretty thick steel here at this corner of the cowl. Drilled a second small hole at the finder flange for a self tapping screw. This is just for stability as the bolt is where the holding power is. Okey Dokey now we're geting some where. Next was to drill a hole close enough to the bend that the flat on the stud mount would be held tight, as there is no way to get a wrench under the bracket. At this point it was time to install the coax and feed it under the hood hinge. The coax is 18ft long with one PL259 so I can feed it through the firewall. That done I used the same sealer that I got from the auto glass shop ( that I used to seal the holes of my foof rack delete) to seal the taped hole for the bolt and the self tapping screw.
Now for the fun part. Where to drill the hole in the plastic cowl cover. Well I was able to fit it in place over the stud mount and guessed where the center was. I drilled a small hole to start and dropped a smaller drill bit into the hole to the stud and lifted the plastic trim off to see where I was. Looks good now for the hole saw. With a block of wood to shim the trim pice at the right angle - its one shot. Couldn't have been any better. Both antennas are plumb and inline with each other. Four hours later ITS DONE!!!
The next step is to custom fit the radio in the cubby where the DVD player would be. Custom because the cubby is a single DIN and the radio is about 1/4in higher and about 3/8in wider. And because the speeker will be in the cubby I and thinking (Just thinking at this time), that I might drill the side of the console and mount the speaker on the inside. There is no where to mount an external speaker any where except under the steering wheel and I already have an electric brake controler on the right side of the steering wheel. I dont want any thing on the left side that would be in the way getting in and out of the seat. Well much like the rest of you the weather here is off and on so that will have to wait till another nice weekend. I will take more pics and detail how that goes when it happens. 10-4
Attachments
Last edited:


