livingez_123
Full Access Member
I think the MDF spacers should be put on a PDF. in templet form see we can just download, print, cut out the templet and trace.
Disclaimer: Links on this page pointing to Amazon, eBay and other sites may include affiliate code. If you click them and make a purchase, we may earn a small commission.
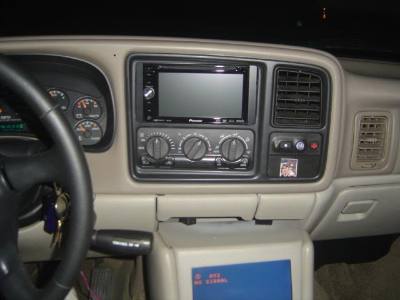
Did you use the trim around the indash from the 03-06 double din it to put around it?Here are some pics of the install of a double din Pioneer Avic-D3 in my 01 a while back. I took some pics of the brackets I fabb'ed and the the bezel I trimmed.
There are a couple different ways you can do this. One way is to trim the bezel, plastic weld ABS and re-finish the entire bezel. Another way is the way I did it below. I only wanted to spend one day on the entire install from start to finish so I did it the easier and faster way.
I took the clip brackets from a AI 95-02 GM truck dash kit. They need to be spaced apart 1/2" on both sides of the unit in order to clip back into the dash properly, so I used 1/2" scrap of MDF. I used my digital calipers to take measurements of where to drill the mounting holes and where to place the brackets so it would go into the dash right the first time.
The MDF spacers/mount:
The clips mounted to the spacers:
I removed the entire radio/hvac housing from the dash to make fitting and trimming easier.
Behind the radio, there is a metal bracket that is held in place by two rivets and two screws. The rivets can be drilled out, then the screws can be backed out to remove the bracket to make room for the new unit. Some units will require this bracket to be removed, some won't.
The trim bezel needs to be trimmed in pre-03 models to fit a dd unit. I used my Dremel, asst of files, and finally different grits of paper to trim and round-over the edges of the new opening to match the oem edges. Some people mention using a 03+ bezel, but the problem is that you'll need to reposition the HVAC controls, and the contour along the bottom edge of the bezel won't match up perfectly if you have the full legnth center console that butts up to the dash.

Here are some pics of the install of a double din Pioneer Avic-D3 in my 01 a while back. I took some pics of the brackets I fabb'ed and the the bezel I trimmed.
There are a couple different ways you can do this. One way is to trim the bezel, plastic weld ABS and re-finish the entire bezel. Another way is the way I did it below. I only wanted to spend one day on the entire install from start to finish so I did it the easier and faster way.
I took the clip brackets from a AI 95-02 GM truck dash kit. They need to be spaced apart 1/2" on both sides of the unit in order to clip back into the dash properly, so I used 1/2" scrap of MDF. I used my digital calipers to take measurements of where to drill the mounting holes and where to place the brackets so it would go into the dash right the first time.
View attachment 87016
The MDF spacers/mount:
View attachment 87017
The clips mounted to the spacers:
View attachment 87018
I removed the entire radio/hvac housing from the dash to make fitting and trimming easier.
View attachment 87019
View attachment 87020
Behind the radio, there is a metal bracket that is held in place by two rivets and two screws. The rivets can be drilled out, then the screws can be backed out to remove the bracket to make room for the new unit. Some units will require this bracket to be removed, some won't.
The trim bezel needs to be trimmed in pre-03 models to fit a dd unit. I used my Dremel, asst of files, and finally different grits of paper to trim and round-over the edges of the new opening to match the oem edges. Some people mention using a 03+ bezel, but the problem is that you'll need to reposition the HVAC controls, and the contour along the bottom edge of the bezel won't match up perfectly if you have the full legnth center console that butts up to the dash.
View attachment 87021
View attachment 87022

What did you do for the custom mount on the HVAC controls? I just had a DD pioneer installed yesterday, I thought the metro kit they used would be fine, but the fit is total crap and i'd rather swap over for a 03 bezel.I fit a Sony DD in my '02 Denali using a cage and bezel from an '03. Had to customize the HVAC mounting but it came out perfect. Added a backup cam and then a 10" JL sub in an MTX Thunderform enclosure with a Soundstream Nano amp running it. View attachment 57264
