Reebok59
Member
I just successfully upgraded my Bose Premium Amp to a Luxury Amp on my 2008 Suburban LTZ and wanted to share what I did. Yes, this upgrade can be done and it sounds so much better than the wimpy Premium Amp! First of all, many thanks to Ben for his GMT800 Upgrade thread “DYI Lux Nav Install” on the “Diesel Place” Forum and Joe for his GMT900 Upgrade thread “GMT900 Bose Premium Amp to Luxury Amp” on the “SilveradoSierra” Forum. It was primarily Joe’s work digging into the Electrical Wiring Diagrams and identifying the primary issues with the Premium to Luxury Amplifier Upgrade that allowed me to hit the ground running. You will want to read these threads if you are new to this. There is a long history with a lot of information that I will not duplicate here. Even though I performed this upgrade on a Suburban, just about everything documented here it is directly applicable to the Tahoe, Yukon, Silverado and Sierra (i.e., GMT900; 2007 to 2013 Light Duty C/K Full Size Utility Truck/SUV).
I was lucky enough to start with a 2008 Suburban LTZ with ROP Codes UQA (Premium 6Channel Bose), UBV (Radio w/Nav), U2K (Digital Audio System), UK6 (Rear Seat Audio) and U42 (Rear Seat DVD). I installed a Luxury Amplifier and Center Console Wiring Harness from a 2008 Yukon XL Denali with RPO Y91 that had the same Radio Part Number that I had in my LTZ. I got the VIN’s from the salvage yards and had the GM Dealership looked up the radio part numbers until got a match with my LTZ. I mainly did this so I could increase my chances for success. After many hour of studying electrical system drawings and performing the upgrade, I can’t imagine this upgrade (Amp swap only) working on any vehicle without RPO Codes UQA and UBV. May be able to do a complete Audio System (Radio and Amp) swap on a non-UQA/UBV vehicle, not really sure. There are just too many audio/electrical system differences and Bose compatibility issues. Not to mention every component communicates and is controlled across the GM Low Speed LAN (GMLS). For example, even though I got a match with the Radio and most everything seems to be working normal (i.e., steering wheel controls, NAV Voice Prompts, Chimes, Rear Park Assist, etc.), the amp will not mute the rear speakers when the Rear Seat Audio (RSA) is turned on. Not a big deal, but still trying to figure this one out, for some reason the Amp is not responding to the Radio telling it to mute across the GMLS. It may be something like the Body Control Module (BCM) needs a tweak, not sure. So here is the disclaimer; I am sharing my success and configuration in detail so you can understand fully what I was able to accomplish if you choose to apply any part of it. I will not be able to answer any questions or provide any advice for any other configuration (i.e., use of a non-NAV Radio, use of Amp in location other than the console, use of 5.1 (UQS) Amplifier, etc.). I will try to answer questions for clarification, but there is no way I can answer or support all the question this subject could generate. Good Luck!
I was able to confirm that the following Radios and Amplifiers are compatible (there may be others).
Radio P/N’s: 25846421 and 20862567
Y91 Amplifier P/N’s: 15937318 and 20808897
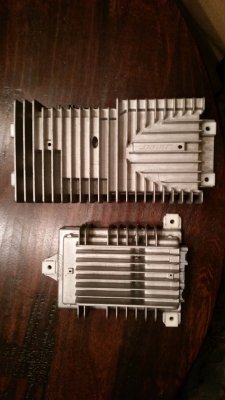
If you have read some of the other threads regarding this subject you have seen this statement; “the only difference in the LUX system and the PREM system is the Amp, that all the speakers are the same”. Well it turns out that the D-pillar speakers, if you have them, are different. Since they are wired parallel with the rear door speakers in the PREM system, they are 12.5 OHM and they have crossover capacitors. The LUX D-pillar speakers are on a separate channel and are 3.2 OHM to better match the impedance of the door speakers. Also, supposedly the three Amp connectors are the same for the PREM and LUX Amps. Well, one of the connectors is grooved different, not directly interchangeable, but could be modified to make it work.
Attached here are the Pin-out Tables for the Amplifiers and the 30-Pin Console Wiring Harness. As you will see, there are many differences in the PREM and LUX Amp Pins that would require re-pinning and adding new wires/pins for many connections (i.e., D-pillar speakers, center speaker, NAV Voice Prompt, VNC MIC, and GMLS) if you used your existing console wiring harness. And for the 30-Pin Console Wiring Harness, there are very few differences. Therefore, it is highly recommended to obtain and use a Y91 console wiring harness. Basically plug-n-play with the exception of adding NAV Voice Prompt shielded pair, re-routing rear speaker wires, changing out D-pillar speakers and reprogramming the Radio. I have included detailed comments and notes on the Pin-out Tables which should prove to be very useful if you choose to take on this upgrade.
PREM and LUX Amp Connections.pdf
Console Wiring Harness Connection 108.pdf
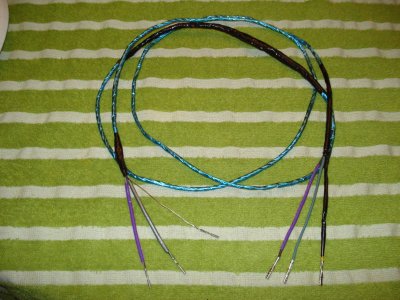
Attached here is picture of the NAV Voice Prompt shielded pair that I made using shielded sections and pins removed from my original non-Y91 Console Wiring Harness. The details are included in the Pin-out Tables above.
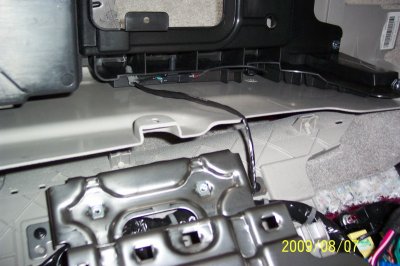
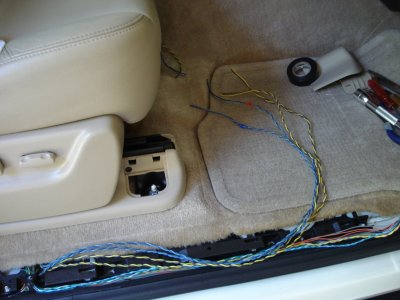
Attached here is a picture of rear speaker wiring. The details are included in the Pin-out Tables above.
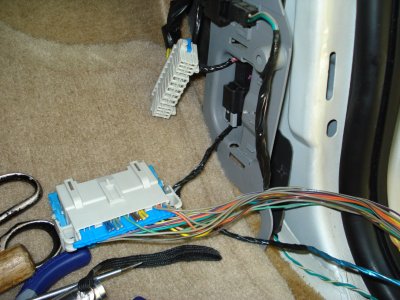
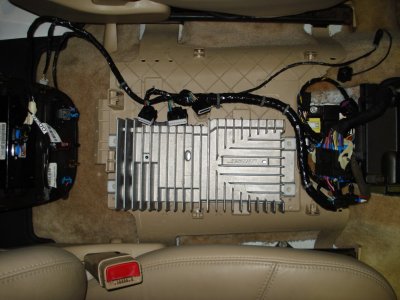
Attached here is a picture of the LUX Amp setting in place with the Y91 Console Wiring Harness, all unplugged and ready to go for Radio reprogramming.
Hope you find this information accurate and useful. In addition to the information shared in this string, I would recommend downloading a copy of the 2007 C/K Full Size Utility Truck Electrical Manual for reference.
https://www.gmupfitter.com/publicat/2007_BB/2007_LD_FS_CK_Utility_Elec.pdf
Finally rocking with a kicking Sub,
Scott
I was lucky enough to start with a 2008 Suburban LTZ with ROP Codes UQA (Premium 6Channel Bose), UBV (Radio w/Nav), U2K (Digital Audio System), UK6 (Rear Seat Audio) and U42 (Rear Seat DVD). I installed a Luxury Amplifier and Center Console Wiring Harness from a 2008 Yukon XL Denali with RPO Y91 that had the same Radio Part Number that I had in my LTZ. I got the VIN’s from the salvage yards and had the GM Dealership looked up the radio part numbers until got a match with my LTZ. I mainly did this so I could increase my chances for success. After many hour of studying electrical system drawings and performing the upgrade, I can’t imagine this upgrade (Amp swap only) working on any vehicle without RPO Codes UQA and UBV. May be able to do a complete Audio System (Radio and Amp) swap on a non-UQA/UBV vehicle, not really sure. There are just too many audio/electrical system differences and Bose compatibility issues. Not to mention every component communicates and is controlled across the GM Low Speed LAN (GMLS). For example, even though I got a match with the Radio and most everything seems to be working normal (i.e., steering wheel controls, NAV Voice Prompts, Chimes, Rear Park Assist, etc.), the amp will not mute the rear speakers when the Rear Seat Audio (RSA) is turned on. Not a big deal, but still trying to figure this one out, for some reason the Amp is not responding to the Radio telling it to mute across the GMLS. It may be something like the Body Control Module (BCM) needs a tweak, not sure. So here is the disclaimer; I am sharing my success and configuration in detail so you can understand fully what I was able to accomplish if you choose to apply any part of it. I will not be able to answer any questions or provide any advice for any other configuration (i.e., use of a non-NAV Radio, use of Amp in location other than the console, use of 5.1 (UQS) Amplifier, etc.). I will try to answer questions for clarification, but there is no way I can answer or support all the question this subject could generate. Good Luck!
I was able to confirm that the following Radios and Amplifiers are compatible (there may be others).
Radio P/N’s: 25846421 and 20862567
Y91 Amplifier P/N’s: 15937318 and 20808897
If you have read some of the other threads regarding this subject you have seen this statement; “the only difference in the LUX system and the PREM system is the Amp, that all the speakers are the same”. Well it turns out that the D-pillar speakers, if you have them, are different. Since they are wired parallel with the rear door speakers in the PREM system, they are 12.5 OHM and they have crossover capacitors. The LUX D-pillar speakers are on a separate channel and are 3.2 OHM to better match the impedance of the door speakers. Also, supposedly the three Amp connectors are the same for the PREM and LUX Amps. Well, one of the connectors is grooved different, not directly interchangeable, but could be modified to make it work.
Attached here are the Pin-out Tables for the Amplifiers and the 30-Pin Console Wiring Harness. As you will see, there are many differences in the PREM and LUX Amp Pins that would require re-pinning and adding new wires/pins for many connections (i.e., D-pillar speakers, center speaker, NAV Voice Prompt, VNC MIC, and GMLS) if you used your existing console wiring harness. And for the 30-Pin Console Wiring Harness, there are very few differences. Therefore, it is highly recommended to obtain and use a Y91 console wiring harness. Basically plug-n-play with the exception of adding NAV Voice Prompt shielded pair, re-routing rear speaker wires, changing out D-pillar speakers and reprogramming the Radio. I have included detailed comments and notes on the Pin-out Tables which should prove to be very useful if you choose to take on this upgrade.
PREM and LUX Amp Connections.pdf
Console Wiring Harness Connection 108.pdf
Attached here is picture of the NAV Voice Prompt shielded pair that I made using shielded sections and pins removed from my original non-Y91 Console Wiring Harness. The details are included in the Pin-out Tables above.

Attached here is a picture of rear speaker wiring. The details are included in the Pin-out Tables above.

Attached here is a picture of the LUX Amp setting in place with the Y91 Console Wiring Harness, all unplugged and ready to go for Radio reprogramming.

Hope you find this information accurate and useful. In addition to the information shared in this string, I would recommend downloading a copy of the 2007 C/K Full Size Utility Truck Electrical Manual for reference.
https://www.gmupfitter.com/publicat/2007_BB/2007_LD_FS_CK_Utility_Elec.pdf
Finally rocking with a kicking Sub,
Scott


