Good body repair stuff

Disclaimer: Links on this page pointing to Amazon, eBay and other sites may include affiliate code. If you click them and make a purchase, we may earn a small commission.

Randy Whistler

Living the dream! I'm just not sure who's dream
Joined
Dec 12, 2017
Posts
139
Reaction score
65
Location
In Hell, but I've got a Tahoe!
I'm about to embark on some rust repair on car #2. The lower parts of the door sills, and a couple of other places on the sides, as well as some rusted out holes behind the front wheels require dusting off of the old body repair skills, but that's been some time ago. I hope things have improved since then. . . :eek:

I already know I will need some sort of mesh/fabric to cover the holes, and probably to mold on some of the door sill places. Has anyone had good success with a particular product that was the simplest to work? With the exception of the door sills, most of the repairs requiring mesh/fabric are on flat surfaces, so that'll at least make the sides simple.

I could go the replacement metal parts, but just don't feel like going to that much effort/trouble for this car. Maybe I'm just getting lazy in my old age. . . . . :rolleyes:

Any helpful suggestions greatly appreciated!!
 

TheGreatGazoo

Member
Joined
Jun 14, 2018
Posts
59
Reaction score
114
Location
Hellinois
I'm about to embark on some rust repair on car #2. The lower parts of the door sills, and a couple of other places on the sides, as well as some rusted out holes behind the front wheels require dusting off of the old body repair skills, but that's been some time ago. I hope things have improved since then. . . :eek:

I already know I will need some sort of mesh/fabric to cover the holes, and probably to mold on some of the door sill places. Has anyone had good success with a particular product that was the simplest to work? With the exception of the door sills, most of the repairs requiring mesh/fabric are on flat surfaces, so that'll at least make the sides simple.

I could go the replacement metal parts, but just don't feel like going to that much effort/trouble for this car. Maybe I'm just getting lazy in my old age. . . . . :rolleyes:

Any helpful suggestions greatly appreciated!!
Greetings,
Pictures would help me see how bad it looks (not how bad it really is). And the best suggestion I can offer is to dust off your welding lid because steel is the only product that will offer a lasting repair.
 

Addicted

Member
Joined
Sep 22, 2014
Posts
69
Reaction score
21
Location
Warren PA
Have you started yet? I've done a fair bit of rust repair with really good luck. My dad's 2003 Jeep Grand Cherokee had majorly rusted fenders which I patched up a 3 years ago (3 new york winters). They still look great with no signs of returning rust.

Waterproof, sealed, waterproof.... most important. Patch with steel, fiberglass, galvanized flashing, or whatever you want as long as it is sealed up and waterproof. Bondo and a few coats of rattle can paint won't last. If moisture can get to the back, it just won't last. If the patch material can absorb water (like most body fillers) it won't last.

My process for a low budget fix would be:
1. Cut or grind away any rusted metal. I grind back through paint that still looks pristine until I find clean metal. You will find that rust creeps along the steel under your paint before the paint shows any kind of defect.
3. Get some galvanized flashing from your local hardware store.
4. Cut and bend patches as needed.
5. Get some 3M body panel adhesive (08115). I don't use the mixer tips that come with the adhesive. You can buy the gun to squirt the adhesive, or just make your own. I have two pieces of broomstick screwed to a small board, and I shove those into the tubes to squirt some out on a mixing board. Mix the adhesive, and go to town. It's like JB weld, but a little thinner. It seals wonderfully, sticks great, etc.
6. Coat all the areas that you have ground down with the body panel adhesive (inside and out), and stick your patches on. you'll probably need some masking tape to hold the patches.
7. For small holes, just grind them down and fill with the body panel adhesive.
8. I would skim coat a thin layer of the body panel adhesive over the whole patch to further seal it up.
9. If you want, apply some waterproof filler and paint to make it look pretty (marine stuff is good). If your patch is all sealed up with epoxy (body panel adhesive), then further filler and paint is cosmetic only.
10. Spray 3m body cavity wax or Fluid film on the inside of the repair, and maybe even the outside if you don't mind it being oily.

This is a good patch that should last several years.

Lest folks should think I am a hack bodyman, I also do top quality body restoration work. You need to decide what you want. Honestly. welded patches don't necessarily last longer. It will cause paint to burn off inside your panels around the patch area, creating more possible places to rust, and many patches are welded in with some overlaps or gaps that trap water. I have cut apart plenty of welded in patches that created as much problem as they fixed. I'm sure it looked good and felt good for a year or two, but then things went down hill.
 
Last edited:
OP
OP
Randy Whistler

Randy Whistler

Living the dream! I'm just not sure who's dream
Joined
Dec 12, 2017
Posts
139
Reaction score
65
Location
In Hell, but I've got a Tahoe!
No, I've not started this project yet. I'll snap some pix later today and post them up here. I'm sure there are others who have a similar problem that my misadventures might help them with their issues. I'm letting the "repair the Tahoe and get it in the road" pain and suffering dim for the other half a bit before I'm out spending money on cars again. . . :rolleyes:

I had thought seriously about getting out the welder, and am still playing with that idea, depending mostly upon what kind of damage I find when digging in deeper. It may be that I have little choice but go the steel replacement route. I'm hoping not, but that'll be what it is when I get that far.

Mike, thanks your explanation and detail will be extremely helpful. The adhesive you're speaking about - is that similar to the standard Bondo-type body putty? IOW, I'm wondering about sanding/filling/etc., and if I would need something special to work it. like sandpaper, etc. Just thinking ahead. . . Some of the adhesives I've worked with in the past were a real pain to try to work after the application. . . .

Thanks to everyone for their help! I'll update things as I go. Hopefully the messes I get into might prevent someone else's pain!
 

Addicted

Member
Joined
Sep 22, 2014
Posts
69
Reaction score
21
Location
Warren PA
The body panel adhesive is not like bondo putty. It is more like JB weld. That's really the point. It is indeed harder to work with, but it does sand and shape very well (just 10x harder than standard bondo / evercoat / etc). Most importantly, you can seal and prevent moisture from reaching your seams. Spend time making your patch pieces the right shape, and glue them in carefully. Spend your time and effort making sure they are all sealed up with something that is truly waterproof (like the body panel adhesive, epoxy primer, etc). That applies whether you weld in patches, or glue, or fiberglass, or whatever. That's the foundation you need whether you choose to apply bondo and paint on top of it or just shoot some truck bed liner around the bottom of your vehicle.

Any easy sanding filler or primer is porous from talc content and will CAUSE rust due to moisture if not done right, not to mention shrinking, cracking, etc. If you use regular filler, I would recommend a legitimate 2 part epoxy primer be applied under and over the filler (start with epoxy on bare metal and end with epoxy over top of the filler). Eastwood sells 2 part epoxy rattle cans that you could use. My rule if I do use filler is that it never touches metal. If I sand through to bare metal, it get more epoxy primer (or maybe body panel adhesive - also epoxy).

There are many ways to do a decent rust repair that will last for years, and there are many ways to make a repair that look great but will only last 6 months.

Just keep this in your head:
Remove existing rust
However you patch, make it 100% waterproof (don't allow moisture to reach back in to the metal).
 
Last edited:

chrmbly

Member
Joined
Jan 11, 2018
Posts
95
Reaction score
48
I have the beginning of rust on the rocker back by the rear of the car, slowly creeping up. Hasn't made any holes yet, just bubbling up. Is it easier to just pay to have someone replace the entire rocker, or is it worth doing this kind of fix? I have a few spots in the lower parts of the passenger doors too.

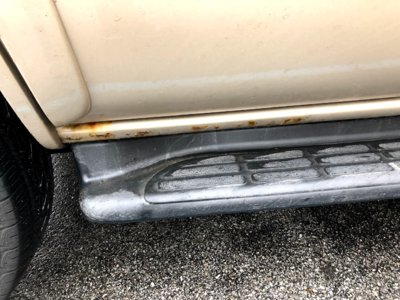
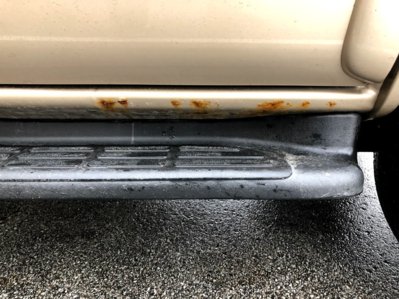
I guess it's not the beginning of rust - just in fact "rust".:( Not to thread hijack, but rust repair is on my list too.. here are some pictures.

IMG_0593.jpg IMG_0594.jpg
 

TheGreatGazoo

Member
Joined
Jun 14, 2018
Posts
59
Reaction score
114
Location
Hellinois
Have you started yet? I've done a fair bit of rust repair with really good luck. My dad's 2003 Jeep Grand Cherokee had majorly rusted fenders which I patched up a 3 years ago (3 new york winters). They still look great with no signs of returning rust.

Waterproof, sealed, waterproof.... most important. Patch with steel, fiberglass, galvanized flashing, or whatever you want as long as it is sealed up and waterproof. Bondo and a few coats of rattle can paint won't last. If moisture can get to the back, it just won't last. If the patch material can absorb water (like most body fillers) it won't last.

My process for a low budget fix would be:
1. Cut or grind away any rusted metal. I grind back through paint that still looks pristine until I find clean metal. You will find that rust creeps along the steel under your paint before the paint shows any kind of defect.
3. Get some galvanized flashing from your local hardware store.
4. Cut and bend patches as needed.
5. Get some 3M body panel adhesive (08115). I don't use the mixer tips that come with the adhesive. You can buy the gun to squirt the adhesive, or just make your own. I have two pieces of broomstick screwed to a small board, and I shove those into the tubes to squirt some out on a mixing board. Mix the adhesive, and go to town. It's like JB weld, but a little thinner. It seals wonderfully, sticks great, etc.
6. Coat all the areas that you have ground down with the body panel adhesive (inside and out), and stick your patches on. you'll probably need some masking tape to hold the patches.
7. For small holes, just grind them down and fill with the body panel adhesive.
8. I would skim coat a think layer of the body filler over the whole patch to further seal it up.
9. If you want, apply some waterproof filler and paint to make it look pretty (marine stuff is good). If your patch is all sealed up with epoxy (body panel adhesive), then further filler and paint is cosmetic only.
10. Spray 3m body cavity wax or Fluid film on the inside of the repair, and maybe even the outside if you don't mind it being oily.

This is a good patch that should last several years.

Lest folks should think I am a hack bodyman, I also do top quality body restorations. You need to decide what you want.
The body panel adhesive is not like bondo putty. It is more like JB weld. That's really the point. It is indeed harder to work with, but it does sand and shape very well (just 10x harder than standard bondo / evercoat / etc). Most importantly, you can seal and prevent moisture from reaching your seams. Spend time making your patch pieces the right shape, and glue them in carefully. Spend your time and effort making sure they are all sealed up with something that is truly waterproof (like the body panel adhesive, epoxy primer, etc). That applies whether you weld in patches, or glue, or fiberglass, or whatever. That's the foundation you need whether you choose to apply bondo and paint on top of it or just shoot some truck bed liner around the bottom of your vehicle.

Any easy sanding filler or primer is porous from talc content and will CAUSE rust due to moisture if not done right, not to mention shrinking, cracking, etc. If you use regular filler, I would recommend a legitimate 2 part epoxy primer be applied under and over the filler (start with epoxy on bare metal and end with epoxy over top of the filler). Eastwood sells 2 part epoxy rattle cans that you could use. My rule if I do use filler is that it never touches metal. If I sand through to bare metal, it get more epoxy primer (or maybe body panel adhesive - also epoxy).

There are many ways to do a decent rust repair that will last for years, and there are many ways to make a repair that look great but will only last 6 months.

Just keep this in your head:
Remove existing rust
However you patch, make it 100% waterproof (don't allow moisture to reach back in to the metal).
Just my opinion - If you’re using 8115 you really should use the static mixing tip. If you don’t mix it correctly you’ll end up wasting a ton of time not to mention money... You personally might get away with it but if they’ve never used 8115 before you’re kind-of throwing them in the deep end...
 

Addicted

Member
Joined
Sep 22, 2014
Posts
69
Reaction score
21
Location
Warren PA
Just my opinion - If you’re using 8115 you really should use the static mixing tip. If you don’t mix it correctly you’ll end up wasting a ton of time not to mention money... You personally might get away with it but if they’ve never used 8115 before you’re kind-of throwing them in the deep end...

Good point, it is essential that the two parts of the epoxy are used in the correct ratio and mixed well. In terms of using a tip or not, I don't see how the 8115 is any different than any other epoxy or paint or body filler that needs to be ratio'd and mixed. The mixing tips are handy, especially for big jobs, but they also waste a lot of material on small jobs (the main reason I don't use them regularly). I use 8115 for a lot of smaller stuff other than sticking big panels on.
 

Addicted

Member
Joined
Sep 22, 2014
Posts
69
Reaction score
21
Location
Warren PA
I have the beginning of rust on the rocker back by the rear of the car, slowly creeping up. Hasn't made any holes yet, just bubbling up. Is it easier to just pay to have someone replace the entire rocker, or is it worth doing this kind of fix? I have a few spots in the lower parts of the passenger doors too.

Chris, of course it is easier to pay someone else replace your rockers :), but if you are ambitious and handy, you can easily buy yourself a few years. Just covering it up won't last. If you aren't in a hurry, try a small spot and see how it goes. That's how I figured out what did and didn't hold up in the snow belt of Western NY.
 

Forum statistics

Threads
132,437
Posts
1,868,187
Members
97,121
Latest member
joel cuh
Top