scoobyxj
Full Access Member
- Joined
- Oct 24, 2013
- Posts
- 176
- Reaction score
- 3
First things first I would state that while this mod is pretty easy you do have to cut and splice into the wiring at the BCM and build a very simple circuit. Also my Tahoe is a 2004 Z71, and the FSM I used was for a 2004 Escy (the color codes and pin outs matched 100%) however I believe the all the associated wiring is going to be good for all 2003-2006 NBS rigs.
All the lamp circuits are controlled by the BCM under the steering column. The BCM switches the relays in the PDC (under the hood) by completing the ground to the coil. All of the inputs to the BCM (as far as the parking, fog, high beam, low beam) are also ground activated (IE: When you press the OEM fog lamp switch the switch completes the circuit to ground, and the BCM turns on the Fog lamps.) What I did was build a "- constant to - pulsed" relay circuit to pulse the fog lamp trigger on the BCM tricking the BCM to think you pushed the button to turn the fog lamps on. This mod also allows you to turn off the fog lamps by just pressing the button. So basically the fog lamps auto on when the head lamps turn on, and if you want them off you press the button. Another feature of this mod is for the guys who have upgraded there fogs to HID is that the fog lamps do not cycle off when you start your truck.
Here is the - constant on to pulsed - circuit I built to pulse the sfog trigger on the BCM.
http://www.the12volt.com/relays/relaydiagram43.html
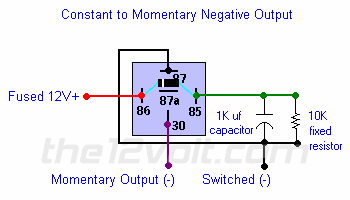
Using a prefabbed relay socket I prepared the whole thing on the bench before installing in the truck.
Twist the 10kohm resistor across the cap as shown.
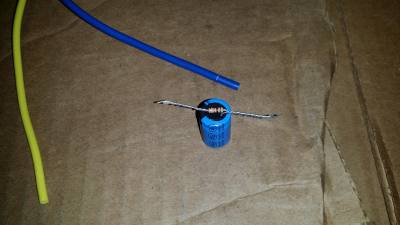
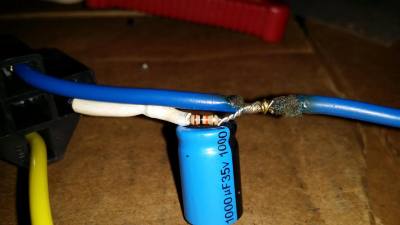
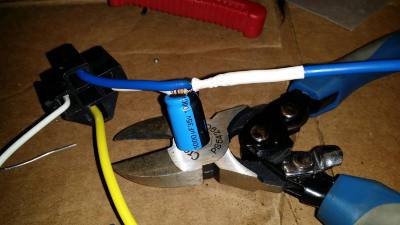
Then solder the pos (+) lead of the cap to the corresponding wire to pin 85 on the relay, and the neg (-) lead to pin 87 leaving aditional wire to attach pin 87 to the BCM parking lamp relay circuit. The neg lead of the cap is marked.
Next is preparing the truck for the mod. First you are going to need a + 12v source. Im sure you could pull this from any fused source, but I chose an unused fused circuit already in place from the factory. If you look in your drivers side fuse panel you will find a 10A fuse labeled as "SEO ACCY" in slot #12. From what I can tell this fuse is for an "Upfitter" to get a fused hot source for their equipment. I'm going to say that 99% of you guys who will do this mod will not have anything utilizing this fuse making it free and clear!
The fuse in question is the empty slot above the 30A fuse for the HTR/AC. (Mine had the fuse but it was just out when I snapped the pic.)
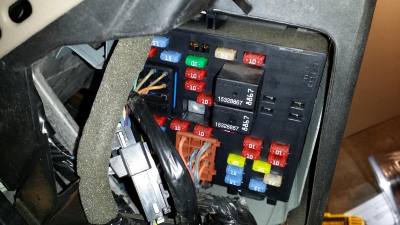
Next step is cutting the wire, and extending it so you can use it for your +12v source. Now if you really want to try you could probably get a push on terminal on the pin in the relay block, but I felt that trying that is just asking for an interment issue down the road so I chose to cut and splice.
Locate the relay block under the drivers side of the dash between the brake peddle and the outside of the truck.
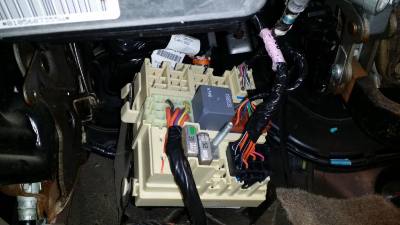
If you do happen to have something utilizing the upfitter circuit there will be a plug installed into the cavity on the top left side.
Detaching the relay block to access the back you will find a solid yellow wire. This is the wire you will cut/splice to get your +12v. (Top right hand side. Second pin from the top right.)
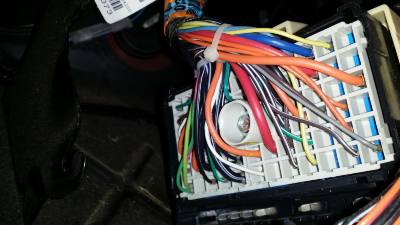
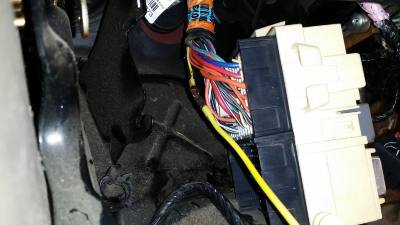
Next step is to locate the white wire on the left hand plug of the BCM This is the "Parking Lamp" relay control. You will splice pin 87 from your relay circuit to this wire. This is the switched constant negative called for in the circuit diagram. (Please ignore the nasty looking black lump. It is the diode for the 4-High mod covered in liquid electrical tape.)
White Plug pin B2 White wire.
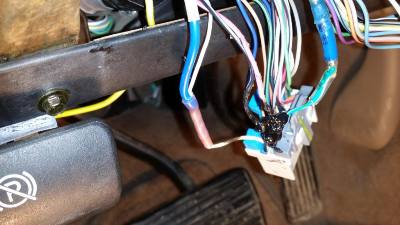
Next step is to locate, and splice pin 30 from the relay circuit into the orange fog lamp control circuit wire on the middle plug of the BCM. This is the pulsed negative output of the circuit.
Brown plug Pin A9 Orange wire.
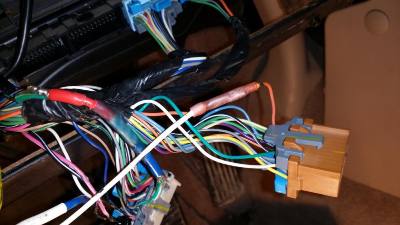
Shot of the completed mod. Again I use liquid electrical tape on the bottom of the cap to insulate it from shorting out on anything.
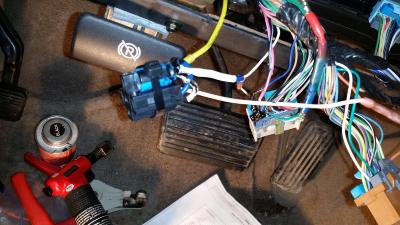
And a short video of the mod in action.
http://smg.photobucket.com/user/scoobyxj/media/20140104_215754_zps2d765dcd.mp4.html
All the lamp circuits are controlled by the BCM under the steering column. The BCM switches the relays in the PDC (under the hood) by completing the ground to the coil. All of the inputs to the BCM (as far as the parking, fog, high beam, low beam) are also ground activated (IE: When you press the OEM fog lamp switch the switch completes the circuit to ground, and the BCM turns on the Fog lamps.) What I did was build a "- constant to - pulsed" relay circuit to pulse the fog lamp trigger on the BCM tricking the BCM to think you pushed the button to turn the fog lamps on. This mod also allows you to turn off the fog lamps by just pressing the button. So basically the fog lamps auto on when the head lamps turn on, and if you want them off you press the button. Another feature of this mod is for the guys who have upgraded there fogs to HID is that the fog lamps do not cycle off when you start your truck.
Here is the - constant on to pulsed - circuit I built to pulse the sfog trigger on the BCM.
http://www.the12volt.com/relays/relaydiagram43.html

Using a prefabbed relay socket I prepared the whole thing on the bench before installing in the truck.
Twist the 10kohm resistor across the cap as shown.

Then solder the pos (+) lead of the cap to the corresponding wire to pin 85 on the relay, and the neg (-) lead to pin 87 leaving aditional wire to attach pin 87 to the BCM parking lamp relay circuit. The neg lead of the cap is marked.


Next is preparing the truck for the mod. First you are going to need a + 12v source. Im sure you could pull this from any fused source, but I chose an unused fused circuit already in place from the factory. If you look in your drivers side fuse panel you will find a 10A fuse labeled as "SEO ACCY" in slot #12. From what I can tell this fuse is for an "Upfitter" to get a fused hot source for their equipment. I'm going to say that 99% of you guys who will do this mod will not have anything utilizing this fuse making it free and clear!
The fuse in question is the empty slot above the 30A fuse for the HTR/AC. (Mine had the fuse but it was just out when I snapped the pic.)

Next step is cutting the wire, and extending it so you can use it for your +12v source. Now if you really want to try you could probably get a push on terminal on the pin in the relay block, but I felt that trying that is just asking for an interment issue down the road so I chose to cut and splice.
Locate the relay block under the drivers side of the dash between the brake peddle and the outside of the truck.

If you do happen to have something utilizing the upfitter circuit there will be a plug installed into the cavity on the top left side.
Detaching the relay block to access the back you will find a solid yellow wire. This is the wire you will cut/splice to get your +12v. (Top right hand side. Second pin from the top right.)


Next step is to locate the white wire on the left hand plug of the BCM This is the "Parking Lamp" relay control. You will splice pin 87 from your relay circuit to this wire. This is the switched constant negative called for in the circuit diagram. (Please ignore the nasty looking black lump. It is the diode for the 4-High mod covered in liquid electrical tape.)
White Plug pin B2 White wire.

Next step is to locate, and splice pin 30 from the relay circuit into the orange fog lamp control circuit wire on the middle plug of the BCM. This is the pulsed negative output of the circuit.
Brown plug Pin A9 Orange wire.

Shot of the completed mod. Again I use liquid electrical tape on the bottom of the cap to insulate it from shorting out on anything.

And a short video of the mod in action.
http://smg.photobucket.com/user/scoobyxj/media/20140104_215754_zps2d765dcd.mp4.html

