chaingun427
OBS Mad Scientist
First things first I'd like to start off by saying that this repair is VERY untested i just did it a few days ago and it's longevity hasn't been put to the test yet. Your mileage my vary but I'm hoping that it lasts and allows many of us to retain our original seats.
To begin you'll need a plate of 1/4 inch steel, you can use thicker but FYI the bending of the plate that is required took the life of my bench vice...
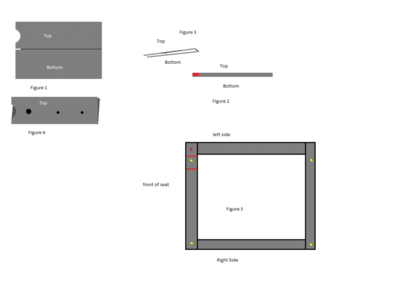
The plate i chose was 4x8, if I could go back i'd probably get closer to 3.8 inches so it seated better but it should be the width of your seats broken mount x2 + 1/4 inch for the bend. As seen in figure 1 you'll need to cut a notch out for the plate to fit over where the front and left side rails meet, as well as cut a semicircle into the top to fit around a round nut that's welded to the seat (unless you feel like removing that nut).
the next step is to have the plate folded almost directly in half, i had the metal shop i bought it at bend it in a break as much as they could, then took it home and placed a 16ga piece of steel in the crease before using my bench vice to close it the rest of the way. It should look like figure 3 when finished not folded flat over, but with a slot in the center large enough to slip it over the existing rails.
At this point you'll need to have your seat out and tipped over onto it's right side (the inner side for the driver seat). In Figure 5 you'll see that the yellow dots represent the existing seat holes, the red dot shows the round nut that is welded on the inside of the rail (which your new plate is notched to fit around. The most common breakage is in between the red lines where the front left bolt is. If that bolt is not completely gone you'll need to cut it out and using a pair of pliers remove the curled lip of the front rail.
Next carefully slip your new plate onto the seat using whatever nail smacker you prefer, mine was a 16oz framing hammer. it should sit firmly against the round nut shown in red on the top of the seat rail and as flush as possible with the inside of the front rail that you bent the curl out of.
Next line up a square on the rear outer and right front bolt holes to find the location that you'll need to drill for the replacement bolt. this part was a bit tricky for me as the square was a bit too large for the job but my hole ended up being close enough to the right spot due to the size of the hole in the slider mechanism.
After marking that hole you can pull the plate off and go back to your bench as you'll need to drill it out and it's hard to do that with it on the seat.
Drill out a hole larger than the diameter of the GRADE 8 bolt you use (don't skimp on that please they are cheap enough and as strong or stronger than the original) but not larger than the diameter of the nut that you'll be using.
I chose to weld the nut onto the top of the plate but it's entirely possible that if you're able to contort yourself well enough you could just bolt it on.
with the plate and nut welded together whack the new plate onto the broken corner of your seat and make sure it all lines up. from here you have two choices, one is to weld this new plate to your existing seat. I didn't as i don't the seat's metal takes a weld very well (it broke twice on me after I'd welded it before always outside the old weld maybe i got it too hot but I'm not sure) The other choice which is the one i took, was to drill two more holes all the way through the plate and the seat frame sandwiched between it, and bolt it all together. These can be smaller bolts but should still be graded 8.
Once the plate is secure on the seat frame remount your seat and you are done. be sure to start with the repaired mount to ensure that it will line up with the rest. on my power seat base there was enough room for the bolt to move around a bit to ensure the other 3 could be bolted up.
I'm sorry that you guys are stuck with my crappy MS paint diagrams, as it was too bloody cold out to document the process properly. I've also included two pics of the finished product already installed onto the seat rails. Sorry for the extreme close up.
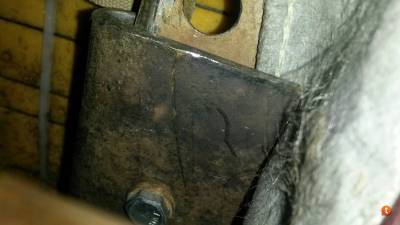
 Close to the middle of the seat
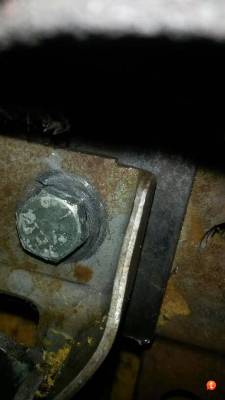
 The corner with the new bolt

To begin you'll need a plate of 1/4 inch steel, you can use thicker but FYI the bending of the plate that is required took the life of my bench vice...
The plate i chose was 4x8, if I could go back i'd probably get closer to 3.8 inches so it seated better but it should be the width of your seats broken mount x2 + 1/4 inch for the bend. As seen in figure 1 you'll need to cut a notch out for the plate to fit over where the front and left side rails meet, as well as cut a semicircle into the top to fit around a round nut that's welded to the seat (unless you feel like removing that nut).
the next step is to have the plate folded almost directly in half, i had the metal shop i bought it at bend it in a break as much as they could, then took it home and placed a 16ga piece of steel in the crease before using my bench vice to close it the rest of the way. It should look like figure 3 when finished not folded flat over, but with a slot in the center large enough to slip it over the existing rails.
At this point you'll need to have your seat out and tipped over onto it's right side (the inner side for the driver seat). In Figure 5 you'll see that the yellow dots represent the existing seat holes, the red dot shows the round nut that is welded on the inside of the rail (which your new plate is notched to fit around. The most common breakage is in between the red lines where the front left bolt is. If that bolt is not completely gone you'll need to cut it out and using a pair of pliers remove the curled lip of the front rail.
Next carefully slip your new plate onto the seat using whatever nail smacker you prefer, mine was a 16oz framing hammer. it should sit firmly against the round nut shown in red on the top of the seat rail and as flush as possible with the inside of the front rail that you bent the curl out of.
Next line up a square on the rear outer and right front bolt holes to find the location that you'll need to drill for the replacement bolt. this part was a bit tricky for me as the square was a bit too large for the job but my hole ended up being close enough to the right spot due to the size of the hole in the slider mechanism.
After marking that hole you can pull the plate off and go back to your bench as you'll need to drill it out and it's hard to do that with it on the seat.
Drill out a hole larger than the diameter of the GRADE 8 bolt you use (don't skimp on that please they are cheap enough and as strong or stronger than the original) but not larger than the diameter of the nut that you'll be using.
I chose to weld the nut onto the top of the plate but it's entirely possible that if you're able to contort yourself well enough you could just bolt it on.
with the plate and nut welded together whack the new plate onto the broken corner of your seat and make sure it all lines up. from here you have two choices, one is to weld this new plate to your existing seat. I didn't as i don't the seat's metal takes a weld very well (it broke twice on me after I'd welded it before always outside the old weld maybe i got it too hot but I'm not sure) The other choice which is the one i took, was to drill two more holes all the way through the plate and the seat frame sandwiched between it, and bolt it all together. These can be smaller bolts but should still be graded 8.
Once the plate is secure on the seat frame remount your seat and you are done. be sure to start with the repaired mount to ensure that it will line up with the rest. on my power seat base there was enough room for the bolt to move around a bit to ensure the other 3 could be bolted up.
I'm sorry that you guys are stuck with my crappy MS paint diagrams, as it was too bloody cold out to document the process properly. I've also included two pics of the finished product already installed onto the seat rails. Sorry for the extreme close up.
 Close to the middle of the seat
 The corner with the new bolt

Attachments
Last edited:

