how to make your AC blow harder and cooler.

Disclaimer: Links on this page pointing to Amazon, eBay and other sites may include affiliate code. If you click them and make a purchase, we may earn a small commission.

MarkD51

Full Access Member
Joined
Mar 9, 2014
Posts
249
Reaction score
9
Location
Sheboygan Wisconsin
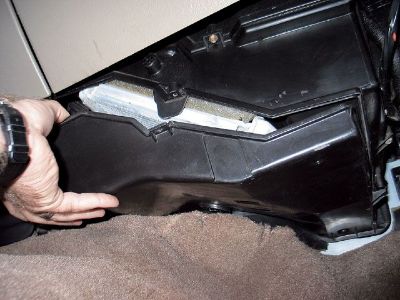
I did the evaporator on my 1997 Hoe this morning.

Mine hardly had any crud, just one little piece of junk stuck to the evaporator, and a little bit of dust in there, but not as bad as I thought, and nowhere near as bad as some of the other poster's "horror pictures".

I first picked the little bit of crud, then blew with compressed air, seen some dust, then squirted the Evaporator down thoroughly with Zep Citrus Orange Cleaner-Degreaser at full strength, let sit 10 minutes, squirted another good dose of the Zep, let sit again, then hosed down the evaporator very well, about 4-5 times.

The Blower Fan, and its Rubber Shroud I hit with compressed air, this was dusty, cleaned the rubber gasketing all around, and treated with a non-silicone rubber protectant-sealant (Wolfgang)

Wiped all out thoroughly to clean and dry with paper shop towels, got all as clean as I could and re-assembled.

I found removing my Glove Box Lid made things a bit easier with removal, and reinstallation of the Rubber Shroud. A plastic tether on the left side of Glove Box simply un-clips, and a pin on the right side gets slight depressed, the Lid then will swing down and come off the hinges, simple.

I've noticed no difference in velocity, but would assume I didn't make things worse, but better. But as I said, mine was basically very clean.

But, after a test drive, my AC would only register at about 45-46 degrees at the vents.
Temps at the time were about 77-78 degrees ambient outside this morning, so that may be why not as cold as seeing 42 at the vents typically when it's mid 90's here?

Maybe it needs to also fully dry out?
 
Last edited:

MarkD51

Full Access Member
Joined
Mar 9, 2014
Posts
249
Reaction score
9
Location
Sheboygan Wisconsin
After the Zep Citrus Degreaser, soak, and then the hose down, my Evaporator basically looked no different, just a dull greyish affair. Didn't look like some highly bright brand new intercooler, or radiator, and I really wasn't expecting such since the truck is 17 years old.

But, my Hoe also only has 39.8K, so perhaps it hasn't seen as many battles as some other user's vehicles.

Plus last year when I had the AC serviced with new Compressor Drier, Orifice Tube, evac, and charge I did drop the entire box lower cover to the left of the evaporator, vacummed, and blew the lving shit out of everything with compressed air, going up, and also blew the shit out of all dash vents, and also removed the entire Windshield Wiper Cowl, cleaned all down in there (there were some leaves, and muck-crud, then renovated the Wiper Cowl with Carpro CQuartz DLX, and re-assembled.

I'm really clean, and meticulous with my vehicles, the first 6 years of life my Hoe resided in a 2 car brick garage, and the last years of ownership, this vehicle has resided in a desert, no leaves, twigs or other large crap, just windstorms, and dust storms in this desert environment.

Wanted to add, the little plastic tether cord for the Glove Box Lid disconnects at the Glove Box itself. I noted on mine the other end which goes to some tubular dash frame member wasn't even properly popped home, so I also corrected that this morning. Also, I noted that there was a wire loom with a clip that clipped to the Blower Motor Shroud, and without removing the Glove Box Lid, I would've never been able to properly re-install that.

I try very hard to keep the vehicle in as much as a "un-molested" state as humanly possible, without breaking, or fubarring shit as I go.
Mark
 
Last edited:

Bottoms Tahoe

TYF Newbie
Joined
Dec 7, 2013
Posts
24
Reaction score
0
Location
Northwest Ga.
Man !!! Doing this worked wonders for my 96 Hoe. Has 148000 miles on it. Looked like a bird had been trying to build a nest in mine. Cleaned about 2 handfuls of pine straw and leAve out from the core. Also squirted water up in there. Bunch of crud ran out. Air is ice cold now and blows a lot harder. Very easy to do.
 

MarkD51

Full Access Member
Joined
Mar 9, 2014
Posts
249
Reaction score
9
Location
Sheboygan Wisconsin
I vaguely remember this myself once dropping the box to clean out, and I think Sunlit Comet touched on this, that on the other side of the evaporator, there is a screen up against it, correct?

Is it possible when cleaning the Evaporator from the right side after removing the Blower Motor, that crud just gets transferred to the other side of the Evaporator, then just is now trapped there and is merely "re-located"?

One day I'm going to have to check this myself by dropping the bottom lid on the Box again
Mark
 

Kirth Gersen

TYF Newbie
Joined
Apr 11, 2017
Posts
23
Reaction score
6
Location
Loa Angeles area, CA
... Saw this on Full size chevy and thought I would do it on my truck.
Very easy to do, took me about 30 minutes. ...
... This applies to all 88-99 GM.. The writeup is on a 99 tahoe 2wd 4dr. The older dash is a bit different so removal of the glovebox and blower motor might be different ....
I cleaned the evaporator box on my '94 K1500 Blazer today & I couldn't believe how much leaves & crud had accumulated -- literally fistfuls!

My box was probably dirtier because I've been driving around without the plastic grille on the exterior cowl area, but even with that on, a lot gets past it. I'm going to try to adapt some sort of mesh screen underneath the cowl's plastic grille.

Definitely higher velocity air blowing thru vents, but I couldn't test cooling because the AC has been leaking & lost most of its refrigerant gas.

BTW, is this your video? Well done!
TUTORIAL HOW TO Make your AC blow harder 88 98 chevy​

> > Warning to others: the "square" instrument panel design on my '94 was much more PITA to remove the blower fan, than your 99 Tahoe.

This guy's video isn't the greatest, but shows some big differences between the "square" and newer "rounded" instrument panel :

For exmpl, I also needed to:

- remove engine computer (ECM) (disconnect battery first!). PITA.
- remove plastic tray that mounts ECM. (4 hex head screws, very inconveniently placed)
- remove passenger lower "kick panel"
- Only now can remove the noise-suppression rubber cover of blower fan, because rubber cover is held "captive" by all the other components.
- remove large bolt under lower-right corner of instrument panel, and carefully bend or flex the lcorner of IP outward about 1/2". This is the only way the blower fan can clear the lower edge of instrument panel!
- finally can clean out the box
- When reinstalling everything, caution to not bend male pins in the 2 large connectors on ECM, or your SOL.
- I ended up spending closer to 3 hrs, not 30 minutes :-(

I dread if the heater core or evaporator core ever starts leaking & needs replacement -- tearing apart the instrument panel to physically remove the 2 cores would be a horrible job.
 

crayfysh

Member
Joined
Oct 14, 2012
Posts
34
Reaction score
6
Location
Indianapolis
Here is a question, the part you scrubbed clean is your heater core?The evaporator core is what gives you air conditioning. How do you clean that area of debris? It's in a separate chamber of the box.
 

east302

Full Access Member
Joined
Dec 21, 2016
Posts
1,630
Reaction score
1,516
Location
Mississippi
This is the evaporator core that they're cleaning. The heater core is at an angle downstream and has the advantage of being replaceable without tearing the whole dash apart.

Not my photo, but here it is...

3FFE82F6-26B8-4942-9169-050630349CFB_zpsxupvlkjf.jpg


Sent from my iPhone using Tapatalk
 

jiggie

Full Access Member
Joined
Jul 14, 2017
Posts
167
Reaction score
102
Soo glad I found this!! Guess its going to be a long night for me!! Ima grab a beer and get to work.


Sent from my iPhone using Tapatalk
 

Forum statistics

Threads
132,770
Posts
1,873,971
Members
97,608
Latest member
Primetimetoons2

Latest posts

Top