Rear AC works / front does not

Disclaimer: Links on this page pointing to Amazon, eBay and other sites may include affiliate code. If you click them and make a purchase, we may earn a small commission.

Matthew Jeschke

Full Access Member
Joined
Dec 28, 2017
Posts
2,008
Reaction score
1,394
Location
Sahuarita, Arizona
My front AC only seems to cool when I'm going down the highway. The rear blows icy cold all the time. A little over a year ago I went through the system as desiccant bag broke and plugged up the expansion valve and orifice tube:

- Cleaned all the lines with ether / starting fluid and blew out with compressed air.
- Replaced all the o-rings
- Replaced expansion valve in rear evap and orifice tube in front.
- Replaced dryer accumulator
- Put new oil in and charged system.

Worked like a champ until a little while ago. Front air doesn't really cool until moving down highway. Rear air is nice and cold while not moving down road. I've done a little diagnostic work.

- System off / Static pressure in lines is 100 PSI at 85F ambient (within spec).
- System on 85F ambient, 40 PSI low side 190 PSI high side (cannot find spec in all data DIY for this)
- Line next to condenser is HOT and line close to firewall is BEER CAN COLD. Seems good.
- Not sure if normal AC clutch runs for a while, then turns off and cycles back on.
- I forced blend door on front air handler to cold air (actuator has an issue so fixed to cold and unpluged).

I'm trying to find spec on splits high to low side pressure. I have All Data DIY but cannot find that spec or table. Maybe there's a generic r134a table?

Any other ideas as to my issue would be greatly appreciated.
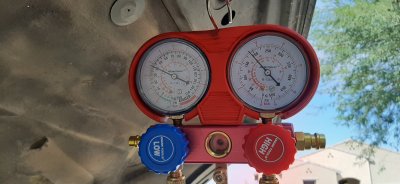
20201019_141849.jpg
 

UmmScott

Full Access Member
Joined
Sep 1, 2019
Posts
194
Reaction score
203
Location
Omaha
You're low on charge or have a restriction.

Common issue when the front isn't very cold but the rear is.

Rear system is an expansion valve. It can and will adjust itself and when you're low on charge you'll have little to no liquid feed to the front system.

You said you checked blend doors, ok so we are good there i assume

Front and rear AC systems need the Exact amount weighed in. Not a few oz less or a few oz more but the exact amount.

Sent from my SM-G975U using Tapatalk
 

UmmScott

Full Access Member
Joined
Sep 1, 2019
Posts
194
Reaction score
203
Location
Omaha
Static pressure check is pretty useless with cars unless its really low on charge. I generally dont read into that value very much.

The actual operating pressures will tell you way more than static

Sent from my SM-G975U using Tapatalk
 
OP
OP
Matthew Jeschke

Matthew Jeschke

Full Access Member
Joined
Dec 28, 2017
Posts
2,008
Reaction score
1,394
Location
Sahuarita, Arizona
thanks, I am trying to find a chart for what the pressures sould be. all i could find is static pressure in the manual.

Sent from my SM-A505U using Tapatalk
 

UmmScott

Full Access Member
Joined
Sep 1, 2019
Posts
194
Reaction score
203
Location
Omaha
You said the line by the firewall is cold.. are you feeling the evaporator inlet or the outlet?

The inlet is the line with the orifice with the two pressure taps on it.
The outlet immediately comes out and drops down into the accumulator. Thats the line you want to feel.
That outlet should be cold. If it is cold to very cold, then you do not have a refrigeration related issue and you have a completely different problem

If it is not cold at all then there is a refrig related issue.

A VERY good factual test you can do is measure the temperature of those 2 lines. Its called a "superheat check" you take the inlet temp and subtract it from the outlet temp. This value tells you how well the evaporator is removing/absorbing heat and cooling the car.
Example: inlet = 34F. Outlet = 38F. That is 4F of superheat. That is a very good number. We are looking from anywhere from 2F to 10F max with anything automotive.
What do these numbers mean?
Superheat that is too high means that evaporator is not doing much work either due to not enough refrigerant (low charge), or a restriction of somesort.
Superheat that is too low is not a good thing either. Too low (stays at 0F) = overcharged system, defective or too big a metering device, or generally a weak/inefficient compressor.

The superheat test is great because no matter what kinda car or equipment you're working on, the same rules hold true. I use that test on large chillers all the way down to small home refrigerators. Same exact concept [emoji106][emoji106]

Sent from my SM-G975U using Tapatalk
 

UmmScott

Full Access Member
Joined
Sep 1, 2019
Posts
194
Reaction score
203
Location
Omaha
Now... i have a question for you.

In your original post you said the dessicant bag broke correct?
Well... I am thinking you might have a different problem.
Our vehicles use an accumulator which holds the dessicant bag. The accumulator is after both front and rear metering devices and after the front evap coil.
So its downstream of all that.

If the bag ruptured, the beads would go into the suction line and into the compressor.
The beads will flow thru the compressor but will not make it past the condenser. The condenser passages are very small and dessicant beads will plug them up.

That being said... heres some important info I need from you.
Where is the high side pressure tap on your car? Is it right next to the low side tap before the orifice?
If so feel that line. Is it mild or is it hot?

Sent from my SM-G975U using Tapatalk
 
OP
OP
Matthew Jeschke

Matthew Jeschke

Full Access Member
Joined
Dec 28, 2017
Posts
2,008
Reaction score
1,394
Location
Sahuarita, Arizona
@UmmScott I got everything working again after this last post. I think it was just low on refrigerant. But now two years later I've done a couple more repairs and the system started having issues again... Rear works front doesn't.

Now... i have a question for you.

In your original post you said the dessicant bag broke correct?
Well... I am thinking you might have a different problem.
Our vehicles use an accumulator which holds the dessicant bag. The accumulator is after both front and rear metering devices and after the front evap coil.
So its downstream of all that.

If the bag ruptured, the beads would go into the suction line and into the compressor.
The beads will flow thru the compressor but will not make it past the condenser. The condenser passages are very small and dessicant beads will plug them up.

That being said... heres some important info I need from you.
Where is the high side pressure tap on your car? Is it right next to the low side tap before the orifice?
If so feel that line. Is it mild or is it hot?

Sent from my SM-G975U using Tapatalk

Front fails "Superheating" check: I didn't even measure just touch. Evaporator inlet is cold to touch, outlet is lukewarm.

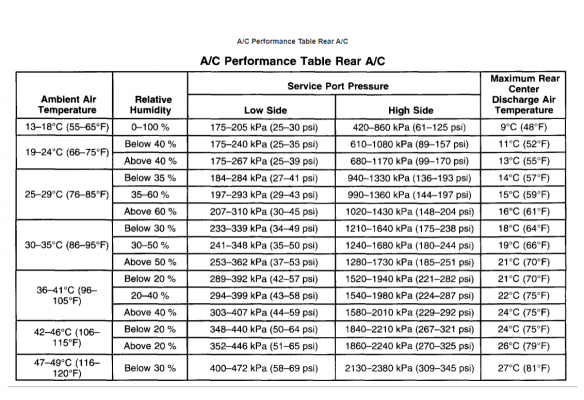
I charged system and got rear to work again. However, I stopped charging as at 95F to 100F the chart said high side shouldn't be more than 300PSI. I was starting to exceed that. Maybe I still don't have enough refrigerant? Never measured weight amount, just adding via pressure.

From high side of compressor towards low / inlet:

1. High port compressor
2. condenser
3. High pressure tap
4. Orifice Tube (junction also goes to expansion valve in rear)
5. Low pressure tap
6. Front Evaporator
7. Dryer
8. Suction line Junction merges front and rear suction lines
9. Compressor inlet

Condenser seems good: I thought maybe some of the desiccant beads didn't get cleaned out and got stuck in the condenser. However, there's no cold or hot spots in the condenser, it's pretty linear to touch from hot to cooler. Also the rear air works great, around 40F vent w/ 97F ambient air.

Slow to equalize pressure after shutdown: the low side pressure 15 minutes later is still climbing / stabilizing out with high side. Seems to reasonably quickly get to within 10 PSI or so then VERY slowly stabilize.


HISTORY OF ISSUES

First desiccant bag broke: I tore everything off, only evaporator in front and lines to rear stayed on car. I flushed everything with brake cleaner, then starter fluid (ether). Put it back together, new orings, new dryer, added oil, vacuumed and charged it. I kind of guessed at oil, guessing on high side. AC worked like a champ. Never another issue.

Second Rebuild: suction line for front system burst. Truck had probably 245,000 miles on it. I replaced it. Charged system and worked great.

Third Rebuild / Engine Swap: opened system during an engine swap. Covered all openings with plastic and rubber bands. Pretty ghetto. Was like that for probably 6 months. Put it all back together, w/ old dryer, charged and worked like a champ.

About three months after engine swap AC started working less and less, around a month later I had no AC front or rear. I checked for leaks (system has contrast dye in it). Could only find a small trace amount on low pressure inlet to pump.

NOTES
Was using a bad pressure chart. Didn't include relative humitity. This one was pulled from factory service manual for my truck.
1652665477110.png

Static pressure test from factory service manual:
Should take about two minutes for high and low sides to equalize out.

Ambient F : (High == Low) PSI
60F : 50 PSI
75F : 70 PSI
90F : 100 PSI

Diagnosis including superheating and sub cooling
 
Last edited:
OP
OP
Matthew Jeschke

Matthew Jeschke

Full Access Member
Joined
Dec 28, 2017
Posts
2,008
Reaction score
1,394
Location
Sahuarita, Arizona
I more or less figured it out given tips from @UmmScott . If you search automotive AC tech stuff on internet you get the BS pressure stuff. I studied residential and other AC systems for a few hours. The pressures are indirectly measuring the actual process. it's easier to measure the temperatures / heat being extracted, specifically superheat and sub cooling.

I was having a really hard time charging the system off pressures with the orifice tube setup. I stopped focusing solely on the stupid pressure charts, and more so used them for a sanity check. I measured superheat off front evaporator (one with orifice tube). I added refrigerant until outlet approached 10 degrees warmer than inlet and the front started to cool.

I did all this without exceeding pressure chart. I realized the rear evaporator has an expansion valve to meter boiling process in evaporator. Front doesn't have that so you have to measure superheat to get it right while adding refrigerant.

I don't know why factory service manual leaves this out. Its WAY easier to conceptualize and do than the pressure gauges. Honestly, I did it by touch / feel as my thermometer wasn't that accurate in hot engine compartment.

Now I need to find the problem that caused the system to stop working in first place. I tightened all the fasteners I could find and searched for contrast dye (couldn't really find any). I'm sure there's a leak somewhere but no clue how to find it as I'm not spotting the dye.
 

MassHoe04

Full Access Member
Joined
Nov 4, 2021
Posts
1,587
Reaction score
2,820
Location
Western MA
My 05 Rubicon had a big leak. Refrigerant was pouring out as quick as I was putting it in. Turned out that a seal on the compressor failed. I wasn't going to pay for a new compressor and redo the entire system on a soft top Jeep.When it was that hot out, I took the doors and top off. I really didn't care if it fixed the issue or killed the system, so I dumped the refrigerant with leak stopper in it (I know... I know...). It worked. I could use cold defog on really wet days to clear the windshield for the last two years I owned it.

That was an I don't care what happens kind of solution. It is someone else's project now.
 

Forum statistics

Threads
132,707
Posts
1,872,925
Members
97,526
Latest member
stking
Top