afpj
Full Access Member
- Joined
- Sep 16, 2009
- Posts
- 801
- Reaction score
- 353
Just replaced valve cover gasket in trying to stop an oil leak. This is an easy procedure, in theory, but I couldn't actually find a guide so this is a little one to help other noobs who don't have a clue, like me.
First, take off the coil packs. The pics show the driver side. They are held on by 5 bolts that bolt onto the valve cover (orange arrows). You only have to disconnect the ONE electrical connector harness in the middle (green arrow)...the individual electrical connectors do not have to be removed. Didn't know that at first so the pics of the parts on the ground show the coil packs disconnected from the little wiring harnesses. remove the spark plug wire from the coil packs (yellow arrows). I do not recommend removing them off the spark plugs themselves (I broke the first one by trying this--10 year old wires beak). Leave them dangling from the spark plugs.
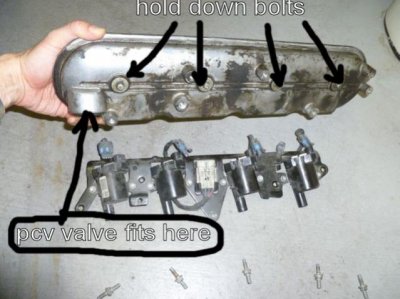
After you get the coil packs off, then clean the dirt from around the valve cover. Then you can back out the 4 bolts that hold down the cover running along the center of the cover.
Remove PCV valve from cover...it just pulls up and out, ( near the firewall), then remove cover.
The third pic shows whats under the valve cover. 4th pic shows the underside of cover, with hold-down bolts.
The gasket sits in a groove around the base of the cover, easy to remove and replace. Since it's rubber, it does not require any sealant, or so I have been told.
Replace in reverse order. The hardest part was discovering I did NOT have to remove the spark plug wires from the spark plugs themselves, and that cost me..had to buy a new set of wires since I broke one (wire came off the plug but the conductor stayed with the plug. I used dielectric grease on the electrical connector and the spark plug wire before replacing. Hope this helps someone else, and sorry if it's been shown before but I couldn't find it.


Last edited:


