05 Denali Front end Rebuild

Disclaimer: Links on this page pointing to Amazon, eBay and other sites may include affiliate code. If you click them and make a purchase, we may earn a small commission.

adventurenali92

Full Access Member
Joined
Feb 16, 2015
Posts
7,390
Reaction score
8,619
Location
Big Bear Lake, ca
Kind of an old thread, but I’m curious. I’m thinking it’s probably close to time to think about rebuilding the front end of my 2006 xl Denali. I’m at 117k now. It hasn’t given me any problems so far, but with as much as I drive, especially up and down the mountain roads as often as I do, I’d rather just get it done and not have to worry about it. Anybody that’s done the front end have any good how to videos on this stuff? Contemplating doing it myself but I know it’s orwtty in depth. I’d like to watch a video of the work being done, even if it’s just generic, to get an idea of whether or not I can tackle it myself.
 

live2pull

Full Access Member
Joined
May 31, 2018
Posts
197
Reaction score
299
Location
Phoenix, Az
Kind of an old thread, but I’m curious. I’m thinking it’s probably close to time to think about rebuilding the front end of my 2006 xl Denali. I’m at 117k now. It hasn’t given me any problems so far, but with as much as I drive, especially up and down the mountain roads as often as I do, I’d rather just get it done and not have to worry about it. Anybody that’s done the front end have any good how to videos on this stuff? Contemplating doing it myself but I know it’s orwtty in depth. I’d like to watch a video of the work being done, even if it’s just generic, to get an idea of whether or not I can tackle it myself.

Assuming you are not pressing bushings and balljoints, with assistance, you can get it done in one day. It is pretty straight forward, I did both front and rear without air tools solo in less than 2. My advice is PB blast ball joints the day before, more if you are exposed to snow more often. WD-40 the torsion bar ends for easier removal. Use air tools for disassembly if you have them, not a necessity though. Do one side at a time.
 

adventurenali92

Full Access Member
Joined
Feb 16, 2015
Posts
7,390
Reaction score
8,619
Location
Big Bear Lake, ca
Assuming you are not pressing bushings and balljoints, with assistance, you can get it done in one day. It is pretty straight forward, I did both front and rear without air tools solo in less than 2. My advice is PB blast ball joints the day before, more if you are exposed to snow more often. WD-40 the torsion bar ends for easier removal. Use air tools for disassembly if you have them, not a necessity though. Do one side at a time.
Great advice! Thanks man!
 

pnwdan

Cunning linguist
Joined
Aug 17, 2014
Posts
347
Reaction score
127
Location
Arlington, WA
Kind of an old thread, but I’m curious. I’m thinking it’s probably close to time to think about rebuilding the front end of my 2006 xl Denali. I’m at 117k now. It hasn’t given me any problems so far, but with as much as I drive, especially up and down the mountain roads as often as I do, I’d rather just get it done and not have to worry about it. Anybody that’s done the front end have any good how to videos on this stuff? Contemplating doing it myself but I know it’s orwtty in depth. I’d like to watch a video of the work being done, even if it’s just generic, to get an idea of whether or not I can tackle it myself.
The biggest pain is pressing the lower ball joints out. Make sure you have the proper press first. Buy a kit that comes with the upper arms and everything will go really easy.

Sent from my SM-N950U using Tapatalk
 

Erickk120

Full Access Member
Joined
Mar 19, 2018
Posts
384
Reaction score
214
Kind of an old thread, but I’m curious. I’m thinking it’s probably close to time to think about rebuilding the front end of my 2006 xl Denali. I’m at 117k now. It hasn’t given me any problems so far, but with as much as I drive, especially up and down the mountain roads as often as I do, I’d rather just get it done and not have to worry about it. Anybody that’s done the front end have any good how to videos on this stuff? Contemplating doing it myself but I know it’s orwtty in depth. I’d like to watch a video of the work being done, even if it’s just generic, to get an idea of whether or not I can tackle it myself.

I did my entire front end not too long ago and it handles so much tighter now! The worst part for me was changing the ******** bushings in the upper control arms that took me an entire day just for those 4 bushings since they were rusted in place, I had to use my press in reverse to pop them out for the install I pressed them in place by hand by making my own tool with some grade 8 bolts and washers, and some races I had laying around. I can not stress enough how this is the most painful thing when it comes to the front end rebuild. You can also buy the whole UCA assembly with ball joints pre-pressed for a little bit more, Although I hear the quality of the BJ can be questionable even by Moog or AC delco standards.


Next hardest thing was separating the ball joints please get a ball joint separator they are the best 20 dollars you will spend, and you will be glad you did, or you will end up making my worse mistake during this whole thing. I opted for the brute force attack and ended up deforming the tapped hole that holds the brake line bracket, to later snap the bolt when I forced it in. If you get one of this you will put it in place tighten it good and tap the knuckle then re-tighten the tool and tap the knuckle again til the ball joint pops out, I wasted almost a day trying with just tapping and a fork that I had that wouldn't fit properly, so please consider the BJ separator at harbor freight, it too fits a lot of other joints.

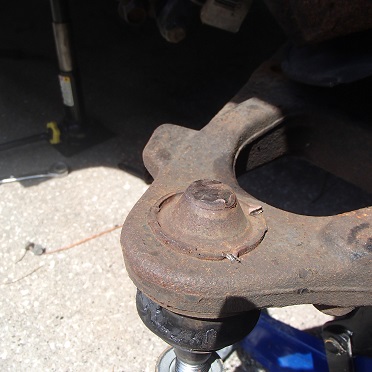
The next most challenging thing was removing the OE lower ball joint since those have 3 tabs that were pressed and you have to either chisel them and fold them over to make the ball joint fall through its bore or grind them off to make it drop. I again used the dumb Brute force attack, and lazily chiseled the tabs and used a 3 and 16-pound sledgehammer, Came out but it was loud and I was spent after. I would recommend the grinder since it will save a lot of time. The top ball joint is a joke and easy to get off with a press tool you can rent for 200 dollars.

P8230208.JPG

After that challenge the next hardest thing was the Pitman arm, Just get a pitman arm puller from Harbor freight, It will make it so much easier, I removed the nut using a adjustable wrench risking rounding the nut, but anything else would not fit, I used a long pipe to use as leverage as it was tight as hell. Then I can't recall the exact order but I think I used the puller to get it off after pulling it I think I had to undo the 3 steering box bolts in order to get it out. Before you get to this step I had separated the pitman arm ball joint. Installing it back is the reverse, pretty straightforward, Make sure you get the right 3 or 4 spline version whichever fits your vehicle.

Installing the ball joints back is easy, just make sure you align them inboard or as recommended depending on which brand you go with, But I would go with good quality Bj's to avoid touching this crap ever again, don't forget to use proper tightening specs or you might risk having a stud snap on you due to overtightening, or not properly tighten, I would for sure not skip the torque wrench for suspension related items.

sway bar bushings, Idler bracket, idler arms are the easiest of the bunch, along with the inner/outer tie rods, new camber caster kits are easy to do once everything is apart, just mark them relatively close to what the old ones were and torque to 140 unless you want random popping. That is about it really, You will end up undoing both cv axles so using a torque wrench should be easy. Thats about it really, any questions let us know :p
 
Last edited:

Bryan Dennison

TYF Newbie
Joined
Aug 17, 2018
Posts
9
Reaction score
0
I did my entire front end not too long ago and it handles so much tighter now! The worst part for me was changing the ******** bushings in the upper control arms that took me an entire day just for those 4 bushings since they were rusted in place, I had to use my press in reverse to pop them out for the install I pressed them in place by hand by making my own tool with some grade 8 bolts and washers, and some races I had laying around. I can not stress enough how this is the most painful thing when it comes to the front end rebuild. You can also buy the whole UCA assembly with ball joints pre-pressed for a little bit more, Although I hear the quality of the BJ can be questionable even by Moog or AC delco standards.


Next hardest thing was separating the ball joints please get a ball joint separator they are the best 20 dollars you will spend, and you will be glad you did, or you will end up making my worse mistake during this whole thing. I opted for the brute force attack and ended up deforming the tapped hole that holds the brake line bracket, to later snap the bolt when I forced it in. If you get one of this you will put it in place tighten it good and tap the knuckle then re-tighten the tool and tap the knuckle again til the ball joint pops out, I wasted almost a day trying with just tapping and a fork that I had that wouldn't fit properly, so please consider the BJ separator at harbor freight, it too fits a lot of other joints.

The next most challenging thing was removing the OE lower ball joint since those have 3 tabs that were pressed and you have to either chisel them and fold them over to make the ball joint fall through its bore or grind them off to make it drop. I again used the dumb Brute force attack, and lazily chiseled the tabs and used a 3 and 16-pound sledgehammer, Came out but it was loud and I was spent after. I would recommend the grinder since it will save a lot of time. The top ball joint is a joke and easy to get off with a press tool you can rent for 200 dollars.

View attachment 210618

After that challenge the next hardest thing was the Pitman arm, Just get a pitman arm puller from Harbor freight, It will make it so much easier, I removed the nut using a adjustable wrench risking rounding the nut, but anything else would not fit, I used a long pipe to use as leverage as it was tight as hell. Then I can't recall the exact order but I think I used the puller to get it off after pulling it I think I had to undo the 3 steering box bolts in order to get it out. Before you get to this step I had separated the pitman arm ball joint. Installing it back is the reverse, pretty straightforward, Make sure you get the right 3 or 4 spline version whichever fits your vehicle.

Installing the ball joints back is easy, just make sure you align them inboard or as recommended depending on which brand you go with, But I would go with good quality Bj's to avoid touching this crap ever again, don't forget to use proper tightening specs or you might risk having a stud snap on you due to overtightening, or not properly tighten, I would for sure not skip the torque wrench for suspension related items.

sway bar bushings, Idler bracket, idler arms are the easiest of the bunch, along with the inner/outer tie rods, new camber caster kits are easy to do once everything is apart, just mark them relatively close to what the old ones were and torque to 140 unless you want random popping. That is about it really, You will end up undoing both cv axles so using a torque wrench should be easy. Thats about it really, any questions let us know :p

Did you also replace the 3 lower control arm bushings? I’m planning to rebuild or replace my control arms soon and I’m thinking from everything I’ve read that for the uppers it makes since to just replace since by the time you buy a quality ball joint and bushings you’ve almost spent the same as a whole new upper control arm. The lowers on the other hand I could save quite a bit of money on if I just replace the bushings and ball joint. What ball joints did you go with. I’m trying to decide between Moog or AC Delco.
 

Erickk120

Full Access Member
Joined
Mar 19, 2018
Posts
384
Reaction score
214
Bushings are dirt cheap, you would save a few bucks by doing them but unless you have a press I would just get new UCA's, The LCA's in the other hand are another thing, those are pretty pricey, I didn't replace those bushings. My bushings have minor age cracks but they aren't compromised yet, they still look and felt solid. Same with my upper ones, They were still good just weather aged but I decided those I would do since they were simple in comparison to the lower ones.
The lower ones look like a lot more work since you have to get the torsion bars out of the way. As far as ball joints I went with Moog, I will see how those perform, but our e150 has Moog bj's and they've lasted over 60k I wonder how they will hold up for my truck. AC delco Pro/Pro forged/Moog seem to be what most people are using for good quality parts. Detroit axle gets thrown around but I'm not sure I would trust all that stuff for so little money. I mixed mine around Moog BJ's and inner/outer tie rods and AC delco pitman arm, with OEM brack and idler arm. I went mainly with moog because they were cheaper than the other two but only time will tell, so far so good. They feel a little tight atm but we'll see how things break with mileage.
 

Bryan Dennison

TYF Newbie
Joined
Aug 17, 2018
Posts
9
Reaction score
0
Bushings are dirt cheap, you would save a few bucks by doing them but unless you have a press I would just get new UCA's, The LCA's in the other hand are another thing, those are pretty pricey, I didn't replace those bushings. My bushings have minor age cracks but they aren't compromised yet, they still look and felt solid. Same with my upper ones, They were still good just weather aged but I decided those I would do since they were simple in comparison to the lower ones.
The lower ones look like a lot more work since you have to get the torsion bars out of the way. As far as ball joints I went with Moog, I will see how those perform, but our e150 has Moog bj's and they've lasted over 60k I wonder how they will hold up for my truck. AC delco Pro/Pro forged/Moog seem to be what most people are using for good quality parts. Detroit axle gets thrown around but I'm not sure I would trust all that stuff for so little money. I mixed mine around Moog BJ's and inner/outer tie rods and AC delco pitman arm, with OEM brack and idler arm. I went mainly with moog because they were cheaper than the other two but only time will tell, so far so good. They feel a little tight atm but we'll see how things break with mileage.

Thanks for the info! I believe the only lower bushing that actually needs replacing is the shock bushing so I'll probably just leave the other 2 alone.
 

Bombsquad85

Full Access Member
Joined
Aug 18, 2016
Posts
1,515
Reaction score
1,556
Location
Northern VA

Forum statistics

Threads
132,376
Posts
1,866,999
Members
97,012
Latest member
Roscoe2352

Latest posts

Top