06 denali xl cd changer removal

Disclaimer: Links on this page pointing to Amazon, eBay and other sites may include affiliate code. If you click them and make a purchase, we may earn a small commission.

06caddykeith

TYF Newbie
Joined
Feb 28, 2015
Posts
5
Reaction score
0
Oh man that is bad a$$! Congrats, I knew it was possible. This is exactly what I want to do. Basically for the cost of a $100 deck you have added blue tooth, usb, and mp3 inputs into your factory stereo. As opposed to the only suggestion I got which was replace head unit (min $600 for something comparable) and add interface or whatever they were called to please all the onstar, steering wheel control etc. stuff ($250-$300). Taxes in without install $1000 seemed pretty steep just to add Bluetooth to my stereo, you have given me new hope! Now quit drinking beer and start ur write up! Lol jks, great job man, cheers!
 
OP
OP
about20ninj45

about20ninj45

Full Access Member
Joined
May 13, 2014
Posts
1,120
Reaction score
330
Oh man that is bad a$$! Congrats, I knew it was possible. This is exactly what I want to do. Basically for the cost of a $100 deck you have added blue tooth, usb, and mp3 inputs into your factory stereo. As opposed to the only suggestion I got which was replace head unit (min $600 for something comparable) and add interface or whatever they were called to please all the onstar, steering wheel control etc. stuff ($250-$300). Taxes in without install $1000 seemed pretty steep just to add Bluetooth to my stereo, you have given me new hope! Now quit drinking beer and start ur write up! Lol jks, great job man, cheers!


Thank you! I even added phone (mic), so i can make calls and stream over bluetooth. Question, when you try to use your cd changer, does your screen show " cdx" withought any errors? Hopefully not.
 

pnwdan

Cunning linguist
Joined
Aug 17, 2014
Posts
347
Reaction score
127
Location
Arlington, WA
I prefer the cleaner look of a single aftermarket that does everything VS running two units. I took my disk changer out and replaced it with a single DIN pocket too so it looks OEM. Yours does look good. Just seems like a lot more work than its worth.
 
OP
OP
about20ninj45

about20ninj45

Full Access Member
Joined
May 13, 2014
Posts
1,120
Reaction score
330
I prefer the cleaner look of a single aftermarket that does everything VS running two units. I took my disk changer out and replaced it with a single DIN pocket too so it looks OEM. Yours does look good. Just seems like a lot more work than its


To each thier own, so your likes may vary. You spent how much on your install? Cost of your new unit, cost of wiring harness and adapter [(+/-) if you paid someone for installation ]....add all those add up = to much money for some people. Im an electrical and computer engineer by trade, so me doing this mod saved me money and the trade offs were none. Ive added functionality and a conversation piece, so when someone that knows about these trucks ask " Hey whats that, how did you it ? Thats not possible." I can simply laugh and smile. In fact, if you look at it, aftermarket is not OEM, and some arent meant to be. I could always cover it or remove it if i wanted an install the original cd changer in about 30 minutes if i needed to sell the truck, but i dont intend to. Its all about customization and knowledge that i can share with others
 
Last edited:

Mr. 960

Full Access Member
Joined
Mar 24, 2011
Posts
327
Reaction score
37
I like it. I'm really pleased with the TNR 800 radio. I think it is badass for what it is in it's time! I added one to my 06 Yukon and one to my 06 sierra. I was lucky enough to find two of the discontinued USA spec 6 disk changers to retain nav and cd function at the same time on both of my rigs.

Mr. 960

---------- Post added at 07:53 PM ---------- Previous post was at 07:52 PM ----------

amen brother! :)


I prefer the cleaner look of a single aftermarket that does everything VS running two units. I took my disk changer out and replaced it with a single DIN pocket too so it looks OEM. Yours does look good. Just seems like a lot more work than its


To each thier own, so your likes may vary. You spent how much on your install? Cost of your new unit, cost of wiring harness and adapter [(+/-) if you paid someone for installation ]....add all those add up = to much money for some people. Im an electrical and computer engineer by trade, so me doing this mod saved me money and the trade offs were none. Ive added functionality and a conversation piece, so when someone that knows about these trucks ask " Hey whats that, how did you it ? Thats not possible." I can simply laugh and smile. In fact, if you look at it, aftermarket is not OEM, and some arent meant to be. I could always cover it or remove it if i wanted an install the original cd changer in about 30 minutes if i needed to sell the truck, but i dont intend to. Its all about customization and knowledge that i can share with others
 
OP
OP
about20ninj45

about20ninj45

Full Access Member
Joined
May 13, 2014
Posts
1,120
Reaction score
330
I like it. I'm really pleased with the TNR 800 radio. I think it is badass for what it is in it's time! I added one to my 06 Yukon and one to my 06 sierra. I was lucky enough to find two of the discontinued USA spec 6 disk changers to retain nav and cd function at the same time on both of my rigs.

Mr. 960

---------- Post added at 07:53 PM ---------- Previous post was at 07:52 PM ----------

amen brother! :)


Thank you sir, I greatly appreciate it! If you ever want to add a secondary radio, make sure you keep your cd player, unless you want to write your own code and install rasberrypi ( like i did initially) it is vital to this mod
 
OP
OP
about20ninj45

about20ninj45

Full Access Member
Joined
May 13, 2014
Posts
1,120
Reaction score
330
In progress. ..so please bare with me. :)

* General disclaimer: I am not responsible if you damage your equipment and or vehicle performing this mod. You agree, that by performing this mod, it is under your own free will and that i did not force you to do this. * blah blah blah, you know how it goes.

So this mod will involve these following tools

Safety glasses *safety first*
Soldering iron
Phillips head and flathead screwdriver
Electrical tape
Digital multimeter
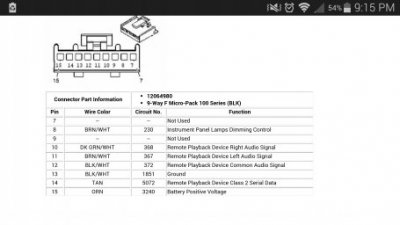
Pinout diagram of cd changer

*Optional equipment*

Beer, music and warm weather because winter sucks


Estimated time: 2-4 hours

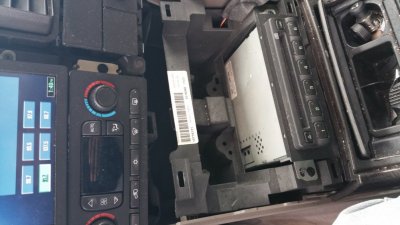
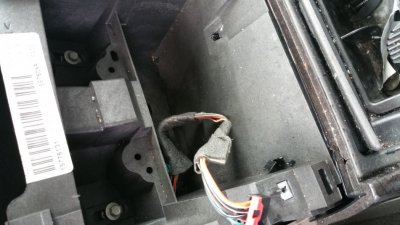
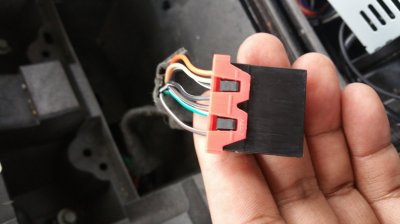
So first you want to start by removing the trim panel on the dashboard. This slides right out, so make sure you tilt the steering wheel down to give you the clearance space you need. Once this is removed you will also remove the center trim around the cd changer which is held in by clips so just gently tug on it and it will come off. Once removed, disconnect the connector from the cigarette lighter and the cd changer. After its removed, the harness that you disconnected, you will see 7 wires that you want to label ( this will save you an assload of headaches)

Measure up about an inch and a half from the 12 pin connector, and cut the wires cleanly across. Strip the ends back with your strippers, and pre tin your wires, this will streamline the mating of these wires later. You want to extend the wires to the lenght of about 16 inches each, which should give you plenty of length for your install.
 

Attachments

  • 20150301_133925.jpg
    20150301_133925.jpg
    96.8 KB · Views: 20
  • 20150301_134829.jpg
    20150301_134829.jpg
    97.8 KB · Views: 21
  • 20150301_135424.jpg
    20150301_135424.jpg
    91 KB · Views: 20
Last edited:
OP
OP
about20ninj45

about20ninj45

Full Access Member
Joined
May 13, 2014
Posts
1,120
Reaction score
330
This is the pinout diagram on the harness from the cd changer so label your wires accordingly. Note that there are two black wires with a white tracer, and two brown wires with white tracers, so dont mix these up.The Tan wire is your class 2 databus communication, so PLEASE PLEASE PLEASE, do not touch any ground or wires to it, every dashboard light known to man on your truck will come on ( if your key is in the ignition on the acc or if the car is started ) and the only way to clear it is to shut off the truck, remove the key open the door and close it. Once you reinsert thebkey into the igniton, the status will return to normal., and you can resume your installation.


So the next step is to dismantle the cd changer CAREFULLY! do not force it or damage any of the boards or ribbon cables, because you will screw yourself. In the even that you do damage them, you will need a new cd changer as a donor to continue. This step is optional, so if you fear dismantling the cd changer, skip to the next step, for the brave hearts, continue on...
 

Attachments

  • Screenshot_2015-03-03-21-15-09.jpg
    Screenshot_2015-03-03-21-15-09.jpg
    19.9 KB · Views: 33
Last edited:
OP
OP
about20ninj45

about20ninj45

Full Access Member
Joined
May 13, 2014
Posts
1,120
Reaction score
330
Im doing all this from my phone so please ignore grammar lolz

You want to look for these two boards and keep them. Be aware that they are joined together by a socket (din) connector and can be separated. Be sure not to bend any pins or damage the connector where the two boards mate. Once you have these out, plug them into eachother and secure them. I used tape to reinforce stiffness to stop bending and to prevent damage to the pins.

20150302_175556.jpg

20150302_175559.jpg
 
Last edited:
OP
OP
about20ninj45

about20ninj45

Full Access Member
Joined
May 13, 2014
Posts
1,120
Reaction score
330
You can see in the pics below how I mated the ends and taped everything together with the electrical tape. Once youve done this, set it aside, because you will need it later. If you have made it this far, congrats! You are half way there! So slam a beer and get ready for the victory lap.

20150302_180601.jpg

20150302_180529.jpg

20150302_180536.jpg
 
Last edited:

Forum statistics

Threads
131,801
Posts
1,857,272
Members
96,105
Latest member
ScottLady
Top