2001 Tahoe 2wd steering wander

Disclaimer: Links on this page pointing to Amazon, eBay and other sites may include affiliate code. If you click them and make a purchase, we may earn a small commission.

Battledrift69

TYF Newbie
Joined
Feb 7, 2021
Posts
15
Reaction score
7
I’ve searched all forums for an answer that would solve my wandering issue.

I have a 2001 Tahoe Lt 2wd that seems to steer on its own left to right which I saw is what’s called wandering or walking.

After searching for what seems like months, I’ve replaced damn near the entire suspension front and back.

new in the front;
Tie rod end, inner and outer
Pitman arm
Idler arm and bracket
Tires
Upper control arms
Intermediate steering shaft
Column bearing
Steering gear box
Sway bar end links
Shocks

wheel bearings have no play nor make any noise or signs of being faulty.

rear has new;
Sway bar end links
Pan hard bar
Springs
Shocks (Monroe self adjusting shocks, I’ve replaced with stock to see if that’s the issue and it wasn’t)
Upper and lower trailing arms


I’ve had 4 alignments done at different shops and they all come back good. They can’t find a single thing wrong.


I had noticed that the rear passenger sticks out a little bit farther than the driver rear. It’s not horrible but is noticeable if you’re looking for it.


I’m at a loss and have no idea where else to check.

no collisions, no rear end damage what so ever.
 

Fless

Staff member
Super Moderator
Joined
Apr 2, 2017
Posts
12,300
Reaction score
25,103
Location
Elev 5,280
I’ve searched all forums for an answer that would solve my wandering issue.

I have a 2001 Tahoe Lt 2wd that seems to steer on its own left to right which I saw is what’s called wandering or walking.

After searching for what seems like months, I’ve replaced damn near the entire suspension front and back.

new in the front;
Tie rod end, inner and outer
Pitman arm
Idler arm and bracket
Tires
Upper control arms
Intermediate steering shaft
Column bearing
Steering gear box
Sway bar end links
Shocks

wheel bearings have no play nor make any noise or signs of being faulty.

rear has new;
Sway bar end links
Pan hard bar
Springs
Shocks (Monroe self adjusting shocks, I’ve replaced with stock to see if that’s the issue and it wasn’t)
Upper and lower trailing arms


I’ve had 4 alignments done at different shops and they all come back good. They can’t find a single thing wrong.


I had noticed that the rear passenger sticks out a little bit farther than the driver rear. It’s not horrible but is noticeable if you’re looking for it.


I’m at a loss and have no idea where else to check.

no collisions, no rear end damage what so ever.


How long has the wandering been an issue? How many miles on the truck?

Ball joints condition?

Front jounce stops in good condition and contacting the lower control arms?

Look at your RPO codes in the glovebox: see ZW7 and G65 codes?
 

OR VietVet

Multnomah Falls
Supporting Member
Military
Joined
Oct 8, 2014
Posts
21,066
Reaction score
37,684
Location
Willamette Valley
Welcome to the forum from Oregon.

I think you answered your own question. You said the right rear sticks out more than the left rear. That is called dog tracking. That is an offset that can cause wandering and can be especially noticeable depending in the road crown and asphalt wear on the road. You said 4 alignments were done. Post the before and after front and rear alignment readings. I am surprised that none of the alignment guys/girls did not say anything about the rear offset.

Hopefully the frame was checked, where the steering gear mounts, for cracks.

Have you owned since new? Ever any accidents. Need to check the diamond in the frame.

This helps explain that:

Getting It Straight
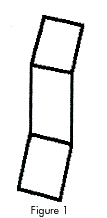
First of all, no less than eight to 10 measuring points should be located and measured before determining any method of repair. Now, suppose you measure the center section of a frame that received a direct impact to the front of the right frame rail. The right rail is driven back, say 18 millimeters, behind the left. Upon measuring the end sections of the frame, you’ll learn the front is swayed to the right and the rear is swayed to the left (see Figure 1).
39946agif_00000006604.gif
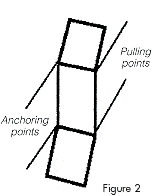
At this point, you’d want to properly secure the left frame rail before you begin pulling the frame. Because the end sections are swayed, you’ll only attach your anchoring chains to the center section of the frame, which will allow the end sections to move freely as you make the necessary pulls. Two or more anchoring chains should be used, and care should be taken to ensure the anchoring chains don’t crimp or crush any brake lines, fuel lines, wiring harnesses, etc. You’ll also want to make sure the anchoring chains aren’t wrapped around or attached to anything except the frame itself. The anchoring chains should extend from the frame rail at approximately a 45-degree angle.

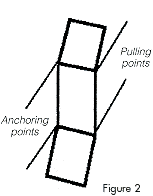
Now attach the pulling chains to the right frame rail in a similar manner. Like the anchoring chains, the pulling chains will produce best results if you attach them in two secure positions on the right frame rail. These positions should also be located in the center section of the frame, preferably opposite the anchoring chains. These chains should also extend from the vehicle at the same approximate 45-degree angle in the opposite direction (see Figure 2). Jack stands should be used to support the frame near the anchoring points to avoid twisting the frame or collapsing the suspension springs. At this time, simultaneously apply equal amounts of pressure to each of the pulling chains. As the force is applied, periodically check the center section with a tram gauge or with a measuring system, if possible.
39946gif_00000006605.gif
As with any pulling procedure, you’ll want to apply a specific amount of force, say 1,000 pounds, and then release the pressure and measure the result of the pull. If needed, re-apply the pressure using slightly more pressure each time and re-measure the frame after each pull. Repeat this process until the center section of the frame measures to factory specifications, and then re-measure the full frame. At this point, most or even all of the side sway in the front and rear sections should have returned to its original position. However, you may need to make additional pulls to remove the last of the side sway from the front and rear sections. On particularly stubborn frames, you may want to make side pulls to the front and/or rear sections while the center section is under the pressure of the pulling force.

Now suppose the right frame rail is back as mentioned earlier, but the front end is swayed to the left due to the direction of travel of the colliding force. In this situation, I’d recommend the same procedures. First, remove the diamond condition from the center section, and then proceed to repair the end section(s). No matter which direction the colliding force came from, it’s still the center section of the frame that should be measured and repaired first.

(If you’re fortunate enough to be employed by a facility that’s equipped with a holding system designed specifically for frame vehicles, good for you. Better-quality frame equipment is designed so a vehicle’s frame can be securely mounted to the holding system at the center section’s four control points.) Once the vehicle is securely mounted, the mounts on either frame rail can be moved forward or back on the holding system to remove a diamond condition in the center section. As described earlier, you’d want to push or pull the frame to a known point and then release pressure so you can measure the result of each pull.


Got It Straight?
When this condition occurs in unibody vehicles, it’s commonly referred to as misaligned control points or a misaligned center section. No matter what name you choose to call it, the repair procedure is basically the same:

  1. Use the measuring system. Proper use of the measuring system saves time by telling us exactly where the damage is located.
  2. Start with the inner-most damage and work your way out. I often make some rough pulls on the end section of a vehicle during my initial disassembly, but I always pull the center section (if it’s damaged) to factory specifications before starting any serious repairs to the end sections.
One more thing: Although there are certain guidelines allowing and limiting the use of heat in frame repair, I personally choose not to heat frames any more than is necessary — and usually as a last resort. If heat must be used, consult I-CAR, ASE or the vehicle manufacturer’s guidelines regarding structural-steel heat temperature and time limits for the vehicle being repaired. It’s important to use heat-sensitive crayons at your recommended temperature and one each at a slightly higher/lower temperature to ensure the recommended temperature is reached, but not exceeded. And I don’t use heat on unibody vehicles at all.


The Diamond Dilemma
Repairing diamond frames shouldn’t be tricky — although some technicians make it tricky. Quit it. By following the simple steps outlined in this article, these types of repairs will go much smoother, much faster and be much more profitable.
 
OP
OP
B

Battledrift69

TYF Newbie
Joined
Feb 7, 2021
Posts
15
Reaction score
7
How long has the wandering been an issue? How many miles on the truck?

Ball joints condition?

Front jounce stops in good condition and contacting the lower control arms?

Look at your RPO codes in the glovebox: see ZW7 and G65 codes?


Jounce stops are brand new as of a few days ago. Although they do not make contact with the lowers, they’re about 1/2 - 1 inch above.

it’s been wandering for about a month now. Ball joints are all good and new.
228.000 miles and counting.

i have the G65 and ZW7 on the rpo codes.
 
OP
OP
B

Battledrift69

TYF Newbie
Joined
Feb 7, 2021
Posts
15
Reaction score
7
Welcome to the forum from Oregon.

I think you answered your own question. You said the right rear sticks out more than the left rear. That is called dog tracking. That is an offset that can cause wandering and can be especially noticeable depending in the road crown and asphalt wear on the road. You said 4 alignments were done. Post the before and after front and rear alignment readings. I am surprised that none of the alignment guys/girls did not say anything about the rear offset.

Hopefully the frame was checked, where the steering gear mounts, for cracks.

Have you owned since new? Ever any accidents. Need to check the diamond in the frame.

This helps explain that:

Getting It Straight
First of all, no less than eight to 10 measuring points should be located and measured before determining any method of repair. Now, suppose you measure the center section of a frame that received a direct impact to the front of the right frame rail. The right rail is driven back, say 18 millimeters, behind the left. Upon measuring the end sections of the frame, you’ll learn the front is swayed to the right and the rear is swayed to the left (see Figure 1).

39946agif_00000006604.gif
At this point, you’d want to properly secure the left frame rail before you begin pulling the frame. Because the end sections are swayed, you’ll only attach your anchoring chains to the center section of the frame, which will allow the end sections to move freely as you make the necessary pulls. Two or more anchoring chains should be used, and care should be taken to ensure the anchoring chains don’t crimp or crush any brake lines, fuel lines, wiring harnesses, etc. You’ll also want to make sure the anchoring chains aren’t wrapped around or attached to anything except the frame itself. The anchoring chains should extend from the frame rail at approximately a 45-degree angle.

Now attach the pulling chains to the right frame rail in a similar manner. Like the anchoring chains, the pulling chains will produce best results if you attach them in two secure positions on the right frame rail. These positions should also be located in the center section of the frame, preferably opposite the anchoring chains. These chains should also extend from the vehicle at the same approximate 45-degree angle in the opposite direction (see Figure 2). Jack stands should be used to support the frame near the anchoring points to avoid twisting the frame or collapsing the suspension springs. At this time, simultaneously apply equal amounts of pressure to each of the pulling chains. As the force is applied, periodically check the center section with a tram gauge or with a measuring system, if possible.

39946gif_00000006605.gif
As with any pulling procedure, you’ll want to apply a specific amount of force, say 1,000 pounds, and then release the pressure and measure the result of the pull. If needed, re-apply the pressure using slightly more pressure each time and re-measure the frame after each pull. Repeat this process until the center section of the frame measures to factory specifications, and then re-measure the full frame. At this point, most or even all of the side sway in the front and rear sections should have returned to its original position. However, you may need to make additional pulls to remove the last of the side sway from the front and rear sections. On particularly stubborn frames, you may want to make side pulls to the front and/or rear sections while the center section is under the pressure of the pulling force.

Now suppose the right frame rail is back as mentioned earlier, but the front end is swayed to the left due to the direction of travel of the colliding force. In this situation, I’d recommend the same procedures. First, remove the diamond condition from the center section, and then proceed to repair the end section(s). No matter which direction the colliding force came from, it’s still the center section of the frame that should be measured and repaired first.

(If you’re fortunate enough to be employed by a facility that’s equipped with a holding system designed specifically for frame vehicles, good for you. Better-quality frame equipment is designed so a vehicle’s frame can be securely mounted to the holding system at the center section’s four control points.) Once the vehicle is securely mounted, the mounts on either frame rail can be moved forward or back on the holding system to remove a diamond condition in the center section. As described earlier, you’d want to push or pull the frame to a known point and then release pressure so you can measure the result of each pull.


Got It Straight?
When this condition occurs in unibody vehicles, it’s commonly referred to as misaligned control points or a misaligned center section. No matter what name you choose to call it, the repair procedure is basically the same:

  1. Use the measuring system. Proper use of the measuring system saves time by telling us exactly where the damage is located.
  2. Start with the inner-most damage and work your way out. I often make some rough pulls on the end section of a vehicle during my initial disassembly, but I always pull the center section (if it’s damaged) to factory specifications before starting any serious repairs to the end sections.
One more thing: Although there are certain guidelines allowing and limiting the use of heat in frame repair, I personally choose not to heat frames any more than is necessary — and usually as a last resort. If heat must be used, consult I-CAR, ASE or the vehicle manufacturer’s guidelines regarding structural-steel heat temperature and time limits for the vehicle being repaired. It’s important to use heat-sensitive crayons at your recommended temperature and one each at a slightly higher/lower temperature to ensure the recommended temperature is reached, but not exceeded. And I don’t use heat on unibody vehicles at all.


The Diamond Dilemma
Repairing diamond frames shouldn’t be tricky — although some technicians make it tricky. Quit it. By following the simple steps outlined in this article, these types of repairs will go much smoother, much faster and be much more profitable.

I bought it 2 years ago now, previous owner was the original owner. No accidents were on the record.

I’ve had the frame checked for any tweaks or damages and they said it had neither.

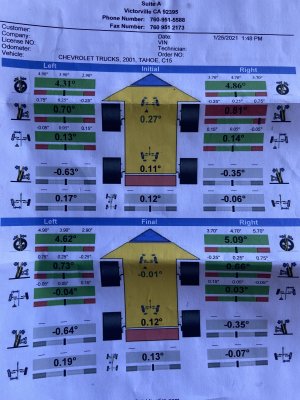
This is the most recent alignment I’ve received

6E5CEDDB-AA90-43B9-8189-7607AF3C19B9.jpeg
 
OP
OP
B

Battledrift69

TYF Newbie
Joined
Feb 7, 2021
Posts
15
Reaction score
7
Your new steering box could be junk out of the box. Not uncommon

I thought about this as well when I finally got to test drive it after installation. The new box did solve the sloppy steering I had beforehand though. It has no play at all l.
 

Forum statistics

Threads
132,965
Posts
1,877,439
Members
97,893
Latest member
Rmcoy0017
Top