2013 Escalade ESV Next BIG adventure: Cooling system refresh, Big 3 Electrical upgrade, Reseal intake, and VLOM mod...

Disclaimer: Links on this page pointing to Amazon, eBay and other sites may include affiliate code. If you click them and make a purchase, we may earn a small commission.

OP
OP
skpyle

skpyle

Full Access Member
Joined
May 15, 2021
Posts
412
Reaction score
1,081
Luckily for me, the removal tool did not slip off and the pulley started moving off the crankshaft snout with me just using a long handled 1/2" drive ratchet. It did take many, many cranks on the ratchet to get the pulley completely off.


2023-12-17 023.JPG
Old pulley at left, new pulley at right. Note the flats cast into the backside of the hub. This is where the notches on the removal tool arms sit.


Pulley out of the way, I replaced the front main seal. Old seal looked good. Too bad. I always replace a seal for a rotating component whenever I remove said component. Old one popped right out with two tugs on a seal puller. I coated the lips of the new seal with assembly lube and tapped it in flush and even with the timing cover surface.


2023-12-17 020.JPG
Old front main seal in place in the timing cover.


2023-12-17 026.JPG
Old seal at left, new GM seal 12585673 at right.


2023-12-17 032.JPG
New seal installed flush with timing cover, lips coated in assembly lube.
 
OP
OP
skpyle

skpyle

Full Access Member
Joined
May 15, 2021
Posts
412
Reaction score
1,081
2023-12-17 021.JPG
Old OEM crankshaft pulley at left, new OEM GM 19300488 pulley at right.


2023-12-17 024.JPG
Backsides of the pulleys, old at left, new at right.


The new crankshaft pulley went on smoothly. I was able to start it on the crankshaft snout by hand just enough for it to stay in place. Though I was pretty sure it was going to fall and cave in my skull. I quickly assembled the installation tool (eerie foreshadowing music...) and threaded the shaft into the crankshaft. The tool smoothly pushed the pulley onto the crankshaft snout with my long handled 1/2" drive ratchet. Again, it took many, many cranks of the ratchet to seat the balancer. Too many, in fact...


2023-12-17 033.JPG
New crankshaft pulley started on the crankshaft snout, installer tool in position.


I made two mistakes using the pulley installer tool:
1) I did not feel the pulley seat on the crankshaft shoulder, and kept turning the ratchet. This drove the thrust bearing into the washer and bowled it. Dummy. I will get a thicker washer and pay closer attention in the future.
2) In my haste to assemble the installer tool, I assembled the thrust bearing with one of its races backwards. Meaning the thrust balls were running against the smooth backside instead of the grooved frontside. Tool worked just fine. It just ruined the thrust bearing. The smooth backside of the race is now badly grooved and damaged. As well as being distorted. And the thrust balls are now suspect. Surprisingly, the installer tool I bought came with not one but TWO thrust bearing assemblies. Almost as if they knew I was an idiot...


2023-12-17 040.JPG
Results of me being stupid. Washer is now bowled. Thrust bearing race backside at left is undamaged. Thrust bearing race backside at right is grooved and damaged from being installed backwards.
 
OP
OP
skpyle

skpyle

Full Access Member
Joined
May 15, 2021
Posts
412
Reaction score
1,081
I chose to use a new torque to yield bolt to retain the new crankshaft pulley. I looked at the ARP bolt, and decided I would be OK with the OEM bolt.


2023-12-17 025.JPG
Old bolt at left, new GM 12557840 torque to yield bolt at right.


I followed the service manual procedure to install the crankshaft pulley:

-install and tighten the OLD bolt to 240 ft/lbs
-removed OLD bolt
-verified crankshaft snout was between 2.4mm - 4.48mm (mine was 4.02mm) recessed below the surface of the pulley hub
-install and tighten the NEW bolt to 110 ft/lbs
-loosen the NEW bolt 360 degrees
-tighten the NEW bolt to 59 ft/lbs
-tighten the NEW bolt an additional 125 degrees

Getting all 125 degrees was a bear. I ended up laying on my back, bracing my right hand on the frame, and pulling with my left arm for all I was worth. It took a few pulls to get all 125 degrees, but I got them. Torque ended up being 403.5 Nm (297.6 ft/lbs)


2023-12-17 035.JPG


2023-12-17 037.JPG


With that, I had completed the tasks for the day. Disregard the fact it took me ALL day... I packed up and went inside at this point.


2023-12-17 038.JPG
New crankshaft pulley, new bolt, and new front main seal.
 
Last edited:

j91z28d1

Full Access Member
Joined
Feb 28, 2022
Posts
3,076
Reaction score
3,801
good job getting the bolt fully tighten. I think most people give up, think it's tight enough and be good. I have only done it once, not on truck thou. I said if I ever had to do it again, I'd think about selling the car first haha.

I tried for a bit on those rear fittings and figured I'd try later with some different tools. most of my stuff is at work.

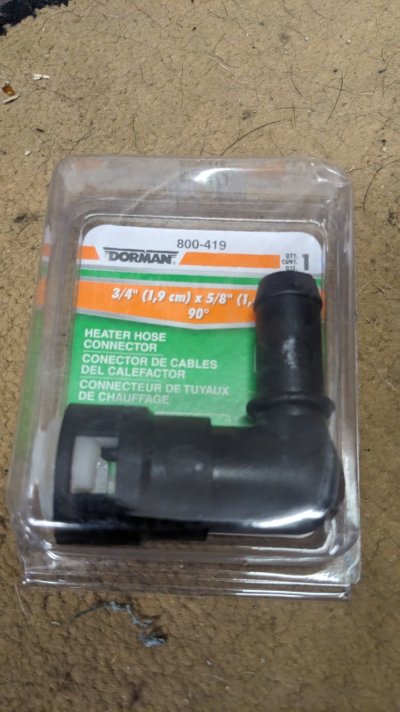
these are the elbows I ordered from a part number off this board. I haven't used them yet thou. was thinking I'd just cut the hose off the pipe end and use a normal clamp. I have replaced all the coolent and heater hoses at this point except these rear ones. of course being a hybrid nothing was the same size as expected haha. PXL_20231218_011802495.MP.jpg

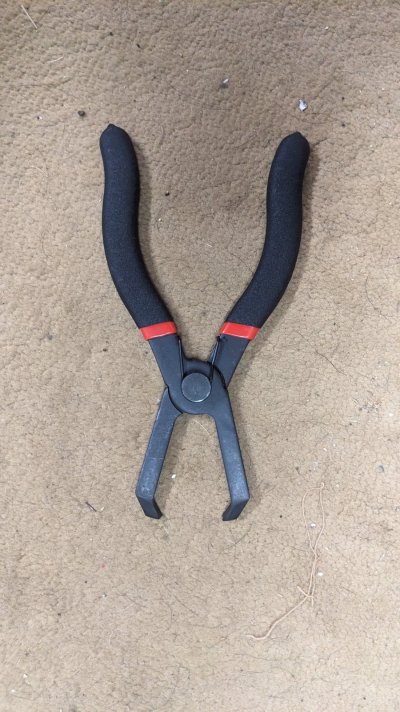
I don't know forsure they'd work, but they were cheap so I picked up these pliers hoping they would be useful.
PXL_20231218_011854266.jpg
 
OP
OP
skpyle

skpyle

Full Access Member
Joined
May 15, 2021
Posts
412
Reaction score
1,081
good job getting the bolt fully tighten. I think most people give up, think it's tight enough and be good. I have only done it once, not on truck thou. I said if I ever had to do it again, I'd think about selling the car first haha.

I tried for a bit on those rear fittings and figured I'd try later with some different tools. most of my stuff is at work.

these are the elbows I ordered from a part number off this board. I haven't used them yet thou. was thinking I'd just cut the hose off the pipe end and use a normal clamp. I have replaced all the coolent and heater hoses at this point except these rear ones. of course being a hybrid nothing was the same size as expected haha. View attachment 416743

I don't know forsure they'd work, but they were cheap so I picked up these pliers hoping they would be useful.
View attachment 416744

Thanks! I learned years ago that there is no such thing as 'good enough' for heavy torque specs. Angle torquing is no different.

Hmmm...I had seen those elbows before, but didn't think about using them. Good to know if I screw up and break one, I can replace it with that.

I have those exact pliers! Never occurred to me to use them on this job. I will try them when I get back to my Escalade.

Thanks!
 

JPS0284

Full Access Member
Joined
Jul 14, 2023
Posts
190
Reaction score
123
I chose to use a new torque to yield bolt to retain the new crankshaft pulley. I looked at the ARP bolt, and decided I would be OK with the OEM bolt.


View attachment 416731
Old bolt at left, new GM 12557840 torque to yield bolt at right.


I followed the service manual procedure to install the crankshaft pulley:

-install and tighten the OLD bolt to 240 ft/lbs
-removed OLD bolt
-verified crankshaft snout was between 2.4mm - 4.48mm (mine was 4.02mm)
-install and tighten the NEW bolt to 110 ft/lbs
-loosen the NEW bolt 360 degrees
-tighten the NEW bolt to 59 ft/lbs
-tighten the NEW bolt an additional 125 degrees

Getting all 125 degrees was a bear. I ended up laying on my back, bracing my right hand on the frame, and pulling with my left arm for all I was worth. It took a few pulls to get all 125 degrees, but I got them. Torque ended up being 403.5 Nm (297.6 ft/lbs)


View attachment 416732


View attachment 416733


With that, I had completed the tasks for the day. Disregard the fact it took me ALL day... I packed up and went inside at this point.


View attachment 416734
New crankshaft pulley, new bolt, and new front main seal.
The only thing I can see wrong with this picture is that it’s missing the 8 Rib for the LSA SC :D gj
 

JPS0284

Full Access Member
Joined
Jul 14, 2023
Posts
190
Reaction score
123
OK, I am getting cold feet.
I have read through various procedures in the service manual, and this is becoming a steeper and steeper slippery slope.

To replace the VVT actuator (camshaft sprocket):
-lower front differential
-remove oil pan
-remove timing cover
-remove oil pump
-remove timing chain tensioner
-remove VVT actuator and timing chain

And this is on the edge of the cliff of:
Since you was in there...
AMF Delete
-'Just Pop the heads off to replace the lifters.'
-pull the radiator
-pull the AC condenser
-pull the auxiliary transmission cooler
-replace camshaft


To be honest, that is WAY more money and time than I want to do right now.
The scope of what I am doing now was some preventive maintenance. My intent was only to have my Escalade down for a couple-three weeks.
All the above will add considerably more time to this.
I replaced my cam phaser when doing my afm delete cam upgrade (not by choice) and it’s not for the faint hearted. The cam pin hole on the back of the phaser is a completely blind fit. It’s easy during the test fit while lining up the timing markers but once you get the chain on you nearly loose all feeling for the pin. It’s pretty nerve wracking to say the least and I had a buddy helping. Also you don’t need to pull the condenser for a cam swap, just the fans and radiator need to be pulled to get the cam in.
 

Monz11

Full Access Member
Joined
Mar 20, 2020
Posts
252
Reaction score
617
Location
Da Burg, Fl
I replaced the little O-rings for the front steam bleed crossover tube. And the slit rubber hose that covers the metal line. I do not understand what that is for. I ordered that hose, as it was listed as 'bleed crossover hose' so I thought I needed it. The new one came in the GM bag slit down the middle. I thought it was defective. And ordered another. And realized I am defective.


View attachment 416073


Something I did note. The Fel-Pro gasket set came with two sets of seals, and the service manual talks about the rear bleed port block off plates. Since I had the intake manifold off, I believed this was the perfect time to replace the seals under the block off plates. Except my 2013 L94 does not have the rear bleed ports. The head castings have dimples for the bleed ports and bolt holes, but no drilled passages. So I did nothing. :D


View attachment 416074
Right cylinder head rear bleed port not drilled. (Sorry for the lousy photo.)


View attachment 416075
Left cylinder head rear bleed port not drilled. (Sorry for the lousy photo.)


Two things I forgot to mention:

I used the OEM rubber lined metal gaskets for the water pump mounting. I had read that aftermarket gaskets tended to not seal as well. Didn't want to find out the hard way.

I went with the OEM plastic heater Tees because they lasted 150,000+ miles. Yes, it is a flawed design that can fail. However, if kept up with, they are OK. So I am good with that.


View attachment 416077
Original OEM water pump gaskets at top, new OEM water pump gaskets at bottom.


View attachment 416078
New OEM heater Tees at top, old OEM heater Tees at bottom.
Seth, just as a backup look into gruven parts heater tees and outlets. Those plastic ones suck and are prone to breaking. These may help fo rear as well
 
Last edited:

Forum statistics

Threads
132,301
Posts
1,865,659
Members
96,890
Latest member
Rednim

Latest posts

Top