PoPoPPV
Full Access Member
Nilleo that's is solid work right there!
 PoPo
PoPo
 PoPo
PoPoDisclaimer: Links on this page pointing to Amazon, eBay and other sites may include affiliate code. If you click them and make a purchase, we may earn a small commission.
 PoPo
PoPoI am wondering if this project is in my skill set. Pics would help but I can't see any. Can you send them or something?For some reason the pictures don't work
Oh, you’re one of those.... need pics to read a book... its ok my kids used to be the same......I am wondering if this project is in my skill set. Pics would help but I can't see any. Can you send them or something?
Thanks
Sent from my SM-G930T using Tapatalk
Not sure what's up on your end, but the pics are there, I just checked from a public computer and theyret there. Make sure you're able to visit imgur.com, that's where they're hosted.I am wondering if this project is in my skill set. Pics would help but I can't see any. Can you send them or something?
Thanks
Sent from my SM-G930T using Tapatalk
Ha. Where is the book?Oh, you’re one of those.... need pics to read a book... its ok my kids used to be the same......
Alright. I'm going to attempt FOG LIGHT install soon. All parts are on order. I will update as I install. I'm going a different and a lot easier route. I will use OEM switch; however, that is only OEM part i'm using. Essentially it will be Fuse box(add-a-circuit) (retained accessory power fuse)>Ground Switch Module<>OEM Switch>Relay harness that came with fog lights>fog lights. This allows a memory function also... so if lights were on when car turned off... then they will turn back on when car starts. Fingers crossed this works first try!
Thanks for the information, inspiration & the time you took to write this! . I did only two things differently. The black wire from the 611T is grounded to the chassis for memory & I also ran a direct line from #85 on the relay, through the fire wall to the brown wire from the 611T.Hey all,
I wasn't able to find many (or any) cases where aftermarket fog lamps were added to a 2015+ Suburban /Tahoe (or similar generation) with the OEM switch, so I created an account here to share for anyone else that's interested.
Let's get to it…
Tools you'll need:
7mm socket driver
10mm socket driver
T15 torx driver
Suggested tools:
Clip removal tool
Electrical tape
Wire ties
Parts used:
Spyder FL-CTAH15-C fog lamp kit
GM headlamp switch w/fog part# 22752195
DEI 611T
Preface
I was hoping to use as much factory wiring for this installation as possible to keep everything as “factory” as possible, but mostly to avoid doing more work than I had to. I dug into some schematics to see what the factory wiring was like and then proceeded to look for all the wires in the truck before getting dirty.
The good news – the factory fog lamp fuse was installed in the fusebox from the factory, woohoo. Also, the wire from the headlamp switch harness to the BCM was present at the headlight switch and at the BCM. The wire from the BCM to the underhood fuse box for the OE fog lamp relay trigger was also present at both the BCM and the underhood fuse box, excellent!
The bad news – the wires that are supposed to go from the fusebox to the factory fog lamps weren't in the wire bundle going to the front grille where they're supposed to be. I investigated further and found that the wire isn't even pinned in at the fusebox, way to cheap out GM!
Here's where the wire should go, notice how pins are populated to the left and right of the pin we need, but not where we want one

This setback meant that I would have to run my own wiring from the aftermarket fog lamps to the battery, and a relay to to control it all. I'll still be using the factory trigger wire for the factory fog lamp relay and just use that to trigger my relay.
Reverse engineering
The factory front fog lamp circuit works as follows – when you press and release the fog lamp request button at the headlamp switch, this sends a ground pulse to the BCM. The BCM interprets this pulse as a request to turn the fog lamps on, and if the headlamps are on, it sends a ground signal to the underhood fusebox to the fog lamp relay. When the fog lamp relay clicks on, it sends power to the front fog lamps and there ya have it.
Since I don't have access to a programming tool to enable the fog lamps feature on the BCM, it didn't do anything when I installed the new switch, as expected. No matter, I brought the 611T into the picture to replace the BCM's role in this party. So the 611T will take the momentary pulse from the fog lamp switch and control a latching on/off ground output that I will feed into the factory fog lamp relay wiring. Since the factory fog lamp relay wiring is missing at the fusebox and I'll be using my own relay, I'm pretty much just hijacking this wire as a way to get through the firewall without running any new wiring.
611T wiring
Black – to BCM brown connector, Blue - pin 22
Green – to headlamp switch, Blue/Gray – pin 6
Red – to BCM brown connector, Red/White – pin 4
Yellow – to BCM brown connector, Blue – pin 22
Brown – to BCM brown connector, Brown – pin 10
611T wiring explained
The module is “active” when the Black wire is at ground and the Red wire is at 12V+. I wired it up so that it only has ground when the parking lamps are active so that the fog lamps can only come on when the parking lamps are on, and turn off when the parking lamps turn off. The Green wire receives the momentary pulse from the headlamp switch to control the MOSFET that the Yellow and Brown wires go to. The Yellow wire is looped over to the Black wire so that it only has a ground input when the parking lamps are on as well. Lastly the Brown wire is what will trigger the aftermarket fog lamp relay on/off witch each press of the fog lamp switch when the parking lamps are on.
Interior Disassembly
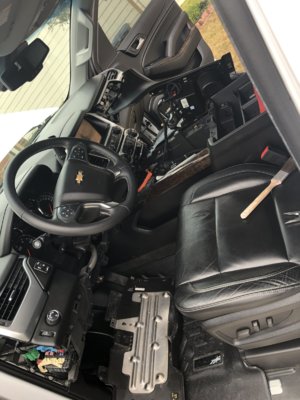
Remove the fuse panel lid on the left side of the dashboard – it's the large plastic panel covering the interior fuses on the left dash.
With that door off, remove two T15 torx screws from the side of the lower dash panel as shown.

Next, remove another two T15 torx screws holding the lower dash panel from underneath, they should be easily visible.

Optional – use a small flathead screwdriver to unclip the hood release latch and separate it from the panel. You don't have to do this, but doing so will let you completely set that panel aside once you unclip it from the rest of the dash assembly.
You should now be able to unclip the lower dash panel. There are about 3-4 clips holding it on now, just get a good grip and pull towards the rear of the truck. These clips can be stubburn.
Once you take off that lower dash panel, you should now see two 7mm bolts holding the switch panel in place. Take those bolts off and pull that panel off – again, pull toward the rear. There are maybe two or so clips on this one. Unplug the harnesses and swap out your switch then set the whole thing aside.

The switch is held on with these clips...


Exterior Disassembly
Start the engine and turn the wheels all the way to one side.
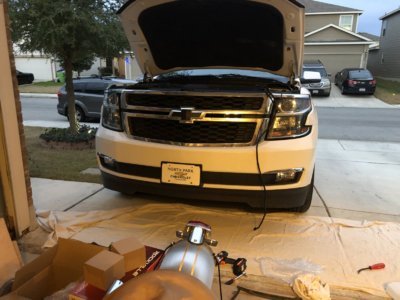
Remove the 7mm bolts securing the felt wheel-well cover on the front bumper.

Get under the bumper and remove two 10mm bolts and a clip holding the felt cover on from each side of the truck.

Reach in and remove four 10mm bolts holding on the fog lamp blanks. (the left-most screw is out of view in the image below due to the angle)

Put the new fog lamps on, turn your wiring up through the fender and into the hood area, and put it all back together if you'd like. Don't forget to secure the wiring with a few wire ties to keep everything tidy.
Wiring
Headlamp switch
Fog lamp request wire (Blue/Gray)

BCM
X5 connector with parking lamp (Blue) and fog lamp (Brown) relay activation wires and a decent constant 12V+ source (Red/White) for the 611T note: the fog lamp relay wire may be Brown or Brown/White, take note of which color it is for you!

Underhood
Trigger wire for your fog lamp relay, should be the same color as you found inside at the BCM

Just in case it's not exactly clear from the previous picture where that harness is, here's a more zoomed out shot

Good 12V+ source for your fog lamp relay

Appendix
For your reference, here's a rough block schematic of some of the circuits discussed here.

And lastly the final product
All lamps on

Parking lamps and fog lamps only

Fog lamps off


