ypsetihw
Full Access Member
This is a great, simple, effective, and free mod that any owner of any model year can take advantage of. The plan is to get the most flow possible from the stock airbox setup while keeping a stock appearance. Great for all the sleepers out there, or those who want to leave the stock parts but optimize their performance.

The way the airbox works is that it has a dirty side (the bottom) a filter, and a clean side all in a sandwich. As such, we can open up the dirty side to allow more air in, while still channeling all the flow through the filter and leaving the upper airbox untouched.
Here's what you'll need:
- 10 mins
- cordless drill
- flathead and phillips screwdrivers
- new high flow filter (k&n or other, optional)
- MAF cleaner (optional)
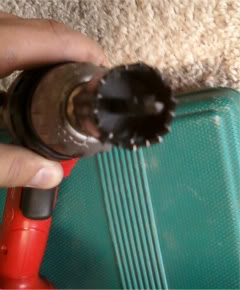
- hole cutter bit (1")

Lets get down to work!
1. open the hood
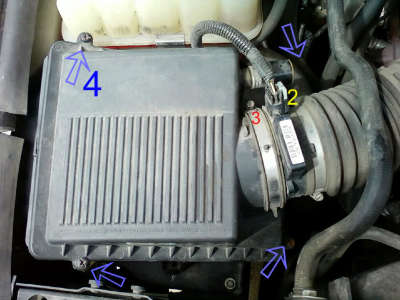
2. disconnect the MAF wiring - pull up on the gray tab then push in, depress the black button and pull out. these are security tabs and are VERY easy to break if you muscle them too much.
3. loosen the MAF to airbox clamp (flathead)
4. undo the upper airbox bolts x 4 of them - they stay in the housing and don't come all the way out (phillips)

5. remove the upper airbox by pulling it up and away from the engine, sliding it outta the clamp on the MAF
6. remove the old air filter and set aside if you're gonna reuse it
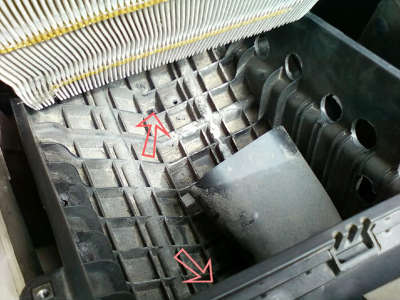
7. now we can see the object of our project - the lower airbox housing. the housing is attached to the bracket by three rubber grommets on the bottom of the box (two are indicated by the red arrows). grasp the lower airbox firmly near one of the grommets and pull up sharply. it should pop right out.

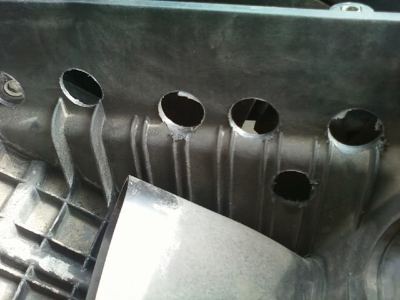
8. notice how the two stock inlets are only a few square inches? time to get drillin and open her up! use the hole cutter bit to cut a bunch of holes in the sides of the lower airbox housing, taking care not to break any of the tabs or mess up the inner air conduit. you should have plenty of room to drill at least 12 1" holes around the sides and front of the lower airbox. keep in mind that the filter protrudes down about an inch so make your holes at least this far from the top lip of the box.
9. once you're satisfied with the drilling, put it all back together. line up the three grommets first, then push down firmly above each one. you should feel them "pop" back in, and the lower airbox should sit in there snug once again.
10. put your old filter back or throw in the new high flow one. if you can see a lot of the filter protruding through your holes, you drilled too high up. not a big deal, but too late now!
11. reassemble the upper airbox and reconnect the MAF. this is a great chance to clean the MAF btw (take it off the car duh . . . don't spray MAF cleaner into your intake).
12. start her up, notice the slight increase in throttle response, torque and smoothness at high rpm, and a touch of intake noise.

The way the airbox works is that it has a dirty side (the bottom) a filter, and a clean side all in a sandwich. As such, we can open up the dirty side to allow more air in, while still channeling all the flow through the filter and leaving the upper airbox untouched.
Here's what you'll need:
- 10 mins
- cordless drill
- flathead and phillips screwdrivers
- new high flow filter (k&n or other, optional)
- MAF cleaner (optional)
- hole cutter bit (1")

Lets get down to work!
1. open the hood
2. disconnect the MAF wiring - pull up on the gray tab then push in, depress the black button and pull out. these are security tabs and are VERY easy to break if you muscle them too much.
3. loosen the MAF to airbox clamp (flathead)
4. undo the upper airbox bolts x 4 of them - they stay in the housing and don't come all the way out (phillips)

5. remove the upper airbox by pulling it up and away from the engine, sliding it outta the clamp on the MAF
6. remove the old air filter and set aside if you're gonna reuse it
7. now we can see the object of our project - the lower airbox housing. the housing is attached to the bracket by three rubber grommets on the bottom of the box (two are indicated by the red arrows). grasp the lower airbox firmly near one of the grommets and pull up sharply. it should pop right out.

8. notice how the two stock inlets are only a few square inches? time to get drillin and open her up! use the hole cutter bit to cut a bunch of holes in the sides of the lower airbox housing, taking care not to break any of the tabs or mess up the inner air conduit. you should have plenty of room to drill at least 12 1" holes around the sides and front of the lower airbox. keep in mind that the filter protrudes down about an inch so make your holes at least this far from the top lip of the box.
9. once you're satisfied with the drilling, put it all back together. line up the three grommets first, then push down firmly above each one. you should feel them "pop" back in, and the lower airbox should sit in there snug once again.
10. put your old filter back or throw in the new high flow one. if you can see a lot of the filter protruding through your holes, you drilled too high up. not a big deal, but too late now!
11. reassemble the upper airbox and reconnect the MAF. this is a great chance to clean the MAF btw (take it off the car duh . . . don't spray MAF cleaner into your intake).
12. start her up, notice the slight increase in throttle response, torque and smoothness at high rpm, and a touch of intake noise.

Last edited:

 - in other words, in stock config, your MAF is capable of outflowing your airbox at high rpm- so vent that thing up!