DIY: Make 2015-2017 LS/LT headlights operate like a LTZ headlight (LED as DRL vice low beams)

Disclaimer: Links on this page pointing to Amazon, eBay and other sites may include affiliate code. If you click them and make a purchase, we may earn a small commission.

Tylus

Full Access Member
Joined
Dec 24, 2013
Posts
373
Reaction score
150
Location
South GA
*** Disclaimer: Try at your own risk. I have provided some information and a method. Please be aware that you can break your vehicle. I am not responsible for what YOU do to your vehicle. That said, good luck modding. ***

Quick and painless. Takes 2 tools and about 20 minutes.

Tools:
5/16” Nut Driver
Pick

Procedure:
Drivers side
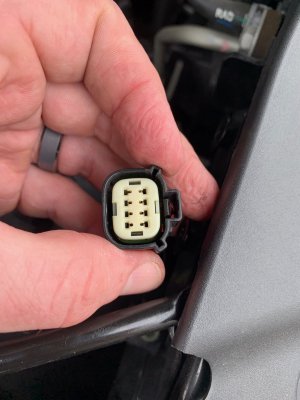
1. Unplug the 8 wire connector (only 7 present) from the headlight.
Headlight Connector.jpg
2. Strip back the tape and wire loom protector about 3”
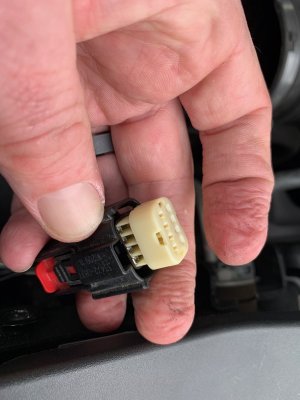
3. Using a small pick, gently remove the off-white pin separator from the connector (see picture below)
Pin Separator.jpg

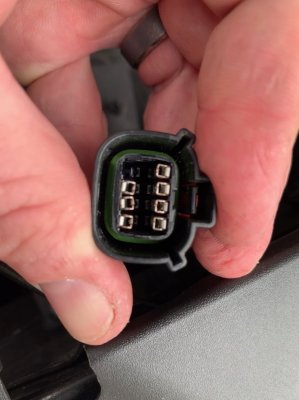
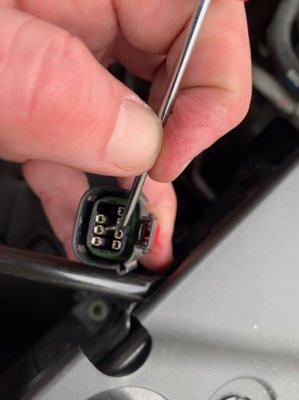
4. Gently using pick, unlatch the detent for #2 wire (yellow). Gently pull the yellow wire out bottom of the connection. Bottom of connector has numbers to indicate which wire is which.
Pin Detents.jpg
Pin Unlock.jpg
5. Gently using pick, unlatch the detent for #6 wire (purple). Gently pull the purple wire out bottom of the connection. Bottom of connector has numbers to indicate which wire is which.
5a. #7 wire will be the same purple (grey on passenger) color. Do not remove this one.
6. Feed the purple wire into the #2 spot. Align the male end to match the other pins.
7. Feed the yellow wire into the #6 spot. Align the male end to match the other pins.
8. Ensure all of the pins are aligned. #8 will be empty. Gently insert the off-white pin separator into the connector. It will click into place and sit flush.
9. Put the wire loom cover back in place and put a few wraps of electrical tape as needed. Reconnect connector to the headlight.

Passenger side
10. Using Nut driver, remove the hose clamp from air box hose to intake silencer. Remove the MAF harness. In-clip the MAF wire harness from lower ledge of the air box (by cylinder #1
11. Remove the air box. It will come out without having to take lid off.
12. Rinse and repeat for Passenger side. The #6 wire will be gray. Exact same placements as drivers side will be utilized.
13. Re-install airbox and MAF harness.

Enjoy. With headlight switch in Auto. Now whenever DRL are needed, the LED strip will turn on. And when headlights are needed, the low beam and LED strip will turn on.
LED DRL.jpg
Hard to see. But the 'Burb is in gear and the LED strips are lit (ie: as the DRL).​

See post #2 for wiring schematics and the how/why this works. Of note: whenever the running lamps are on manually, you will now have the headlights on as well.

TLDR version: swaps the low beam and the DRL circuits. LTZ uses programming to do this in PCM
 
Last edited:
OP
OP
Tylus

Tylus

Full Access Member
Joined
Dec 24, 2013
Posts
373
Reaction score
150
Location
South GA
Premise: Make 2015-2017 LS/LT headlights act like LTZ headlights

LTZ vehicles have RPO code Y91 (MERCHANDISED PKG-LUXURY EDITION…ie: Upgraded Lights). This package is a different wiring harness and uses PCM programming to accomplish LED strip as the DRL.

Chevrolet - RPO Code X88
Cadillac - RPO Code Z75
GMC - RPO Code Z88

Chevrolet LS/LT vehicles use the -Y91 wiring schematic for X88 drawing. LTZ vehicles use the Y91 section to reflect their wiring harness.

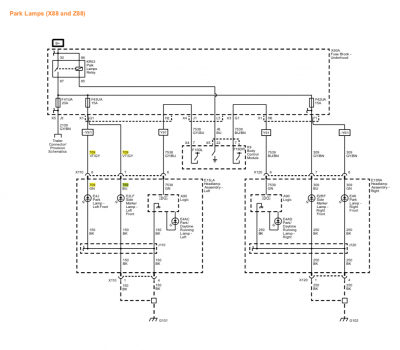
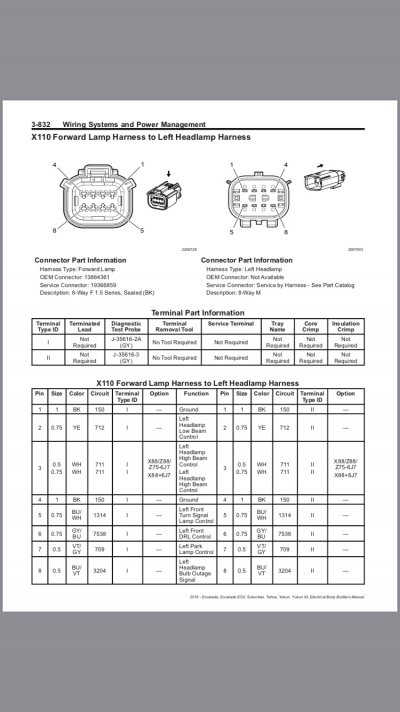
Looking at the schematic, Chevy does some funky wiring. The lights are not operated like traditional. They operate as follows:
  1. In Park, the LED strip only
  2. In any gear, the low beam lights operate as DRL
  3. Light switch manually selected to on, LED and Low Beam are powered.

Currently when in any gear the low beam lights are used for DRL. The LED strip only operates when in Park, or when dark outside (in auto on switch) or when manually turned on. From the Upfitter Manual
Description of Operation.png

To make the LED strip operate as DRL and the Low Beam only come on when required:
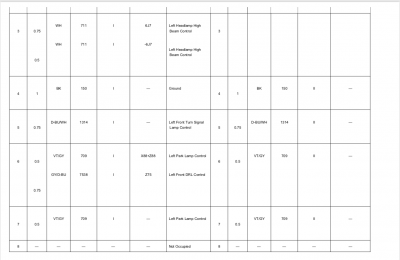
  1. Position #2 is the low beam
  2. Position #6 is the LED strip
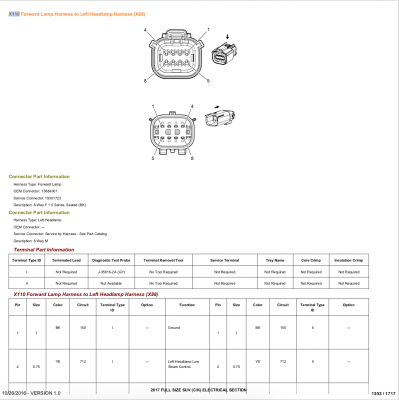
  3. Swap the #2 and #6 pinouts in the X110 and X120 connector (headlamp plugs)
  4. That’s it. The vehicle will now operate the LED strip when DRL are commanded by the PCM. And when the PCM (auto position) or switch commands all lights, the low beams will energize.
Headlight Connector
X110 #1.png
X110 #2.png
Headlamp wiring Circuit
X88 Parking Lamps.png
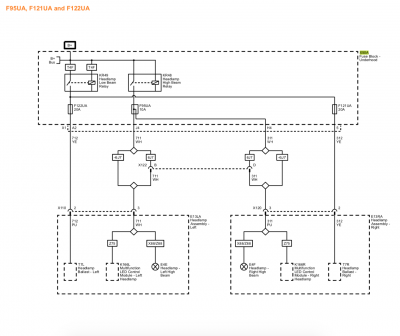
Low Beam Power Supply
Low Beam Power Schematic.png
 

BEIS

Member
Joined
Jun 21, 2017
Posts
41
Reaction score
34
This is great. Thanks for your work on this. Now, if we could only figure out how to make the LED strips brighter like the LTZ during the day time.
 
OP
OP
Tylus

Tylus

Full Access Member
Joined
Dec 24, 2013
Posts
373
Reaction score
150
Location
South GA
This is great. Thanks for your work on this. Now, if we could only figure out how to make the LED strips brighter like the LTZ during the day time.
If you look at the wiring diagram, the LTZ LED strip is physically different than LS/LT LED.

I R Mekanic, but it looks like a logic circuit for the Y91 setup that allows for variations. Which gives us the brightness difference.

I haven’t dug through the upfitter manual yet, but I’m betting there are 2 different part numbers.
 
Last edited:

Kpwweb

Full Access Member
Joined
Dec 11, 2015
Posts
695
Reaction score
299
I think this is great!

I wonder if there is a problem feeding the LEDs with the PWM signal from the low beams?

Conversely, is there a problem feeding the lamps straight 12V without the PWM? Shortened life maybe? Course it would help with hid conversions!

Thank you for the great research and write-up!!
 
OP
OP
Tylus

Tylus

Full Access Member
Joined
Dec 24, 2013
Posts
373
Reaction score
150
Location
South GA
I wonder if there is a problem feeding the LEDs with the PWM signal from the low beams?

Conversely, is there a problem feeding the lamps straight 12V without the PWM? Shortened life maybe? Course it would help with hid conversions!
The -Y91 harness essentially feeds directly off the fuse box. 20A for lows, 15A for the LED. Plenty of power to drive HID. But probably better to drive HID off a separate 12v battery source.
X88 Parking Lamps.png

I was initially concerned about swapping the leads. But I also have LED low beams. And they draw less than the halogen H11 bulbs. Evens out in my head.

Even temporarily kicked around the idea of doing a 12v relay for the lows (like discussed above for HID). Use the Purple/Grey wires to trigger the relay and energize low beams. If I have issues, I will swap to that.


Whole point of this was to keep it clean and minimize (hopefully) any issues with aftermarket equipment. My fog lights don’t work at the moment. The relay failed today while I was under the hood. What I get for using cheap Chinese stuff lol

Low Beam Power Schematic.png
 

LT1ZOB

Full Access Member
Joined
Jul 10, 2018
Posts
409
Reaction score
507
Thank you OP. Your write up is great. Will do this as soon as I have some time
 

fire730

Full Access Member
Joined
Jan 4, 2010
Posts
979
Reaction score
29
Location
Louisiana
Great work.
I wish I would have seen this when I had my whole front end off to change my condenser on Friday night.
 
OP
OP
Tylus

Tylus

Full Access Member
Joined
Dec 24, 2013
Posts
373
Reaction score
150
Location
South GA
Great work.
I wish I would have seen this when I had my whole front end off to change my condenser on Friday night.
You can access the drivers side without any disassembly

Passenger side is just the air box.

About as easy a “mod” as can be luckily
 

cmatt

Full Access Member
Joined
Apr 29, 2009
Posts
604
Reaction score
652
@Tylus very well done. I actually just built pigtail harnesses that swap these circuits so the factory forward lamp harness doesn't have to be modified. That way it's plug and play and reversible.


I updated the pic with the finished harnesses (taped & wire loom like the factory harness)
73bc77d3788d83301c963c4e3fc48c50.jpg


Couple questions:

1. You mentioned the Y91 forward lamp harness is larger to allow for more voltage draw. However, the wire gauge sizes are similar across the suv platforms at the headlamp connectors. The only exceptions are for those with RPO 6J7 (for PPV highbeam flasher) and the Escalade DRL circuit. Both are 18AWG instead of 20AWG in those instances. What am I missing? In 2018, when GM began using the LED strip for DRLs on all Tahoes, the main harness change I see is the wire at position 6 on the headlamp connectors only being 18AWG and only describing it as the DRL Control circuit.

c619c0c906589df3314e2f1318b1756f.jpg


2. I also saw where you said the wiring diagram showed the LTZ LED strip being physically different. Can you expand on which diagram and where it shows that? I'm not seeing it.

Getting the LED strip to have the same brightness as the LTZ version is what I've been working on. What I haven't determined yet is whether the LED strip hardware is different on the LTZ or if it's the circuitry/programming on the components inside the headlamp assembly. The parts catalog I can see doesn't show anything about the LED (only HID/non-HID assembly). Like @Kpwweb mentioned, I wonder if it's a PWM control issue where bypassing it with a relay would work. Although, if that's the case, I would think Gen5DIY's $230 LED DRL harness with its relays would address it. They make a point to state the LED brightness won't change. Maybe that's all their harness does, swap the circuits and use the DRL control to activate relays to provide a constant +12v. They even give the same disclaimer on park lamp/headlamp functionality change that you noted. What are your thoughts?

The only other way I'm currently aware of to do this is with three relays. That allows the LED strip to function as DRLs and keep factory functionality with the other headlamp functions. That's the way @73Vetteman did it.

I'm happy to build the pigtail harnesses with or without the relays for those interested. I'll even do the install with the relays if you'll come to me so I can verify the LED brightness. I'm in Mobile, AL.
 
Last edited:

Forum statistics

Threads
132,087
Posts
1,862,135
Members
96,554
Latest member
eod_tech

Latest posts

Top