Heater fan problem, HELP IT'S COLD OUT!!!

Disclaimer: Links on this page pointing to Amazon, eBay and other sites may include affiliate code. If you click them and make a purchase, we may earn a small commission.

Evil 'Bird

Full Access Member
Joined
Nov 21, 2009
Posts
58
Reaction score
1
Location
Connecticut
Glad you got it fig'ed out! mine still wont work on high:emotions122:

Hello from 20 min south!

99YUK thankyou for posting the schematic!!! :Handshake:

YOU TOO?

yea my fan stopped working last year so i tested it and it has a bad ground...put a new ground wire on and it been working except on the highest setting??????? :emotions122:
 

TIM Z

DMAX Power
Joined
Oct 20, 2009
Posts
346
Reaction score
1
Location
Navarre Ohio
YOU TOO?

yea my fan stopped working last year so i tested it and it has a bad ground...put a new ground wire on and it been working except on the highest setting??????? :emotions122:

Yep, mine and my dads 96 suburban both. replaced everthing but the motor in both of them, going to try the motor next.
 

fowldarr

TYF Newbie
Joined
Aug 27, 2009
Posts
22
Reaction score
0
Location
Nebraska
I keep my ice scraper handy to wack the lower dash to kick mine on, if anyone has a pic of what wires they are finding bad, that would be cool.
 

rucr8z2

Full Access Member
Joined
Nov 11, 2009
Posts
100
Reaction score
3
Location
Saluda,Va.
try smacking the fan instead of the dash and 8/10 times the fan elec brushes are bad
 

qlc1964

qlc1964
Joined
May 2, 2009
Posts
168
Reaction score
2
my fan was working last monday then tuesday it didn't come

on at all i checked for power it had it to the fan connector so i

took the fan out and wired it straight to the batt and it worked.

But it arced when touch the ground wire to it a little to much

i think (too much current draw) possible. i then took the relay

out which was working and three terminals was a little brown

then the fan speed resister and the coils was all so brown i

just replaced all three works fine now. i knew i need to change

the fan it was making chirping sounds on low speed for 2 yrs.
 

Popeye

Full Access Member
Joined
Jan 25, 2010
Posts
91
Reaction score
0
Location
Ontario, Canada
my fan was working last monday then tuesday it didn't come on at all i checked for power it had it to the fan connector so i took the fan out and wired it straight to the batt and it worked. But it arced when touch the ground wire to it a little to much i think (too much current draw) possible. i then took the relay out which was working and three terminals was a little brown then the fan speed resister and the coils was all so brown i just replaced all three works fine now. i knew i need to change
the fan it was making chirping sounds on low speed for 2 yrs.

Just my luck, the snow gets here and the heater dies on me. For some time it has been making these chirping sounds and the other day it just plain would not start. Not sure where to start. Would love to see some diagrams/pictures of this HVAC unit before i start ripping things apart. Can some one help me please, the heated seats are not enough to keep me turning blue in the morning.

The Blowermotor.pdf link from 99YUK does not work, does anyone have a copy of same. thx for your help.

Added some threads that will come in handy for other users
excellent thread

Removing the Glove Box

Replacing the resistor/glovebox with pics

Procedure from Sunlitcomet
 
Last edited:

SunlitComet

OBS Jedi-Do Good
Joined
Sep 30, 2010
Posts
16,206
Reaction score
188
Location
unknown at this time.
  1. Disconnect the negative battery cable.
  2. Remove the Instrument Panel (IP ) storage compartment.
  3. Remove the front screw from the right door sill plate.
  4. Remove the right hinge pillar trim plate.
  5. Disconnect the electrical connectors from the blower motor, as necessary.
  6. Remove the bolt from the right lower IP support.
  7. Remove the blower motor cover.
  8. Remove the motor cooling tube.


82131219


  1. Remove the blower motor flange screws and ferrules.
  2. Perform the following steps in order to remove the blower motor:

    • Carefully pull the blower motor forward in order to avoid distorting the blower motor fan.
    • If necessary, pry back the right side of the IP.

  1. Inspect the blower motor terminals for distortion.
  2. Clean corrosion from the terminals as necessary.
  3. Replace the blower motor as necessary.
  4. Inspect the flange of the blower motor for damage or distortion that may cause an air leak.
  5. Repair the flange as necessary.
  6. Inspect the blower fan for any damage and distortion.
INSTALLATION PROCEDURE


  1. Guide the blower motor and blower fan into position. Be careful in order not to catch the blower fan on any protruding components. NOTE : Refer to Fastener Notice in Cautions and Notices.
  2. Install the blower motor flange ferrules and screws. Tighten Tighten the blower motor mounting screws to 2.1 N.m (20 lb in) .
  3. Install the blower motor cooling tube.
  4. Install the blower motor cover.
  5. Install the bolt to the right lower IP support.
  6. Install the electrical connectors to the blower motor, as necessary.
  7. Install the right hinge pillar trim panel.
  8. Install the front screw into the door sill plate.
  9. Install the instrument panel storage compartment.
  10. Install the negative battery cable.
  11. Verify the circuit operation.
 

Popeye

Full Access Member
Joined
Jan 25, 2010
Posts
91
Reaction score
0
Location
Ontario, Canada
Thanks for the quick reply SunLitComet. i will start working on this today. Any additional pics (if anyone has any) would be apreciated.
 

Popeye

Full Access Member
Joined
Jan 25, 2010
Posts
91
Reaction score
0
Location
Ontario, Canada
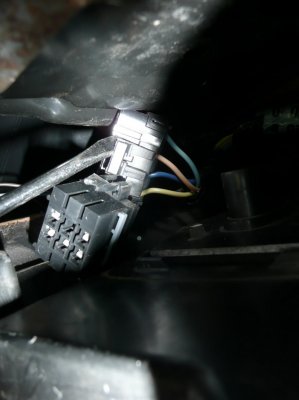
I removed the glove box and managed to wrestle the power cables off as seen in Pic1. I verifed the fan speed resistor condition, like new. so i put it back and checked the voltage to the terminals. At no point of my testing i had any power to the fan speed resistor (i verifed green/brown/blue/yellow). Test was to start engine and start the blower motor via switch using all settings. Low - High.

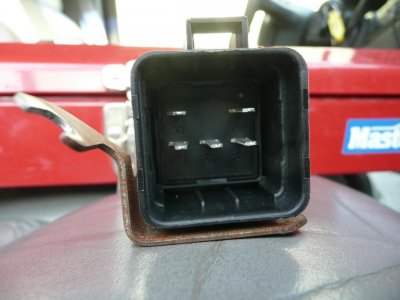
The relay had power to terminal 87 even when the vehical is switched off. This condition did not change ay any point of my testing. i.e. There is power to terminal 87 on the relay but nowhere else.

Any ideas what is blown? Do you folks think i need a new relay?

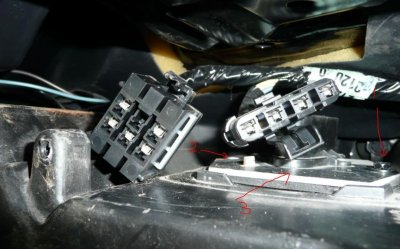
For anyone who does not know, pic 3 shows 1 and 2 bolts that needs to be removed to get at plate #3. Under that plate is the fan resistor. I assume you already guessed that the bolt on the far left of the pic has to come out first.
 

Attachments

  • 016.jpg
    016.jpg
    84.2 KB · Views: 4
  • 014.jpg
    014.jpg
    79.1 KB · Views: 4
  • tahoe_Blower_Motor.jpg
    tahoe_Blower_Motor.jpg
    93.4 KB · Views: 5
Last edited:

SunlitComet

OBS Jedi-Do Good
Joined
Sep 30, 2010
Posts
16,206
Reaction score
188
Location
unknown at this time.
If 87 is a red wire then that is normal. it is a fused battery feed to run the blower on high when that relay activates.

On indoor fuse panel check fuse #12 and check the brown wire on back of fan switch for voltage. While you are at it disconnect it and check the terminals as well.

With vehicle on and those wires having voltage turn the blower on different settings. If you have no volts on tan, yellow, lt. blue or orange your switch is toast.
 
Top