Just Fishing's 09 Tahoe Build thread

Disclaimer: Links on this page pointing to Amazon, eBay and other sites may include affiliate code. If you click them and make a purchase, we may earn a small commission.

OP
OP
Just Fishing

Just Fishing

Can't fix stupid
Joined
Aug 30, 2020
Posts
3,926
Reaction score
8,503
Location
Utah
I have also used "work out"/yoga mats that my wife makes the unfortunate mistake of leaving in the garage.

Mosy i don't like anything that could hide oils and other fluids in.
Nothing worse than laying down and having the oils wick out onto you.

Cardboard seems to do pretty well, easy to tell when its soaked.

U haul stores sell boxes for a decent price.
I also saw my local homedepot (or was that lowes..) carrying decent sized boxes.

I have been keeping that in mind just in case i couldn't get enough decent sized cardboard... lol

My cold case radiator hooked me up with the last few pieces that i believe I'll need for what will hopefully be the last go around.

And that out door carpet is a pretty good idea.
I recall being able to get a decent sized sheet of it for like $40 ( grey color )

That was about 10 years ago.
When i did my first boat refurbishment.
A little 15ft starcraft, the type you drive from the front.
Tossed a 3cyl 65hp mercury on there, that thing really moved.

Second boat i went with vinyl flooring, specific for marine use.
The carpet held up well and cleaned easily.
But it was a fishing hook magnet.

I still use that home depot stuff to line trailer bunks.
Very tough stuff.
 
Last edited:

Rocket Man

Mark
Supporting Member
Joined
Dec 25, 2014
Posts
26,004
Reaction score
50,862
Location
Oregon
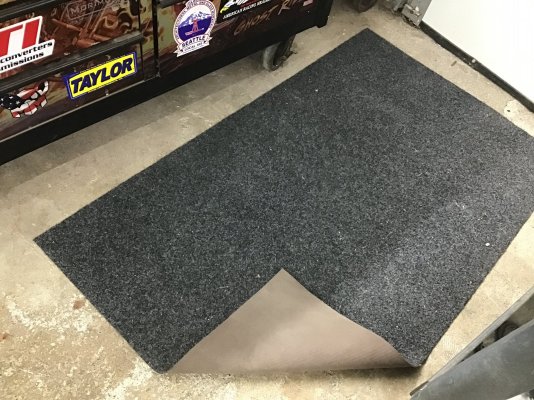
If I’m draining anything I keep the carpet back a ways so it doesn’t get any fluids on it. This is the stuff I get. It’s rubber backed, real thin. I have some bigger pieces rolled up but this one stays on my garage floor, ready for quick use.
 

Attachments

  • image.jpg
    image.jpg
    469.8 KB · Views: 6
OP
OP
Just Fishing

Just Fishing

Can't fix stupid
Joined
Aug 30, 2020
Posts
3,926
Reaction score
8,503
Location
Utah
Got my pump "cover" yesterday.
Located the transgo shift kit that i installed when i first got the old hoe.

Left over in that kit is an upgraded boost and pressure regulator valve.
Big part of that boost kit is a pressure relief valve in the end of it.
That's there to prevent a pressure run-away that causes a cracked 4-5-6 clutch drum.
That condition will cause the truck to drive fine, park.
But when you go back to drive it again, you have no drive and no reverse. :jester:

They also mention a slightly modified pressure regulator design that sits behind the boost valve.
That's to prevent a shift clunk that these units can exhibit.

The new boost valve was a very tight fit, i doubt there will be any leaks.
I'm sure this was designed for a used pump, and not a new one.
took some oil and careful well-oiled insertion to get it to seat completely.
then disassembled to clean once more... :emotions33:

It's also a steel valve vs the standard aluminum ones.
I suppose that's for a longer life...

I also have the Sonnax boost valve on hand.
I did some measuring between the stock boost, Sonnax, and Transgo.
I didn't see any size differences.
But the transgo did have a slightly heavier feeling spring.

Sonnax boost: https://www.sonnax.com/parts/5003-boost-valve-kit

Usually there is an increase in size to increase the pressure boost effect.
Interesting.
I guess they don't see a use for it, and it's all controlled by spring pressure.

The Sonnax also has a slight valve looking thing right down the middle.

Still waiting on my pump/bell housing cover, once i have that i'll snap some pictures.


Oh and the new pump has the updated seals that have anti rotational tabs.
Part of what's in the transgo kit is an upgrade for the first gen pump design.
Add's springs behind the seals to correct the issue without going to the newer design pump stator.

With the newer design pump stator, there are also some Orings behind the seals.
I didn't notice those o-rings when doing a dissemble of the pump for a good cleaning.

Hit the pump with some carb cleaner to break up the packing gunk, then rinsed off with break clean.
Then i saw those o-rings were swelling! :fc5716bd:Whoops!

Luckly the cover kit came with a spare set of pump seals and o-rings!
 
Last edited:
OP
OP
Just Fishing

Just Fishing

Can't fix stupid
Joined
Aug 30, 2020
Posts
3,926
Reaction score
8,503
Location
Utah
Got a bunch done to the hoe over the weekend.
Exhaust is with the welder to have him install an extra O2 sensor bung.
1645551849266.png

I found some caking of oil all over the transfer case.
It also looks like the output shaft to driveshaft seal is starting to leak slightly.

I'm not sure if the nasty all over the transfer case is from that or not, but I'm leaning towards resealing the case while I have everything easy to get to.
This will also make it easy to replace that bushing in the case extension. ;)
I'm thinking it might be a good time to have U joints done @ 180k

But U-joints would be easy to do later on, so I'll make a decision later on it.

Part of this I needed to remove the front driveshaft from the tcase.
It has this seal on a slip joint...
Looked like I needed to snip a metal retainer for that seal in order to get it off.

but then I found a video on the subject, they showed how you can slowly pry that seal off of the shaft.
And it worked like a charm!!


With the transmission tilted down, I didn't have much of an issue getting to all of the bellhousing bolts from the underside.
Much easier than fiddling with a silly ratchet with the heads off.

Engine is ready to pull short of needing to reinstall the transmission crossmember and adding some sort of wooden spacer to level everything
(and to prevent the transmission from crashing to the ground)
And of course, i haven't yet removed the water pump


I didn't get a picture of this when i installed it, but this is my install of the transmission cooler line filter.
1645551661175.png

I used rivnuts in the frame to keep it cleaner and easy to remove later.
I'm planning to do the same for the power steering side.

For the transmission side, this will be AN fittings once I'm done.
 
OP
OP
Just Fishing

Just Fishing

Can't fix stupid
Joined
Aug 30, 2020
Posts
3,926
Reaction score
8,503
Location
Utah
I picked up the Y last night, pictures soon.

Over the weekend i also yanked the fluid cooler lines.
Noted that the engine oil cooler side looks real close to 1/2 in, so i measured with my dial caliper.
Just slightly smaller.

So i grabbed one of the -8AN tube sleeves and gave it a little test fit.

Slightly looser, but i think it's tight enough to work as a support...

So I'm planning to reuse the stock oil cooler piping.

But I'll replace the flexible rubber sections with the nice braided SS line and AN fittings.
 
OP
OP
Just Fishing

Just Fishing

Can't fix stupid
Joined
Aug 30, 2020
Posts
3,926
Reaction score
8,503
Location
Utah
Oh and last night, i tried to use my abused second hand engine hoist to move the old 5.3 block off of the stand.

Looks like the hydraulic jack part leaked out most of it's fluid... lol

While i do have more, that ram has issues.

I decided fk it, and i went down to hf last night and picked up a new 8 ton jack for the hoist.

I decided to spring for the pneumatic version.

I figure this will make life so much easier when removing the engine on my own.

Gives me the ability to operate it from a distance.
And if needed, easy enough to lengthen the hose/control.
 
OP
OP
Just Fishing

Just Fishing

Can't fix stupid
Joined
Aug 30, 2020
Posts
3,926
Reaction score
8,503
Location
Utah
I pulled the engine, heads still on.

I ended up removing the exhaust manifolds to ensure it didn't damage the AC.
Doing this on my own, so it's hard to watch everything.

With the crank pully off, it gave me plenty of room to clear the engine bay.

I also tried out this little thing i saw on youtube.
Apparently, the hood has a "service position"
You remove the spring-loaded bars on the side, and disconnect the gas filled hood prop.
And with the plastic hinge trim removed, the hood goes back.

Then some little hook little things are visible!
Just the right size to jam the bolts you removed from the spring struts.

Hood in service position!

1645915072016.png

Zoom in of the locking location.
1645915108287.png

Apparently in the NBS, this is actually a hole and it's threaded!

I heard after 2015, they did away with it all together...
 
OP
OP
Just Fishing

Just Fishing

Can't fix stupid
Joined
Aug 30, 2020
Posts
3,926
Reaction score
8,503
Location
Utah
Engine sitting on the stand, It looked really huge with the pan still on.
Those valve cover spacers almost make it look like a big block IMO.

1645915229049.png
 
OP
OP
Just Fishing

Just Fishing

Can't fix stupid
Joined
Aug 30, 2020
Posts
3,926
Reaction score
8,503
Location
Utah
And the Crank has been pulled in that image ^

I'm very happy to say that the Thrust bearing actually survived the last run!!
So, with the cooler bypassed = success!!


I had a mismatched set of main bearings, so i did have some metal.
I was expecting to see that coming from the rear bearing, but i didn't...

So anyways, engine is coming fully apart for cleaning and inspection.

I'm worried the cam bearings got some trash in there.

The only other thing that could match the color I see is the rod bushings.
One of those rod bushings I damaged when disassembling the engine due to all of the buildup.
I had asked that machine shop to freshen up the bushings, but they told it it was fine.

Since I don't trust them for shit now, I'm going to look over them carefully.
Maybe pick up a nice used set...

Adventure!!
I learned aspects of engine building that i never wanted to know... :jester:
 

Forum statistics

Threads
132,321
Posts
1,865,958
Members
96,913
Latest member
Fidanza27
Top