Kenwood DNX-8210 install into 2008 non-Bose LT

Disclaimer: Links on this page pointing to Amazon, eBay and other sites may include affiliate code. If you click them and make a purchase, we may earn a small commission.

pavemen

TYF Newbie
Joined
May 29, 2009
Posts
22
Reaction score
0
Location
Modesto, CA
Recreating my thread from the 'other site'. It's still locked down so i cannot get the original info, at least I found the pics on my PC.
---------------------------------------------------

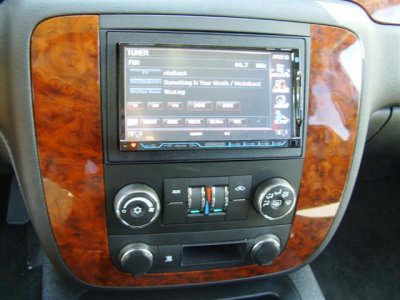
Few months ago I installed a Kenwood DNX-8120 and Boyo backup camera into my 2008 non-Bose Tahoe LT with OnStar and RSE but no DVD.

I had tried the OEM navigation and it works but OnStar volume is almost nothing and radio/nav outputs are very low and while the blinkers and other sounds are present, they are so low they can barely be heard, sometimes not at all. So I had the original CD/XM head unit reinstalled and found the 8120 to do myself.

I used a Pac-Audio OS4 for base integration and a Pac-Audio SWI-JACK for steering wheel control interface.

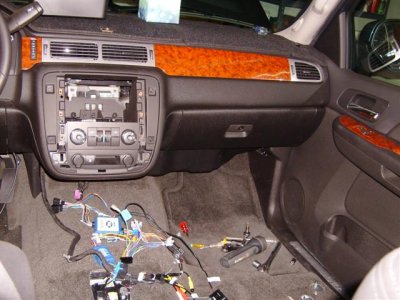
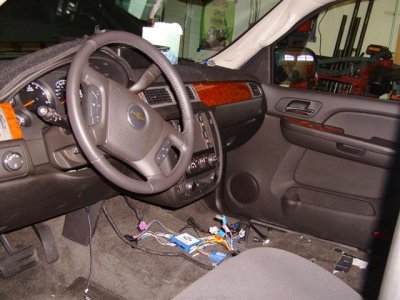
I recommend pre-wiring the OS4, SWI-JACK and HU harnesses before starting the main install. I would recommend that you add about 2-2.5 feet of wiring between the OS4 and HU harnesses since directly connecting them will not leave room for mounting the OS4/JACk. You will see in the images below that there are suddenly a bunch of blue wires in the harness. This is becuase of the above, but I found out too late and had to redo the harness.

Remove the negative terminal from the battery and wait 5 minutes for the airbag capacitor to discharge before beginning any work.

Installation required removing the front seats and the center console for access purposes. Be aware that if you have RSE, you will need to temporarily hook up the center consol wiring harness to test your wiring as the audio is routed through the RSE unit before hitting the speakers.

So, to get started, remove the caps covering the seat mounting hardware and then pop off the 'keepers' that the caps snap onto. Once the seats are removed, use caution as there are flimsy plastic vent tubes for the rear floor HVAC as well as several studs sticking up that you do not want to kneel on.

On the center console, remove the cup holders and mat in the front section. Pry up and pop out the recessed tray in the front section. There are 4 metal spring clips, two along each side, none in the front/back.

Reach inside and pull the wiring harness loose and then disconnect the large connector by pressing the button and flipping the lever over. Pull the connectors apart. The center console can then be lifted up and removed as a whole unit.

Then remove the trim around the head unit. I am sure there are one or more threads where about how to do that. Just go slow and be careful.

Remove the four bolts holding the stock HU slide it forward and remove the 2 wiring harnesses and antenna.
 

Attachments

  • HPIM4632 (Small).JPG
    HPIM4632 (Small).JPG
    59.2 KB · Views: 152
  • HPIM4633 (Small).JPG
    HPIM4633 (Small).JPG
    55.1 KB · Views: 117
Last edited:
OP
OP
pavemen

pavemen

TYF Newbie
Joined
May 29, 2009
Posts
22
Reaction score
0
Location
Modesto, CA
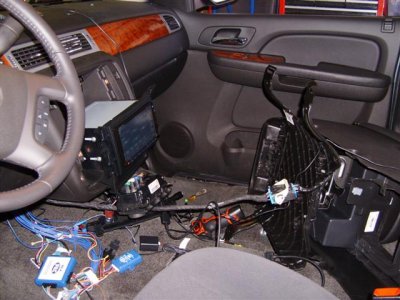
The plan is to mount the OS4 and SWI-JACK to the carpet under the center console. Here you can see the extended wiring harness I made up. It will be put into loom once the electronics have been tested. You can also see the center console back in the Tahoe so I could connect the RSE harness.

I ran the GPS antenna to the same location the stock NAV uses, a recess in the dash just forward right of the center defrost vent.

To do that, you need to remove the a-pillar panels. Pull the screw covers, remove screws and carefully unsnap and remove the panel. Use caution as there are airbags and their hardware/wiring back there.

Once the a-pillar panels are pulled you can pry up the forward half of the dash which has the defrost vent in it. It will not come all the way up, but it will roll forward enough to get the GPS antenna in there. It fits really easily in this ~3"x3" square. The wire was run through the dash interior down to near the glove box. The wire is very long and was coiled up and stored on the trans hump within the center console footprint. Leave enough loose to run up to the head unit.

You can then snap the dash back down and reinstall the a-pillar panels. Use caution to not snap, damage or pinch the air bags components. Reinstall screw caps.

Run the pre-built wiring harness up to the back of the head unit as well as any additional/optional harnesses. I had the iPod video cable, telephone mic, GPS antenna, A/V input and A/V output, and USB harnesses/wires to connect.

Plug the OEM connectors into the OS4, plug the CMX chime module into the OS4 and mount that somewhere (I put mine inside the metal supports that go from the dash to the floor).

With everything plugged in, connect the battery and test the install.

The backup camera is next and takes the longest time to install due to wire routing.
 

Attachments

  • HPIM4635 (Small).JPG
    HPIM4635 (Small).JPG
    57.5 KB · Views: 111
OP
OP
pavemen

pavemen

TYF Newbie
Joined
May 29, 2009
Posts
22
Reaction score
0
Location
Modesto, CA
The Boyo VTL400 backup camera came free with my Crutchfield purchase (really good deal overall with sales, freebies, discounts). It is designed to mount to a license plate but I had other plans.

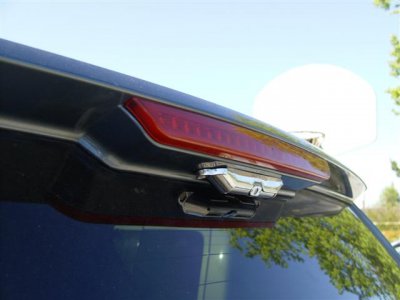
I decided to be cool and mount the camera to the underside of the rear spoiler.

The camera came with long wiring harness that has to be run the entire length of the Tahoe. Pretty much a PITA.

First we pulled the passenger kick panel, both sill plates, pried loose the b-pillar, c-pillar panels, the passenger lower rear panel, and removed the d-piller panel (airbag here) and the rear upper panel at the top of the rear hatch.

We ran the wiring harness front to back since the camera end had a small connector on it and the front end had a large connector. To start, remove the rear spoiler by opening the glass and removing the three Torx flat head bolts that hold the spoiler to the glass and then the two nuts on the hinges that hold the spoiler to those.

Disconnect the center stop lamp wiring and set the spoiler aside for now. We'll get back to the actual camera install later.

Now, remove the tape from the large grommet that the stop lamp wiring goes through. You need to cut the long camera wire but cut where you leave enough slack in outside the grommet as you need to account for glass/hatch opening as well as enough material to fish into the inside and over to the d-pillar so you can splice to the other half of the wiring harness.

You will need some small crimp butt connectors to splice the wires back. I found that telephone wiring crimp connectors worked best as they are made for that tiny gauge wire. Soldering my be hard due to the tiny wire size. Cutting and splicing will also let you remove any excess wiring.

Spray some silicon lube inside the grommet and fish your camera wire through it into the body channel. With enough slack on the outside, tape the grommet back up to reseal it from the elements.

Fish the wire from the grommet through the body channel to the passenger side d-pillar.

Run the front portion of the wire from the HU to the kick panel and down to the plastic factory wiring channel. Feed it along the entire way, keeping it as much in the channel as possible for protection. Get it up to the d-pillar and cut to length and splice in the other half. Tap and secure the splice.

At the HU, attach the power and ground from the short harness to the RAP side of the OS4 included relay. This will allow the camera to be powered whenever the HU has power. Connect the video RCA to the r.cam input on the HU.

Now, to mount the camera itself.

With the spoiler removed, remove the center stop lamp to keep from damaging it. Flip the spoiler over and center the camera on the underside of the lamp opening and move it as far rearward (towards the edge of the spoiler) as possible. On this particular camera, there is a small lip intended to sit atop a license plate frame that fit the edge of the spoiler perfectly. I had not moved it far enough rearward initially and the camera blocked operation of the rear wiper. With it all the way rearward, the wiper slides right behind it without any contact.

Drill the two mounting holes. Drill the one extra hole for the wiring in the proper position. Be careful not to drill too far, you only have about 3/4" until you come out the center stop lamp opening.

Now to attach the camera. I used a Dremel w/ cutoff wheel to cut two small openings in the backside of the spoiler, in the thin back plastic that covers the non-finished portion of the spoiler. Make them just big enough to get an open end wrench in there. Mine were about 1" tall and 2-2.5" wide. Be sure they are inline with the mounting holes you drilled.

Cut the mounting bolts to length, be sure to thread a nut on first to clean the threads after cutting. Fish the camera side wiring into the spoiler, then mount the camera. I held the bolt by hand in the camera and used a pair of needle nose pliers to slide a washer in the access hole on the bolt then to hold the nut in place. I threaded the bolt by hand until it grabbed the nut. Then diligently worked the nut down and tightened with the open end wrench. Use caution as to not over tighten and crack the spoiler or camera

Reinstall the stop lamp, run both sets of wires through the clips and mount the spoiler. Be careful where the camera wire is as to not pinch it between the spoiler and the glass. Do not over tighten the Torx bolts so you don't crack the glass. Be sure to center the spoiler on the glass before final tightening. Don't forget the nuts at the hinges as well.

Connect the camera wire to the wiring harness and tape/seal it.

Test the unit.

Please note that these images show the camera in the original position that interferes with the rear wiper. You can make out the small lip in the second image. This lip is now over the edge of the blue portion and under the stop lamp.

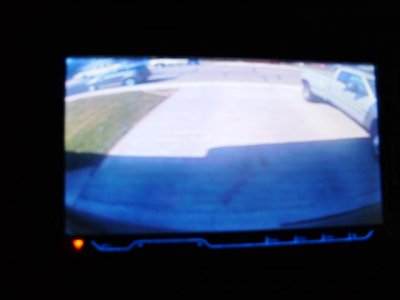
The view at the HU is nice. This is from inside our garage out to street. The driveway is slightly angled so it does view farther out than when on a flat street. On the street it does not view any farther back than the middle of the hood of a car stopped an appropriate distance behind you at a light. However, it does give nearly full view of the ground directly behind the bumper. I can see things on the ground about 12" behind the bumper. This is the view I care about the most when backing. I can see the trailer tongue, kids, or other vehicles when in a parking lot.
 

Attachments

  • HPIM4657 (Small).JPG
    HPIM4657 (Small).JPG
    26 KB · Views: 84
  • HPIM4658 (Small).JPG
    HPIM4658 (Small).JPG
    31.7 KB · Views: 68
  • HPIM4653 (Small).JPG
    HPIM4653 (Small).JPG
    20.7 KB · Views: 76
Last edited:
OP
OP
pavemen

pavemen

TYF Newbie
Joined
May 29, 2009
Posts
22
Reaction score
0
Location
Modesto, CA
Now back to the HU install. Once the wiring has been verified, decide if you want to override the parking brake restrictions on the video output on the unit itself.

I decide to install a double throw switch under the dash near the driver knee panel that will send the OS4/OEM parking brake output to the HU or direct ground ("Kenwood green wire override") to it. The center post goes to the HU green wire, one output post goes to ground, the other to the OS4 parking brake output.

Also, if you are installing an iPod cable, decide where you want it. I wanted to be able to set my iPod Touch in the center console, so I cut a small hole in the underside of the console that just fit the connector. I used a Kenwood v300i cable. I was originally finding online that it did not support video from the Touch, but it works fine.

Test all functionality and begin reinstalling everything. Head unit and other controls go in. The DNX 8120 is large unit and it fully fills the space in the dash, so be careful to not disconnect any harnesses or RCA plugs.

Reinstall/attach all trim panels, then reinstall the center console and seats. Reconnect the seat belts and seat wiring. Reinstall the seat bolt covers, center console front tray, and the trim around the head unit.

Retest all functionality.
 

Attachments

  • HPIM4654 (Small).JPG
    HPIM4654 (Small).JPG
    48.4 KB · Views: 122
  • HPIM4655 (Small).JPG
    HPIM4655 (Small).JPG
    43.1 KB · Views: 99
OP
OP
pavemen

pavemen

TYF Newbie
Joined
May 29, 2009
Posts
22
Reaction score
0
Location
Modesto, CA
Last one! Mostly notes and additional comments

The OS4 maintains factory XM to the RSE unit only. You need a separate/new XM receiver for the 8120 if you want to go that route. I do not know who to connect to the factory antenna, but I believe there is info on this site about what you need to connect your receiver to the factory antenna.

Programming the SWI-JACK was not too bad, I had done that prior to finishing the install. One thing to note on programming the 'speak' button if you have OnStar. The SWI-JACK instructions tell you to hold each button down for over 1 second to allow the SWI-JACK to learn. However, on this button, if you hold it down, OnStar starts. For this button, you can just push the button for about 1/2 second and release then wait for a bit as the SWI-JACK will pick it up and learn correctly.

Be aware that you need to set the SWI-JACK mode to a fixed value, regardless of what the vehicle specific instructions tell you since you are connecting it through the OS4. Also, the SWI-JACK wiring is slightly different when using the OS4, in fact you just plug it directly in to the OS4, no cutting or anything. See the OS4 manual for more info.

The Pac-Audio CMX chime model does sound a bit cheesy at first, but we are now used to it and its okay.

The backup camera located up high is nice since I can see the trailer tongue and backup in a parking lot and get within inches of other vehicle to make maneuvering easier.

Using the DNX-8120 usability is okay once you figure out all the features (there are so many). iPod Touch interface works fine, I can watch movies from the Touch, play music by playlist, artist, genre, etc. just like with the iPod itself.

My daughter likes to listen to her CDs in the middle row. She uses headphones to the RSE and I put the 8120 in dual zone mode, turn on the RSE unit and give her the 8120 remote control. She can control her own volume, tracks, etc.

The Bluetooth functionality when connecting to a phone is cool, if your phone supports all of the functionality. It can do SMS, call logs, call history, import address book, direct dial, etc. My Palm Treo and my wife's Blackberry Curve work for telephone and A2DP (my Treo needs an app for that though).

One thing I do not like about it is that the 8120 does not automatically connect to whatever device is present. It can pair with multiple devices, but will only automatically connect to the last device connected. So if my wife is in the car, it will connect automatically to her phone, but if I drive alone, it will not automatically connect to my Treo and I have to manually make it connect. Then if she drives alone or is in the car, it won't auto connect to her phone.

Talking about the phone features, I installed the included microphone on the steering wheel column right between the tach and the speedo. Matches nicely and is kind of invisible. When mounting it via the double sided tape included, make sure you have it forward enough that you can get full range of the tilt mechanism. I had originally installed it too far back and when I tilted the wheel up fully the mic popped off the mount. Moved it forward a bit and no issues.

---------- Post added at 02:17 PM ---------- Previous post was at 02:16 PM ----------

I've subscribed to this thread so if you have comments or questions I should be able to get back to you.
 

asz344

TYF Newbie
Joined
Aug 28, 2010
Posts
3
Reaction score
0
great work...i just wonder if the Pac-Audio OS4 will do the steering wheel controls as well.

regards
 

asz344

TYF Newbie
Joined
Aug 28, 2010
Posts
3
Reaction score
0
have no idea, not sure what that part is

I meant is it enough to use one the interfaces to have the controls working. I thought the OS4 was also designed for the steering controls.
I also would like to know if u have connected the green wire for the SWI JACK and where u did find the wire.

Form, the photos u r posting I think u have a Bose Audio System in your car. Please correct me.

regards
 
OP
OP
pavemen

pavemen

TYF Newbie
Joined
May 29, 2009
Posts
22
Reaction score
0
Location
Modesto, CA
sorry, i was not paying attention. the OS4 supports the SWI-JACK in a plug-n-play setup. it will not do SWC on its own.

which green wire? The Kenwood one or one off the OS4 or SWI-JACK? The SWI-JACK gets installed in a specific way if you are integrating with the OS4. You do NOT follow the regular directions as if it was a stand alone install. The OS4 expects a certain code and wiring wiring setup.

I do NOT have the Bose system. There was no amp under the center console and the audio was very low when I first installed the factory nav unit. I do have the rear radio/XM/HVAC control though but no overhead entertainment.
 

Forum statistics

Threads
133,098
Posts
1,879,700
Members
98,075
Latest member
kamarsh94
Top