My LED Lighting Project (2009 Yukon XL)

Disclaimer: Links on this page pointing to Amazon, eBay and other sites may include affiliate code. If you click them and make a purchase, we may earn a small commission.

OP
OP
agupta3224

agupta3224

Member
Joined
Sep 4, 2016
Posts
34
Reaction score
10
This looks really cool. I was searching for info on changing out ALL interior and exterior bulbs to led white. Then I saw this. Love it. Love the look. Why GMC won't make it standard is beyond me. Anyhow , keep up the good work and please post as much info as possible on your build, including what you would have done different. It always happen that way lol.


What I would have done different ?? Perhaps never started the project lol. I am not a spring chicken any more. I think GMC is a brand that should separate itself from Suburbans. Nothing against either one, I am a bit biased to yhe Yukons.

1. I would have also installed a Glove Compartment Light. (This is on the agenda)
2. Fold the mirrors in when truck off and mirror out when truck on. (That is also on the agenda) I just have to think this one thru really carefully and minimize the relays.
3. I might have connected the wires a bit differently. I can sort of see them under the running boards when I am walking towards it.

If you ever do something like this where the wire is running from inside to the door, let me know and I will tell you how. My first was a pain but by the time I got to the fourth one it was a snap.

All four doors have courtesy lights and accent lights.
I will try to post more pictures and perhaps a silent video. :)
 

Ob1hybrid

Full Access Member
Joined
Nov 26, 2016
Posts
121
Reaction score
17
What I would have done different ?? Perhaps never started the project lol. I am not a spring chicken any more. I think GMC is a brand that should separate itself from Suburbans. Nothing against either one, I am a bit biased to yhe Yukons.

1. I would have also installed a Glove Compartment Light. (This is on the agenda)
2. Fold the mirrors in when truck off and mirror out when truck on. (That is also on the agenda) I just have to think this one thru really carefully and minimize the relays.
3. I might have connected the wires a bit differently. I can sort of see them under the running boards when I am walking towards it.

If you ever do something like this where the wire is running from inside to the door, let me know and I will tell you how. My first was a pain but by the time I got to the fourth one it was a snap.

All four doors have courtesy lights and accent lights.
I will try to post more pictures and perhaps a silent video. :)

All four doors have courtesy lights and accent lights? and running board lights? I'm jealous lol. I would love to do it but it gotta be an easier way (like paying someone to do it ) or just waiting til it get warm to do try this.

I had a 04 Nissan Maxima back then that folded/unfolded the side mirrors when ignition turned on/off. Thought it was the coolest thing coming from a NYC guy that see people's side mirrors get disrespected by speeding motorist....maniacs. Which brings me to this idea; installing side view cameras under the swing arm of the side view. Now I don't know better, but you might. Would a 3/4 camera fit under there?

Again man. Hats off.
 
OP
OP
agupta3224

agupta3224

Member
Joined
Sep 4, 2016
Posts
34
Reaction score
10
All four doors have courtesy lights and accent lights? and running board lights? I'm jealous lol. I would love to do it but it gotta be an easier way (like paying someone to do it ) or just waiting til it get warm to do try this.

I had a 04 Nissan Maxima back then that folded/unfolded the side mirrors when ignition turned on/off. Thought it was the coolest thing coming from a NYC guy that see people's side mirrors get disrespected by speeding motorist....maniacs. Which brings me to this idea; installing side view cameras under the swing arm of the side view. Now I don't know better, but you might. Would a 3/4 camera fit under there?

Again man. Hats off.


See!!! Why do you have to mention cameras. !!!! There goes another light bulb in my head and a thought of my wife filing for divorce. lol.

This whole thing started when some idiot on a motorcycle intentionally broke my right mirror. Since I had color matched mirror covers the cost of replacement just started going up. So it was replacement of the one mirror gave me the budget for the rest and since I had the thing opened, why not add (blah blah...) you know how guys think.

But to answer your question, I really have no idea. I am sure there is a way to do it. The idea would be to make it look factory installed.

Maybe one day I will tackle it.
 
OP
OP
agupta3224

agupta3224

Member
Joined
Sep 4, 2016
Posts
34
Reaction score
10
@bigrhino
@Ob1hybrid

Here are some of the answers of the questions.

This is the type of Leds I used. As I said first, I found these inside a store signage that was being trashed. the lights were sitting in the garage for a while.
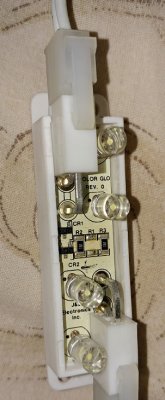
LED.jpg

These are string of Leds. The first thing was to mount them to 3/4 x 3/4 aluminum angle iron. This is available at Lowes or Home Depot. I think I used 1/8 inch thickness. Clean the inside with rubbing alcohol and then stuck them to one side using double sided (3M) tape. The brand is important. If you look under the running board it is sort of partitioned in three parts (12, 18 and 23 inches). So naturally those were the sizes I cut the aluminum to. I chose aluminum because when and if does rust, it actually oxidizes and make a preventive coat, protecting from corrosion. The angle also acts as a good reflective surface.

Once the lights are stuck on the aluminum I used 1.25 inch diameter shrink wrap (clear). It kind of looked cool once I shrink wrapped it. The running board itself has a nice 45 degree angle if you look for it. Once again cleaned the underside with rubbing alcohol about 3 times.

Here is the best part. I bought some 1/2 inch molding tape and used it to stick the aluminum (shrink wrapped) on the board.
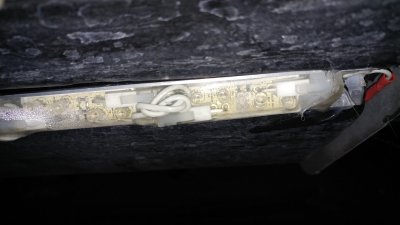
Running Board 2.jpg

It is sort of hard to see, but you get the idea.
Then just connected the different strips.
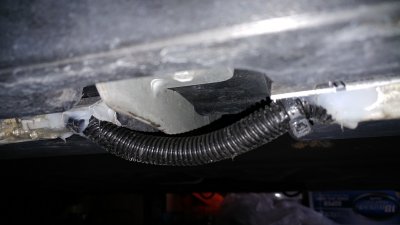
ConnectionUnderRunning.jpg

The white ***** thing is a 30 year exterior weatherproof water resistant silicone, just make sure to fill the gaps so there is no water entry.

Now for the Rear. That is actually a 4 foot section. The ends of the strip is filled with the Loctite Water Proof sealant. The end is zip tied. Then more sealant and more clear tubing etc. I think I went overboard but there are four layers of Clear tubing covering the ends of the strip. And yes it is only on the ends. Do not ask me why I did that way but that was the thinking of the day.

To mount it there is a metal bracket that holds the bumper cover. I bent some braces to 135 degree and mounted the strip to it.

For extra measure I strapped the strip with a 3/8 inch vinyl covered metal rope.
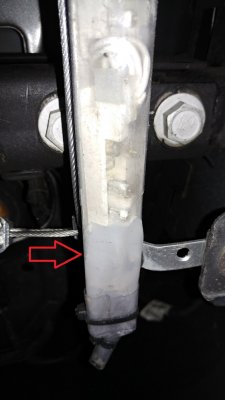
Bumper and Silicon.jpg

Red circle shows the bracket under the bumper. I used stainless steel nuts, bolts, washers just in case. Bumper and Brace.jpg
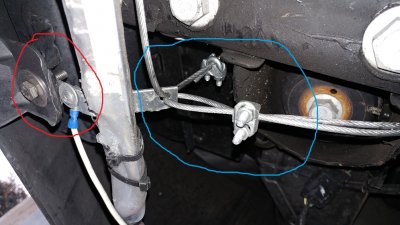
The first test will come this summer when I launch my jet skis in the lake. As I mentioned earlier, the wire is an independent run all the way up to the engine compartment.

I have been meaning to mention this for a while. If you are running any wires from inside to the door, please do not cut the boot (as some idiots on youtube will tell you). Instead feel for a round insert inside the body where the boot attaches. You should feel two tabs, Lightly squeeze the tabs and boot comes free. Then use some ingenuity, perhaps some lubricant to fish a hard (coat hanger type) stuff thru the boot into the door. Once thru, tape the wires to the other end and pull from the inside. There is not much room in that boot, so try not to put a thick bundle thru.


I am only allowed 5 pics upload at a time hence the uploads.
As always I welcome comments.
 
OP
OP
agupta3224

agupta3224

Member
Joined
Sep 4, 2016
Posts
34
Reaction score
10
Thanks for the info. I hope to do this project once the weather gets warmer.

If you do the same as I did, leave some more room for shrink wrapping. Maybe Like 1/2 inch on each side. It will make your life easier. Fill with silicone and zip tie.

Other than that Good Luck. Let me know if you need help. PM me and I will send you my email address.
 

bigrhino

Full Access Member
Joined
Aug 18, 2009
Posts
957
Reaction score
204
Location
l.e.s manhattan,nyc
If you do the same as I did, leave some more room for shrink wrapping. Maybe Like 1/2 inch on each side. It will make your life easier. Fill with silicone and zip tie.

Other than that Good Luck. Let me know if you need help. PM me and I will send you my email address.

Thanks.
 

Forum statistics

Threads
132,382
Posts
1,867,103
Members
97,019
Latest member
jeremylentsch
Top