The prep work is a killer.Or the easy way....
You are using an out of date browser. It may not display this or other websites correctly.
You should upgrade or use an alternative browser.
You should upgrade or use an alternative browser.
Nadthomas 2007 Yukon Denali 200k Mile Re-build
- Thread starter nadthomas
- Start date
Disclaimer: Links on this page pointing to Amazon, eBay and other sites may include affiliate code. If you click them and make a purchase, we may earn a small commission.
iamdub
Full Access Member
List looks good for everything external of the longblock. For the intake, I'd go with an Airaid MIT instead of a K&N. A dry K&N filter (AEM Dryflow) if you insist on replacing the stock filter.
nadthomas
Full Access Member
- Joined
- Dec 1, 2017
- Posts
- 158
- Reaction score
- 177
Might as well put a new camshaft and lifters even if stock. At least check them and the cam bearings out.
Get the updated driver's side valve cover, prevents oil blow-by. Consider replacing the VVT parts while it's apart too.
I probably would replace/inspect the cam if I had more knowledge in that area. I'm sure its only a couple of hours more work, but I'm probably going to let sleeping dogs lay on that one.
Is the VVT components you are talking about the cam phaser actuator? If so, its on my list. I will need to look into the DS valve cover. Do you have a part number?
List looks good for everything external of the longblock. For the intake, I'd go with an Airaid MIT instead of a K&N. A dry K&N filter (AEM Dryflow) if you insist on replacing the stock filter.
I like the K&N because it has more of an enclosed box around the filter. Also, never had an issue with a oiled K&N filter. I know its kind of a waste of money, but the extra intake noise makes me happy.
swathdiver
Full Access Member
I will need to look into the DS valve cover. Do you have a part number?
12642655
nadthomas
Full Access Member
- Joined
- Dec 1, 2017
- Posts
- 158
- Reaction score
- 177
NICE! THANKS!12642655
Bonus, I will now have an extra valve cover to test paint with the wrinkle paint before I do the one that will be on the truck.
Last edited:
iddqd
Full Access Member
Might as well put a new camshaft and lifters even if stock. At least check them and the cam bearings out.
Get the updated driver's side valve cover, prevents oil blow-by. Consider replacing the VVT parts while it's apart too.
Cam bearing is a known issue on Gen IV. If the engine is out, DO replace the cam bearings with updated parts from GM. There's even a TSB on that.
http://community.cengage.com/Chilto...2D00_cam_2D00_bearings_2D00_GenIV_2D00_V8.pdf
Worn #1 cam bearing causes low oil pressure, VVT errors and ultimately junked engine
delightskinned1
Member
Driving 07 Denali as well and although only at around 140k I do plan on keeping it long term so I do hope you update this thread as you go as it has some good interesting info that I'm sure will be useful to alot of us in the future!
nadthomas
Full Access Member
- Joined
- Dec 1, 2017
- Posts
- 158
- Reaction score
- 177
Cam bearing is a known issue on Gen IV. If the engine is out, DO replace the cam bearings with updated parts from GM. There's even a TSB on that.
http://community.cengage.com/Chilto...2D00_cam_2D00_bearings_2D00_GenIV_2D00_V8.pdf
Worn #1 cam bearing causes low oil pressure, VVT errors and ultimately junked engine
Thanks for the info. You have convinced me to at least take a look at the cam and cam bearings. It seems pretty simple to remove and inspect, since I'll be right there when I'm replacing the oil pump. From the research I have done so far though, there appears to be pretty even mixed opinions if the cam bearing wear that is seen is even an issue. Lots of LS motors with what looks like heavy bearing wear, but many people are not bothering to replace the cam bearings and they continue to be problem free. It also appears that AFM/DOD motors are more prone to this issue. My motor does not have AFM/DOD.
Last week I compiled my complete list of parts (which I will share), and I'm already up to $1500. Which is well over what I was expecting this project to cost, and that doesn't include new fluids. It looks like the recommended replacement bearings from GM will cost about $100. So, I'm not loving needing to add that to this project. Also, its not clear to me right now that I can even replace the cam bearings without needing to tear down the motor further.
At the moment, I'm thinking if I don't see scoring or debris I'm going to leave it alone for now. If after I get it all back together, if I still see low oil pressure I'll go back in for the cam bearings. As that seems to be the real indicator of a problem with the bearings. Additionally its hard for me to say and justify that the slightly low oil pressure I was seeing was due to a cam bearing when there is so many other common failures. Also, GM says the oil pump is rated for 200k miles, so my oil pump is clearly at end of life.
Again. Thanks for the input!

nadthomas
Full Access Member
- Joined
- Dec 1, 2017
- Posts
- 158
- Reaction score
- 177
For documentation purposes, and to give anyone that has not done something like this before an idea, I'll now circle back now to cover the engine remove. Prepare for lots of words. Everyone can scroll down for the pics.
Its a pretty straight forward process, and there are a number of good manuals, books, and YouTube videos that cover this in more details.
To start I'm not sure if there is actually that much of a difference between a Silverado and a Yukon when it comes to engine remove, but the Hayes Silverado book seemed to miss a good bit. Not that it wasn't kind of obvious, but still disappointing they didn't cover all the things that would need to be disconnected. Most notable, the Hayes book only says the A/C needs to be evacuated on the V6 models. So, I assume there would be enough soft lines on a V8's A/C system that I could move A/C components out of the way without needing the evacuate/recharge the system. From what I can tell that is simply not the case. I was too deep in when I realized this, so I had to just crack the bolt on the condenser and slowly let it drain while I enjoyed some pool time with my daughter and for killing the world I'm leaving her with.
Since this is not something I do on the regular, step one is to get painters tape, a sharpie, and a box of quart size bags. Where possible I try to put nuts/bolts back where I got them, otherwise they go in a bag with a label. All electrical connections get labeled with the tape as well. If you have no idea what you are disconnecting is called just make 2 labels, and label each thing with the same number. For example electrical connection #4 will get connected to sensor #4, and so on, doesn't matter what it is actually called as long as it gets reconnected correctly. The very first motor I pulled I probably didn't know what half of the things were that I disconnected, but with my labels everything got perfectly reconnected the first time. Also, just because it may be obvious when your first disconnect it and how the wiring harness lays/routed, the harness may get moved quite a bit by the time you are done, and when part of the harness that runs to the bottom of the engine is laying on top of the intake as you put it back together those labels will help. There is no shame in keeping it simple in my book. Although this time, I can happily say I was able to label/name everything correctly, but don't sweat it if you can't.
Generally you are going need to do the following. Remove grill, bumper cover, and headlights. Removing the metal bumper may not be necessary, it depends on your engine hoist, but it also makes it easier to get at things with it out of the way.
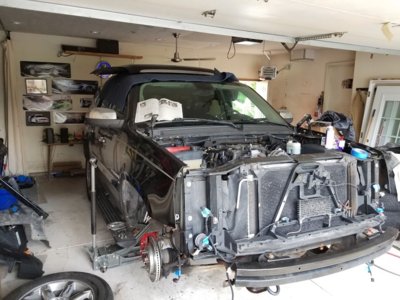
Disconnect battery, remove intake, and engine cover. Drain oil from pain, and drain coolant by popping over the lower hose to the radiator and expansion tank.
Now you want to tackle getting all of the coolers out of the way. Once drained, disconnect all hoses and line to the radiator. I don't recall which needs done first, but you will need to remove all of the "coolers" (trans, radiator, A/C condenser) and upper support beam. Once done you will have clear access to the front of the motor, and visually made some good progress.
Next I tackled removing the splash shields from the front wheel wells. The starter, and the y-pipe to exhaust manifold bolts. You will want to lift and secure the truck on some jackstands. The exhaust manifold bolts were the only thing that gave me substantial problems. My 1000ft/lbs impact could not break these loose, but with a 2ft breaker bar it was pretty easy...on the passenger side. On the passenger side, two nuts came off no problem, the third one the stud snapped. The driver side is a different animal. IIRC unbolting the drive shaft helps, but access is still restricted. One of the nuts is easily accessible. The other nut, I thought I was on completely and square, but I was not and rounded it. The 3rd nut I could not find a good way to access it and get enough leverage to break it loose. I already had plans to replace the DS exhaust manifold, so I jump to cutting the nut/stud pretty quickly. Spend a couple of bucks on a carbide tipped metal blade, it will get through it pretty quickly. Unlike the hours I wasted with a dremel and old metal blades.
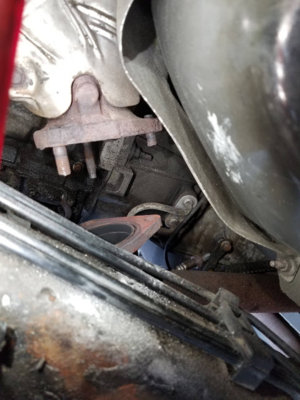
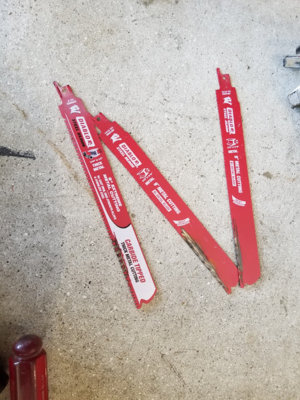
From there I removed the starter, and the flywheel to torque convertor bolts. Be sure to make a mark on the torque converter and flywheel so you can line them up again later.
Next I moved on to removing most of the transmission bell housing bolts. You can remove the lower 3/4 of the bolts from underneath. It was kind of slow going, but not particularly difficult. I found a deep offset box end wrench most useful for removing most of these. The top two or three bolts that you cannot get from the bottom. Well, I guess some people with 2 ft extensions can, but I suspect that is only on 2WD models. As the transfer case seemed to be in the way for me. Additionally, since I had already planned to remove the intake manifold to install a lift plate, these are pretty easily accessible once the intake is removed. So, I saved them for the very last.
From this point forward its pretty easy going. Also, IIRC at this point you can toss your wheels back on and take it off the jackstand to make it easier to work on. You just need to work on getting all of the hoses, lines, and electrical connections disconnected and moved to the side. Unbolting things as needed. Take your time, bag, and label. I kind of started with the few sensor connections at the bottom. Then I moved to the top/intake/injectors which has the bulk of the electrical connections, and then disconnected anything left in between. A note, the power steering and alternator bracket can be unbolted form the engine as a unit. Then use a bungee cord to hold the entire assembly off to the side.
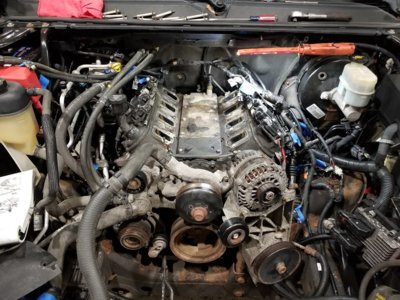
With the intake manifold off and everything else out of the way, you should now be able to easily reach the top transmission bolts. Use a jack and piece of wood to support the transmission. Remove the remain trans bolts and the 3 bolts for each of the engine mounts. Hook up your engine hoist to the lift plate, and put just a little tension on the chain and taking some pressure off the engine mounts. Give everything a wiggle. Double check to make sure the engine is evenly separating from the trans, otherwise you may have missed a bolt. Also double check for any hoses/line/electrical connections. Lift a little more and wiggle a little more, inspect, rinse and repeat until its out.
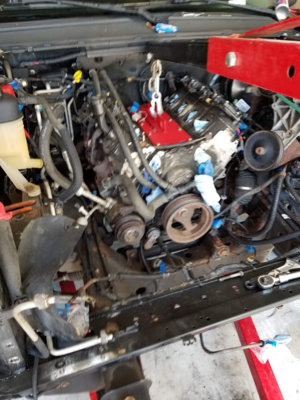
I also took a number for photos for reference along the way to make sure I route hoses, lines, and electrical connections the same way when I put it back together.
Its a pretty straight forward process, and there are a number of good manuals, books, and YouTube videos that cover this in more details.
To start I'm not sure if there is actually that much of a difference between a Silverado and a Yukon when it comes to engine remove, but the Hayes Silverado book seemed to miss a good bit. Not that it wasn't kind of obvious, but still disappointing they didn't cover all the things that would need to be disconnected. Most notable, the Hayes book only says the A/C needs to be evacuated on the V6 models. So, I assume there would be enough soft lines on a V8's A/C system that I could move A/C components out of the way without needing the evacuate/recharge the system. From what I can tell that is simply not the case. I was too deep in when I realized this, so I had to just crack the bolt on the condenser and slowly let it drain while I enjoyed some pool time with my daughter and for killing the world I'm leaving her with.
Since this is not something I do on the regular, step one is to get painters tape, a sharpie, and a box of quart size bags. Where possible I try to put nuts/bolts back where I got them, otherwise they go in a bag with a label. All electrical connections get labeled with the tape as well. If you have no idea what you are disconnecting is called just make 2 labels, and label each thing with the same number. For example electrical connection #4 will get connected to sensor #4, and so on, doesn't matter what it is actually called as long as it gets reconnected correctly. The very first motor I pulled I probably didn't know what half of the things were that I disconnected, but with my labels everything got perfectly reconnected the first time. Also, just because it may be obvious when your first disconnect it and how the wiring harness lays/routed, the harness may get moved quite a bit by the time you are done, and when part of the harness that runs to the bottom of the engine is laying on top of the intake as you put it back together those labels will help. There is no shame in keeping it simple in my book. Although this time, I can happily say I was able to label/name everything correctly, but don't sweat it if you can't.
Generally you are going need to do the following. Remove grill, bumper cover, and headlights. Removing the metal bumper may not be necessary, it depends on your engine hoist, but it also makes it easier to get at things with it out of the way.

Disconnect battery, remove intake, and engine cover. Drain oil from pain, and drain coolant by popping over the lower hose to the radiator and expansion tank.
Now you want to tackle getting all of the coolers out of the way. Once drained, disconnect all hoses and line to the radiator. I don't recall which needs done first, but you will need to remove all of the "coolers" (trans, radiator, A/C condenser) and upper support beam. Once done you will have clear access to the front of the motor, and visually made some good progress.
Next I tackled removing the splash shields from the front wheel wells. The starter, and the y-pipe to exhaust manifold bolts. You will want to lift and secure the truck on some jackstands. The exhaust manifold bolts were the only thing that gave me substantial problems. My 1000ft/lbs impact could not break these loose, but with a 2ft breaker bar it was pretty easy...on the passenger side. On the passenger side, two nuts came off no problem, the third one the stud snapped. The driver side is a different animal. IIRC unbolting the drive shaft helps, but access is still restricted. One of the nuts is easily accessible. The other nut, I thought I was on completely and square, but I was not and rounded it. The 3rd nut I could not find a good way to access it and get enough leverage to break it loose. I already had plans to replace the DS exhaust manifold, so I jump to cutting the nut/stud pretty quickly. Spend a couple of bucks on a carbide tipped metal blade, it will get through it pretty quickly. Unlike the hours I wasted with a dremel and old metal blades.


From there I removed the starter, and the flywheel to torque convertor bolts. Be sure to make a mark on the torque converter and flywheel so you can line them up again later.
Next I moved on to removing most of the transmission bell housing bolts. You can remove the lower 3/4 of the bolts from underneath. It was kind of slow going, but not particularly difficult. I found a deep offset box end wrench most useful for removing most of these. The top two or three bolts that you cannot get from the bottom. Well, I guess some people with 2 ft extensions can, but I suspect that is only on 2WD models. As the transfer case seemed to be in the way for me. Additionally, since I had already planned to remove the intake manifold to install a lift plate, these are pretty easily accessible once the intake is removed. So, I saved them for the very last.
From this point forward its pretty easy going. Also, IIRC at this point you can toss your wheels back on and take it off the jackstand to make it easier to work on. You just need to work on getting all of the hoses, lines, and electrical connections disconnected and moved to the side. Unbolting things as needed. Take your time, bag, and label. I kind of started with the few sensor connections at the bottom. Then I moved to the top/intake/injectors which has the bulk of the electrical connections, and then disconnected anything left in between. A note, the power steering and alternator bracket can be unbolted form the engine as a unit. Then use a bungee cord to hold the entire assembly off to the side.

With the intake manifold off and everything else out of the way, you should now be able to easily reach the top transmission bolts. Use a jack and piece of wood to support the transmission. Remove the remain trans bolts and the 3 bolts for each of the engine mounts. Hook up your engine hoist to the lift plate, and put just a little tension on the chain and taking some pressure off the engine mounts. Give everything a wiggle. Double check to make sure the engine is evenly separating from the trans, otherwise you may have missed a bolt. Also double check for any hoses/line/electrical connections. Lift a little more and wiggle a little more, inspect, rinse and repeat until its out.

I also took a number for photos for reference along the way to make sure I route hoses, lines, and electrical connections the same way when I put it back together.
nadthomas
Full Access Member
- Joined
- Dec 1, 2017
- Posts
- 158
- Reaction score
- 177
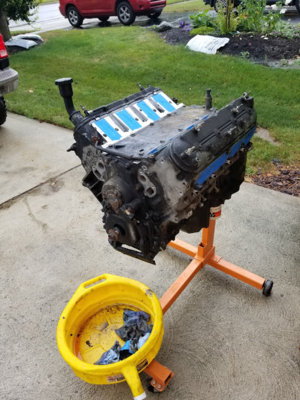
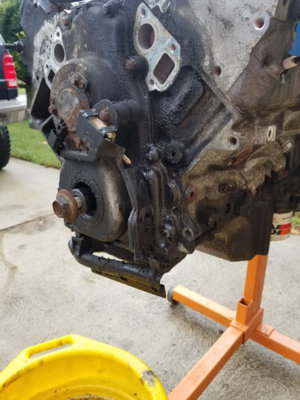
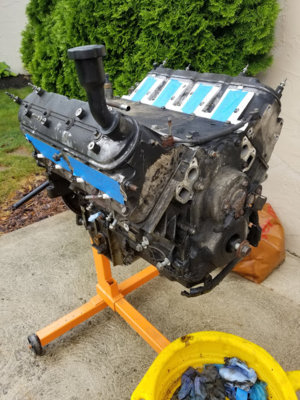
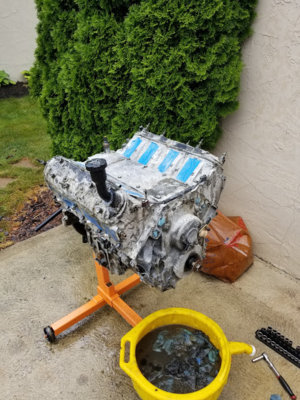
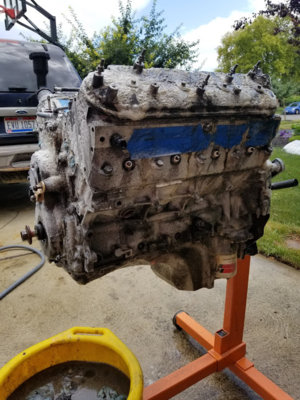
Now, an actual update! At this rate, I might get this done before the snow flies. It was sitting untouched on the engine stand for 2 weeks. Well, I finally took my first real stab at de-greasing the engine. I used oven cleaner, which I know some people on the internet have voiced concerns about using on an aluminum block. After some reading and discussing with a friend that recently used oven cleaner on the aluminum bumper on his Grand Wagoneer, I determine the results would be acceptable. You don't want to use oven clean on any polished parts, unless you plan to wet sand and re-polish, but on cast aluminum block like the Denali I think its fine. It does darken the surface of the aluminum, and will leave a bit of an ashy coating behind. I did two heavy coats of oven clean, and just rinsing with water in between coats. The first cost I let sit for about 5 minutes before rinsing. The second coat I let set for 20 minutes, which was a little to long as the sun came out and it started to dry. I was then running out of time, so I quickly hit a few of the pockets that still had grim with more oven clean and a bush.
Given the thick heavy layer of dirt and grease that covered most of the engine, and really minimal scrubbing the results are pretty good. Also, nothing was damaged as a result of using the oven cleaner.
If you are just looking to get a 95% degrease on your engine you could stop here. Once I get done replacing everything. I'm going to go back over the entire thing in detail with Simply Green and brush to prep it for paint. I will then hit it with some silver engine paint to make it look factory fresh.


Last edited:
Similar threads
- Replies
- 4
- Views
- 248
- Replies
- 55
- Views
- 2K
- Replies
- 4
- Views
- 820
