NORCAL SS Kit info/tech on how to level the rear of a 2015 up GM SUV

Disclaimer: Links on this page pointing to Amazon, eBay and other sites may include affiliate code. If you click them and make a purchase, we may earn a small commission.

CMoore711

Full Access Member
Joined
Jul 18, 2017
Posts
1,286
Reaction score
1,101
Anyone else using the 1" spacer and stock sway bar have any extra sound from the rear when going over bumps?

Same rear set up on my ‘15 Yukon XL Denali and no odd rear end noises here.
 

Dearmosd

Full Access Member
Joined
Nov 10, 2018
Posts
221
Reaction score
44
Only thing I can think of is when I placed the top rubber mount on it wasnt in the exact same groove as the stock spring was but figured the rubber would settle and conform to the new spring. Maybe when the second ring pushes up and makes contact with the rubber I hear a rubber squeak? IDK

Just dont like rolling through the neighborhood making noise like that....makes me feel cheap
 

Akinshake

Member
Joined
Mar 13, 2019
Posts
81
Reaction score
54
Location
Bowling Green, KY
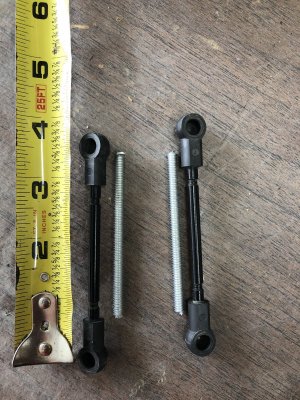
So I’ve got the springs and spacers installed, but my question is in regards to the links. From what I’ve gathered, 3-11/16” is the distance from the shoulder to the other shoulder of the end links. But the new rods are about the same length as factory. So what’s the rough length to start with and how do I take the end links off the factory rod? They just spin and spin so they aren’t threaded, I assume. Thanks image.jpg
 

Dearmosd

Full Access Member
Joined
Nov 10, 2018
Posts
221
Reaction score
44
They shouldn't be same length. You will have to pull the end caps off. Yes they spin but will pop off. The new rods should be about 1/4 shorted easy. From center cup to cup should be about 3" with new rod. I ended up a little shorter when using the plastic 2" spacer instead of the factory rubber piece.
 
OP
OP
NORCAL SS

NORCAL SS

SUV SUSPENSION GURU
Supporting Vendor
Joined
Jun 9, 2009
Posts
8,744
Reaction score
608
i think we spoke on the phone yesterday and your good now?
 

Godzuki86

TYF Newbie
Joined
Feb 23, 2019
Posts
5
Reaction score
0
So I just got my kit in the mail for my ‘16 Yukon. I want the rear lowered ~3” in the rear.

If I install the isolators on the axle and the supplied springs and links, how much will this drop the truck?
 

TyFeeback

TYF Newbie
Joined
Nov 23, 2020
Posts
1
Reaction score
0
Being a dealer for Belltech/DJM/Mcgauhys/Eibach/Matrix I tested them all on the 15 ups and tested which one works best and the 5305 belltech springs by far are the winnners. This customer came to me today so I just wanted to show how simple it is to lower the rear. Hearing shops charging 2 hours to do this is a rip off. NOTE THIS IS FOR A AUTORIDE TRUCK INSTALL

KIT FOR AUTORIDE IS 250 SHIPPED AND 1.75- 4 ADJUSTABLE
https://tbssowners.com/store/index.php?act=viewProd&productId=578

KIT FOR NON AUTORIDE IS 275 SHIPPED and adjsutable 2-3 inches


Lets get onto the install.

1) Jack truck up and put jackstands on both sides in front of lower a arm frame brackets
View attachment 169627

2) Next pop open the clip that holds the abs lines on the frame and make sure they hang freely
View attachment 169628

3) Pull out oem bumpstop and instert new shorter bumpstop
View attachment 169629

4) AUTORIDE ONLY --- Next pop off autoride links on upper a arms and replace with the rod that is included with my kit. Due to different spring rates on the front of the these trucks my rods are longer so you can adjust the rear not to sit lower than the front.
View attachment 169630

5) Place a floor jack under the rear end and pump it up just enough to release tenstion on the shocks
View attachment 169631

6) Remove the brake line bracket on diff. If you do not do this when you go to release rear end it will snap the brake line
View attachment 169632

7) Remove shock from oem bracket and install shock extenders but do not bolt shock back yet
View attachment 169633

8) Unloosen endlinks on both sides and remove from bar. I usually put the bolts on ends to keep work area cleaner
View attachment 169634

9) Now SLOWLY release floor jack to let rear end down. Making sure the ABS lines and the brake line bracket on the axle are free to move around

10) The spring you will be able to pull right out. Then you put the new springs in WITH CLOSER COILS FACING UPWARDS and the 1 inch spacer goes on the axle
View attachment 169635


11) The top coil will have a insulator and this pic shows whats under the insulator. MAKE SURE THE INSULATOR SITS CORRECTLY ON THIS LIP AND THE INSIDE OF THE TOP COIL SHOULD WRAP THE OUTSIDE OF THIS LIP. I usually jack up the rear end while guiding it in
View attachment 169636

12) Once you jack up rear end tighten shocks to shock extenders
View attachment 169637

13) Pop on the abs lines back into the frame clip
View attachment 169638

14) Bolt the brake bracket to the top of the rear end
View attachment 169639


15) Put tires back onto truck drop it down and drive around the block. On my kit I will update all info on how to dial in ride height in rear.


Any questions guys feel free to pm me on here or reply. I'm around 24/7 for support


I tried to click on the link for the kit but takes me to tbss site, no luck finding kit
 

Dearmosd

Full Access Member
Joined
Nov 10, 2018
Posts
221
Reaction score
44
Tony I noticed your website has the lowering kit supplied with Belltech 5305 coils. My kit came with 5301 coil. What would be the difference?
 

Forum statistics

Threads
132,360
Posts
1,866,619
Members
96,981
Latest member
12GMCYukon

Latest posts

Top