CJ Rodarme
Full Access Member
I'd like to preface this writeup with a few things. First, if you don't have a lot of patience, don't do this mod. Two, this is my first writeup so I apologize in advance (not really) if its a little bit rough. Third, don't do this mod if you don't enjoy headaches, pains in the ass etc. It was not a fun experience in the slightest and I probably wouldn't do it again, but the end result is amazing. This write up is written given that if your doing this you have basic knowledge on working on the interior of your truck (how to pull panels, run wires etc) and basic electrical knowledge. If you don't have those don't attempt this mod.
Before doing anything, watch this video, it gives a good outline of the process before you go in depth:
Parts Needed:
32w Fiber Optic light engine (wall socket style)
Fiber optic strand kit (I'd recommend 800 strand minimum for Tahoes/Yukons and more for suburbans/XLs)
Soldering iron/solder
Heat Shrink
Ring terminals
18 gauge or bigger wire, at least 30'
Basic tools (sockets, screwdrivers, allen keys etc.)
Plastic Clip/trim puller
Glue gun/glue
Patience
Time
Step 1: Pull Your Headliner
Pulling the headliner is pretty straight forward. However, there are some tough points. I used this writeup (https://www.tahoeyukonforum.com/threads/uninstall-headliner-dashboard.6635/) to help me along. The toughest part for me was the two coat hooks in the back. Pry them apart and it becomes a clip that holds the headliner in. Be careful not to damage or bend the fiberglass when removing it.
Step 2: Prepping the fiber optic strands and light motor
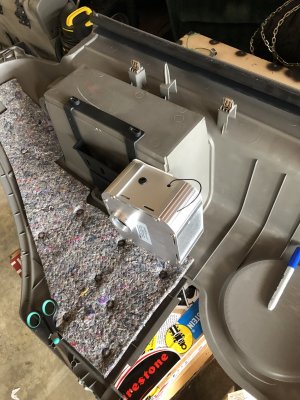
First, pull your drivers side rear interior panel. To do this, remove the bolt that's close to the cupholder. Then pull the plastic pin that's towards the rear, below the black post that your cargo net attaches to. To pull that black post thing, I took vice grips and a old rag, and twisted it off, mine was on there pretty tight. You will need to remove your jack, tools, and gloves, then remove the metal plate. If you have a OEM subwoofer etc. you may have to remove that as well (and install a quality sub lol). Then, glue the motor to the plastic panel as shown in the picture below. Make sure it is glued on tight and secure, you don't want it to fall off. If the light engine you use is different than the one I used make sure you don't glue it in a way that makes it so you can't access something you need such as where the cord plugs in, antenna etc. Set the panel to the side
Step 3: Wiring
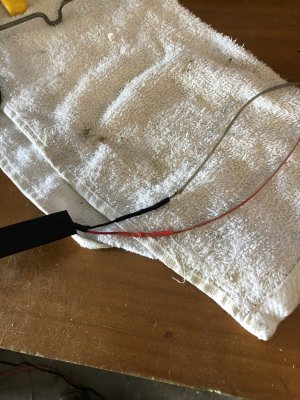
First, take the cord for the light engine and cut if off before the inverter block. Then use a razor to cut the rubber to reveal the red and black wires. Solder on your power and ground wire and protect it using heat shrink. I grounded mine under my drivers side middle seat. If you don't have an existing hole through your firewall you'll need to make one. Run the wire under the plastics, should be easy considering how small of wire you'll be using. Solder in an inline fuse close to the battery and make sure to use an appropriate sized fuse. I didn't use a switch on mine but its probably a good idea to do so, and if you do use a relay.
Step 4: Preparing for fiber optics
Take the bundle of strands, and mock up how it runs to the headliner. Mark off how much you need, from where the light engine will sit and where it will go up to the headliner, then add 6" and use tape to mark that point. This way you ensure your strands will be long enough. Fiber management is crucial for this project. Use zip ties or tape to make smaller bundles of strands and try to minimize tangling (it's an absolute nightmare).
Step 5: Running the Fibers
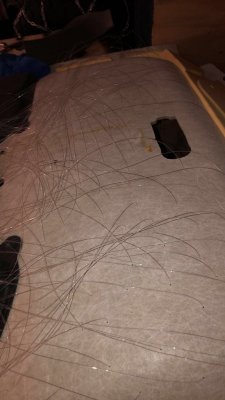
This is where things get fun, or not. Place your headliner on a flat, raised surface. I used two sawhorses and a empty sub box to support mine. Then take something sharp, and start punching your holes in you headliner. I've seen multiple different tools used, and the key is using something that is similar in diameter (the fibers are usually 0.75 mm) to the kit. I used a straight piece of a metal coat hanger, and it worked, but the holes are just a little bit too big. DO NOT do what I did. You can mark out constellations, patterns etc or just go random like I did. I've even seen people section off areas and separate strands so its perfectly even. Then, you feed the fibers through one by one. Make sure you feed quite a bit of fiber through, you don't want them to come out. Then take a glue gun, or glue of your choice and glue each strand down. Be careful when using a glue gun though. The glue, as well as the tip of the gun can melt the fibers. This part of the process takes hours and hours, especially if you are the only one working on it.
Step 6: Reinstalling the Headliner
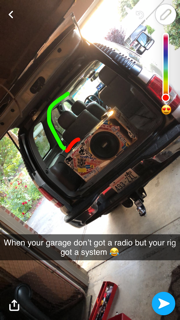
Once you are done with all of the fibers, take a look at your headliner for spots you may have missed and/or want to fill in. Once you are fully satisfied, install the headliner, following the steps for removal backwards. Make sure you have easy access to the end of the strands and enough slack. Tuck in all of the strands going across the sunroof (if you have one) around the edge. Verify that the sunroof works. Run the bundle of strands down the pillar as shown. Then, connect your strands to the light motor, and reinstall that panel. Put basically everything back together and make sure you're not missing anything.
Step 7: Trimming
To finish this process, you will need to trim all the excess fibers. To make your life easier you will want a garbage bag to throw the strands in because they will definitely make a mess if you don't (I'm still finding tons of strands after cleaning it twice). You will want to trim them flush, or maybe just over flush. I wouldn't recommend going under flush so they don't get pushed back under.
If you get this far, you now have the coolest headliner around, and something that (at the time of writing this) very few people have in their trucks. It takes time and patience and more time, but if you do it right it'll be beyond worth it. Feel free to ask any questions and I'll respond as soon as I can.


