Suspension went straight to the floor after complete overhaul

Disclaimer: Links on this page pointing to Amazon, eBay and other sites may include affiliate code. If you click them and make a purchase, we may earn a small commission.

crabbman

Full Access Member
Joined
Nov 19, 2015
Posts
113
Reaction score
28
Location
GYPSUM,COLORADO
Hello, that is right i did something wrong. This is for the front. 2002 gmc yukon xlt. i am thinking i inserted the torsion bars in the wrong hole of the lower control arm,both sides.
What do torsion bars do anyway?
the screw in the middle of the undercarriage that adjust the torsion bars do not even touch the bar to adjust this.
Not sure why the suspension bottom out.
What else i could have done wrong, i do not have a clue.
Suggestions and help here.
Thank you.
 

Chubbs

Full Access Member
Joined
Jun 24, 2017
Posts
634
Reaction score
391
Google images of torsion bar keys using various phrases including the truck model. I would get you pics but it's raining here. If you don't have any progress or revelations with that, I should be able to update tomorrow.

The bars can only go 1 way so I presume the keys are not installed and torqued correctly, which is where all of the tension is created. It requires a GM torsion bar tool to install the keys properly.
 
OP
OP
crabbman

crabbman

Full Access Member
Joined
Nov 19, 2015
Posts
113
Reaction score
28
Location
GYPSUM,COLORADO
i EITHER PUT THE HEX END INTO THE LOWER CONTROL ARM A TURN TOO MUCH WHICH CREATED THE KEY TO FLIP UP TOWARDS THE BODY. SO I WILL MOVE THE CROSS MEMBER TOMORROW.PUNCH THE KEY OUT,PUT IT IN CROSSMEMBER THE RIGHT WAY AND PLUG IT INTO THE HEX AND PUT CROSSMEMBER BACK INTO PLACE. WHAT DO YOU THINK OF THIS?
the alternative is a month ordeal of taking the entire upper and lower control arms and axle removed. NO THANK YOU TO THIS
 

Chubbs

Full Access Member
Joined
Jun 24, 2017
Posts
634
Reaction score
391
You shouldn't be able to even start the 18mm bolt threading without having the torsion bar key torqued up with a torsion bar tool. you need to rent the torsion bar tool from the AutoZone or wherever and then the orientation of the key/bolt/bar within that crossmember should make more sense. You also need to have the front completely lifted off the ground during the entire exercise of removal and reinstall.

Let me repeat, you need the GM torsion key tool. You put a deposit at the store and it is refunded upon its return. Like $80 or $100. It's a clamp of sorts that acts more like a puller by attaching to the X-member and getting the key compressed so the block can be installed where that adjustment bolt threads into.

Also brush the threads out on the tool and apply some grease to make the work go smoother. You need 1/2" ratchet or breaker bar for leverage. A lot of torque & pressure is involved here: some folks more familiar with the process won't touch it. Someone commented recently on a different GM forum that a finger was broken while attempting to adjust or replace TB keys. If you begin to develop some fear then you know things are going right.

The process is different working from the control arm like you did, originally. Doing it from the crossmember is actually standard routine with a service procedure and obviously, special tool accompanying.
 
Last edited:

Chubbs

Full Access Member
Joined
Jun 24, 2017
Posts
634
Reaction score
391
Here you go, instructions:

Front Torsion Bar Replacement
Tools Required

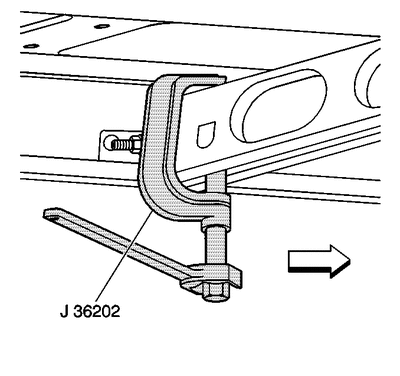
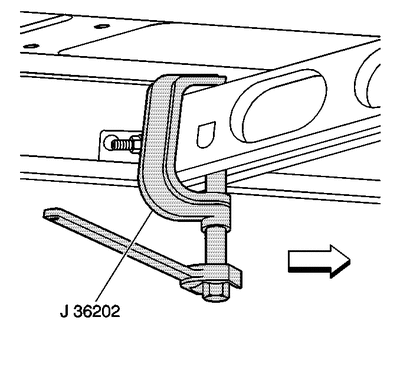
J 36202 Torsion Bar Unloading/Loading Tool

Removal Procedure


  1. NOTE
    Notice

    Use care when handling the torsion bars in order to avoid chipping or scratching the coating. Damage to the coating will result in premature failure of the torsion bars.


    Raise and support the vehicle. Refer to Lifting and Jacking the Vehicle in General Information.

  2. 360742.gif


    Click to Enlarge
    Install the J 36202 to the adjustment arm and the crossmember .

  3. Increase the tension on the adjustment arm until the load is removed from the adjustment bolt and the adjuster nut.

  4. 348349.gif


    Click to Enlarge


    NOTE
    Important

    Mark the adjustment bolt and count the number of times that is required to remove the adjustment bolt.


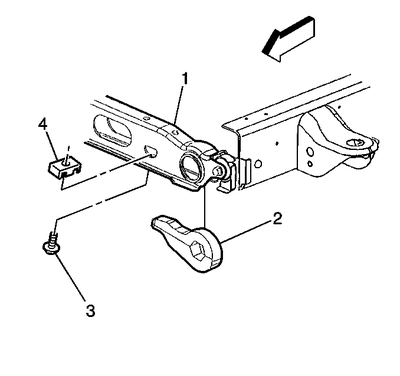
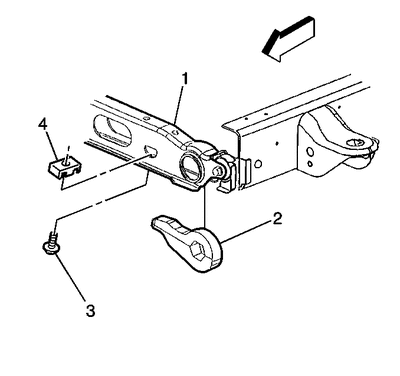
    Remove the adjustment bolt (3) and the adjuster nut (4).

  5. Remove the J 36202 , allowing the torsion bar to unload.

  6. 165128.gif


    Click to Enlarge
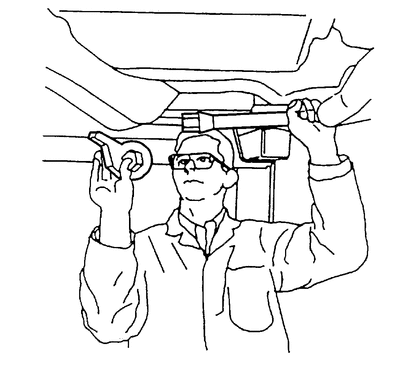
    Remove the adjustment arm by sliding the torsion bar forward until the torsion bar clears the adjustment arm. Use your hand to support the adjustment arm as the adjustment arm releases from the torsion bar.

  7. 348347.gif


    Click to Enlarge
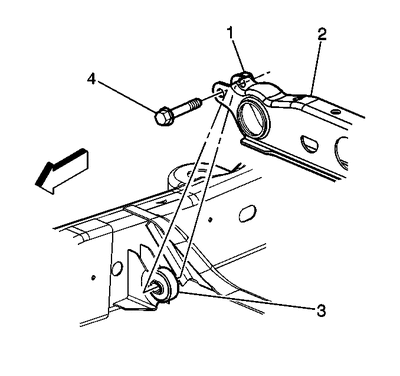
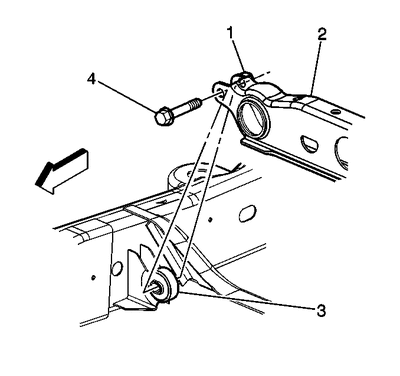
    Remove the torsion bar crossmember bolts (4) from the weld nuts (1).


  8. NOTE
    Important

    Note the position of the torsion bars as the left and right bars are different.


    165137.gif


    Click to Enlarge
    Remove the torsion bars from the vehicle.
Installation Procedure
  1. 165137.gif


    Click to Enlarge
    Install the torsion bars to the lower control arm.

  2. Install the torsion bar crossmember.

  3. 348347.gif


    Click to Enlarge


    NOTE
    Notice

    Refer to Fastener Notice | Fastener Notice | Fastener Notice in Cautions and Notices.


    Install the torsion bar crossmember bolts (1) to the weld nuts (4).


    Tighten
    Tighten the bolt to 95 N·m (70 lb ft).

  4. 360742.gif


    Click to Enlarge
    While supporting the adjustment arm, slide the torsion bar rearward until the torsion bar fully engages the adjustment arm.

  5. Install the J 36202 to the adjustment arm and the crossmember.

  6. Increase the tension on the adjustment arm in order to load the torsion bar.

  7. 348349.gif


    Click to Enlarge


    NOTE
    Important

    Install the adjustment bolt the same amount of turns that were required to remove the bolt during removal.


    Install the adjustment bolt (3) and the adjuster nut (4).

  8. Remove the J 36202 releasing the tension on the torsion bar until the load is taken up by the adjustment bolt.

  9. Remove the safety stands.

  10. Lower the vehicle.

  11. Measure the Z height. Refer to Trim Height Inspection in Suspension General Diagnosis.

  12. 516269.gif


    Click to Enlarge
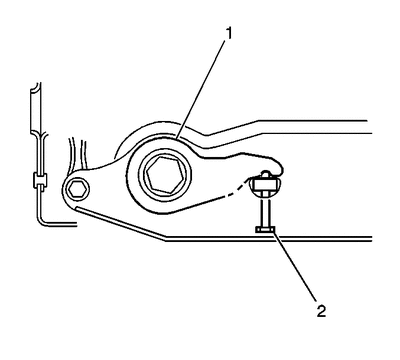
    Turn the adjustment bolt (2) clockwise to increase the Z height and counterclockwise to decrease the Z height.
 
OP
OP
crabbman

crabbman

Full Access Member
Joined
Nov 19, 2015
Posts
113
Reaction score
28
Location
GYPSUM,COLORADO
Thank you MR. Chubbs. I understand. Thank you so much. Why is it you go from heaven to hell in a matter of minutes doing Auto mechanics? And also reverse emotions as you have stated to me. Again thank you and I am starting this project this morning.
update after I finish.
Good day
 
OP
OP
crabbman

crabbman

Full Access Member
Joined
Nov 19, 2015
Posts
113
Reaction score
28
Location
GYPSUM,COLORADO
Thank you Mr Chubbs. Got the tool to install the key. Was done in three hours. that is fast for me. cost $90.00, BUT WAS RETURNED TO ME WHEN I BROUGHT IT BACK.
LOVE RENTAL TOOLS.
Took my Dewalt tile cutter and did cutouts on the crossmember,and the key per gravity plopped out and down. Too easy.
took yukon on test drive and it was scary. all over the road and wheels sick with Camber. setting up an appointment for alighment this week so we all can use it.
Good day and thank you again.
 

Rocket Man

Mark
Supporting Member
Joined
Dec 25, 2014
Posts
26,006
Reaction score
50,869
Location
Oregon
Cutouts on the crossmembet with a tile cutter? Please explain.
 
OP
OP
crabbman

crabbman

Full Access Member
Joined
Nov 19, 2015
Posts
113
Reaction score
28
Location
GYPSUM,COLORADO
yes rocket man. I have a Dewalt hand held I guess grinder,polisher and many more applications for which disc you put on it. . I decided to put the metal grinder disk onto it. I was able to find enough room to get clearance to cut in a straight line to the cross member. just right under neath the key i cut out two straight lines on each side of the key and yes it really happened. The key fell down a few inches enough room to hammer off the key attached to torsion bar. EASY IT WAS. Did both sides. This will not damage the cross member or effect installation of another key. Also made it easy to re-install the key and Torsion Bar. Good luck,try it you will like it.
 

Rocket Man

Mark
Supporting Member
Joined
Dec 25, 2014
Posts
26,006
Reaction score
50,869
Location
Oregon
I guess that key was in a real bind. Good thing you got it back off I'm thinking. Pictures?
 

Forum statistics

Threads
132,737
Posts
1,873,413
Members
97,565
Latest member
Champ74
Top