What did you do to your OBS GMT400 Tahoe/Yukon Today?

Disclaimer: Links on this page pointing to Amazon, eBay and other sites may include affiliate code. If you click them and make a purchase, we may earn a small commission.

Sam Harris

Supporting Member
Joined
Sep 26, 2018
Posts
7,427
Reaction score
14,911
Location
Texas
Well I'm out of commission with a back injury and shingles. So my hubby took my truck to the shop and ground off all the rust off the roof and has applied the ospho and sealed it back up with some black rust inhibitor. Ol' FrankenBetty is looking sweet.
Damn that sucks! Get well soon!
 

dkknaebel

Keeping LKQ in business
Joined
Sep 25, 2017
Posts
438
Reaction score
726
Location
St. Petersburg, FL
I’ll toss out a suggestion in case you run into this.

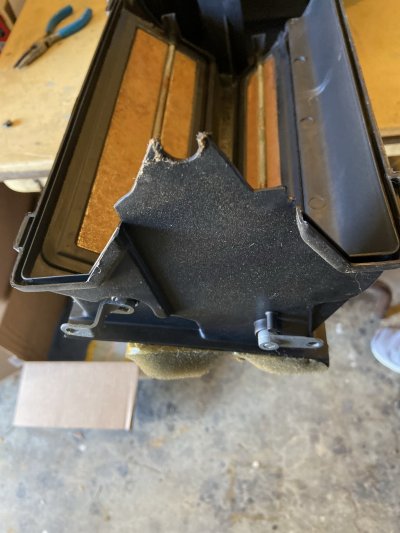
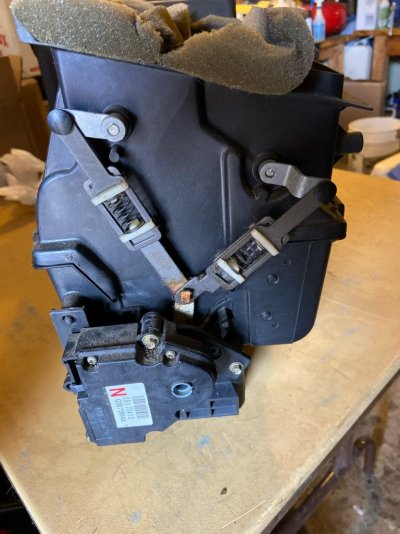
The box containing the three dampers (defrost, panel and floor vent) has two that are pressed into brackets that connect to the actuator motor. Your dampers are likely rotted at the edges and the foam on the top of the box is probably shot as well.

Getting those dampers pressed off of the linkage is difficult even with the box sitting on a bench. Mine broke at the plastic, requiring either careful gluing or just replacing the box. I just bought a new box - it’s GM part number 52467204 and available on amazon for around $70. It includes the dampers already installed. The third damper that routes air to the floor just drops in and is easily replaced. I’d replace that as well and put some new foam on the top of the box.
d6bc7d660e052b5b68fb599135acc6e7.jpg

cd8666b3d02afa0dc3a4fb5a245bed2c.jpg

Separating the top of the box without pulling it from the vehicle may be a challenge since there are several screws that are against the firewall. It fits together like a clamshell. I haven’t tried to do it without pulling it, but pulling it requires a coolant drain down and opening the a/c lines.

It can snowball if you pull it - the evaporator line loves to rust and seize where it connects to the accumulator and there isn’t a lot of room to work to begin with. In my case, I was replacing the entire a/c system so it didn’t matter, but it’s something to keep in mind.

My hubby and son dropped my dash tonight. Guess what is broken @east302 ? That door is broken on one side. But I'm super stoked that i'm going to have air blowing out of one set of vents only. She's starting to look good :)
 

Kelsda

Full Access Member
Joined
Sep 16, 2017
Posts
280
Reaction score
226
Location
New Jersey
My hubby and son dropped my dash tonight. Guess what is broken @east302 ? That door is broken on one side. But I'm super stoked that i'm going to have air blowing out of one set of vents only. She's starting to look good :)


I changed all three blend doors same situation the rubber edges disintegrated can be done without disconnecting a/c lines east302 is correct on blend door housing on one side is clam shelled by hvac box what you need to do is remove center console on floor to let dash hinge down far enough to access milk crate to sit on all the work is in the center take out all screws on inside of black box and carefully wedge it apart it won’t give a lot but enough to do so I used wooden wedges you will notice blend door housing has a lip under black box once you wedge apart should be able to carefully pry top out and blend door housing should come out take photos where blend door linkages go can be confusing on reassembly all three doors are inexpensive on Amazon now for the hard part putting it back together blend door housing splits in half four clips slide bottom half in get your doors and linkages in order then work top half back in its like surgery take your time you can do it remove wedges replace screws three out of four clips go in real easy fourth one not so much but I got it my a/c works well I didn’t want to disconnect it
 

dkknaebel

Keeping LKQ in business
Joined
Sep 25, 2017
Posts
438
Reaction score
726
Location
St. Petersburg, FL
I changed all three blend doors same situation the rubber edges disintegrated can be done without disconnecting a/c lines east302 is correct on blend door housing on one side is clam shelled by hvac box what you need to do is remove center console on floor to let dash hinge down far enough to access milk crate to sit on all the work is in the center take out all screws on inside of black box and carefully wedge it apart it won’t give a lot but enough to do so I used wooden wedges you will notice blend door housing has a lip under black box once you wedge apart should be able to carefully pry top out and blend door housing should come out take photos where blend door linkages go can be confusing on reassembly all three doors are inexpensive on Amazon now for the hard part putting it back together blend door housing splits in half four clips slide bottom half in get your doors and linkages in order then work top half back in its like surgery take your time you can do it remove wedges replace screws three out of four clips go in real easy fourth one not so much but I got it my a/c works well I didn’t want to disconnect it

I'll show this to the hubby. He has the dash completely out of my truck and is replacing it with a pretty mint one we scored at the swap at Turkey Rod Run in Daytona. But I'll be sure to send him these destructions and see how it goes.
 

Kelsda

Full Access Member
Joined
Sep 16, 2017
Posts
280
Reaction score
226
Location
New Jersey
I'll show this to the hubby. He has the dash completely out of my truck and is replacing it with a pretty mint one we scored at the swap at Turkey Rod Run in Daytona. But I'll be sure to send him these destructions and see how it goes.


My dash is like brand new so I didn’t want to take it out all the way good luck and feel better I noticed you weren’t feeling so good btw I experimented on another truck in the bone yard before I worked on mine
 

dkknaebel

Keeping LKQ in business
Joined
Sep 25, 2017
Posts
438
Reaction score
726
Location
St. Petersburg, FL
My dash is like brand new so I didn’t want to take it out all the way good luck and feel better I noticed you weren’t feeling so good btw I experimented on another truck in the bone yard before I worked on mine
Thanks Kelsda! I'm even more goodies done on the Ol' FrankenBetty. The hubby convinced me to get a set of Q Logic kick panels, he had a set in his Syclone and I'm gonna have some decent tunes. Actually most of my audio will be donated and from his old Syclone LOL Now some hinge pins, door striker, hood release cable. Thought about sneaking a set of nerf bars in the cart...
 

Colorado Yeti

Member
Joined
Jan 29, 2019
Posts
69
Reaction score
97
Location
Ft. Collins
I installed a Warn RC 9000 winch, some Hella 7" driving lights and a Warn Transformer Series pushbar on the front of my 2-door Tahoe. I had the winch and lights sitting around from a previous Jeep build, so that part was free. I wired the lights into my hi-beam circuit and the visibility is amazing. The Warn pushbar was definitely not cheap, but it is incredibly well-designed, relatively easy to install and is incredibly robust compared to a lot of other light duty pushbars out there. Only bad part....caught myself on fire doing it. Note to self: don't wear polar fleece while welding.

View attachment 242076
 
Last edited:

Forum statistics

Threads
132,411
Posts
1,867,624
Members
97,072
Latest member
trav02nj
Top