4 inch Rancho lift, 34 inch tires and steel bumpers front and rear.

Disclaimer: Links on this page pointing to Amazon, eBay and other sites may include affiliate code. If you click them and make a purchase, we may earn a small commission.

OP
OP
Tozan

Tozan

Overlander
Joined
Nov 12, 2016
Posts
617
Reaction score
908
Location
Yavapai Arizona
Have you put any armor under the body? Truck looks amazing.

Thank you. I will be adding some in the future most of the critical things holding oil are pretty protected. So most of my additions will be more one the lines of sliders and stuff to keep things form poking into soft stuff.
 
OP
OP
Tozan

Tozan

Overlander
Joined
Nov 12, 2016
Posts
617
Reaction score
908
Location
Yavapai Arizona
Cool bumpers bud
What brand and model?

They are Fab Four bumpers. I am not sure they make them anymore but they still make them for a suburban so they might fit the Tahoe too. They are certainly a strong bumper and they are lighter than most of the other brands I have seen.
 

Dingus mcghee

TYF Newbie
Joined
Oct 7, 2019
Posts
15
Reaction score
20
They are Fab Four bumpers. I am not sure they make them anymore but they still make them for a suburban so they might fit the Tahoe too. They are certainly a strong bumper and they are lighter than most of the other brands I have seen.

They look badass. And very functional.

Nice ride bro.
 
OP
OP
Tozan

Tozan

Overlander
Joined
Nov 12, 2016
Posts
617
Reaction score
908
Location
Yavapai Arizona
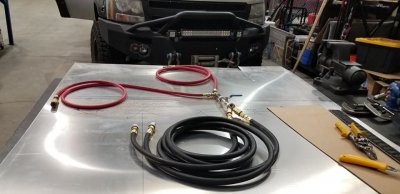
More work today, setting up my air up/down system. Everything is spread out before installation. The red hoses will hook to my CO2 air tank in the back of the Tahoe and route under the carpet one coming out by the refrigerator one beside the back seat on the left side. They will be the connection points for airing up both tires on the right or left side at once. The black hoses are connected to two tires and dumped or filled when connected to the air tank. With this system I will be able to air up or let out air from two tires at a time.

79411859_10157974066466738_1507315353737232384_o.jpg
With this valve set up when it is disconnected from the red hose the air can be dumped out really fast from both tires at once. Open the valve and air will flow out close it and the gauge (not installed yet) will read air pressure on both tires. There is an outlet in this manifold for an air gauge that will be added soon. When Airing up you connect the manifold to the red air line on either side and open the valve. The tank has an adjustable regulator set at 50 psi so I will be able to open the valve and take a break while the system does all the work. Then hook it to the other side and repeat. Later if I get lazier I can add two more air lines and do all four at once.

These are the best locking air chucks I have found to date they are very positive they lock to more than one side. But they do cost a lot more.


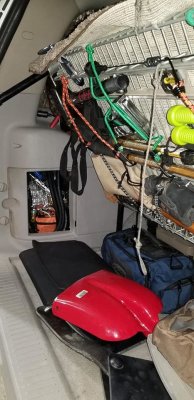
This little square storage area is where the two black hoses go when not in use. If your Tahoe storage area does not, look this big it is because you have not sawed the original box out of there yet... What are you waiting for the storage behind there is huge. Even with the hoses in place there is a lot of room. (Room for 2 more hoses) In this photo you can see I fasten a lot of stuff under the lift up shelf in the back so there is no wasted space here. If you are looking for a good place to store snow chains just get a small blue storage bag form Cabellas and stick some rubber gloves in a side pocket to keep your hands dry when putting them on or taking them off. This bag holds chains for a set of 35x12.5x17 tires.

78368094_10157974067006738_4739161992097431552_o.jpg

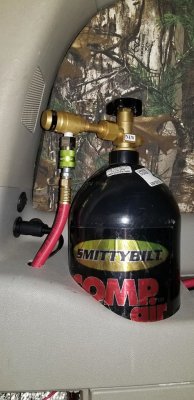
This is the tank hook up without the regulator installed. I also installed two power outlets back here a twin USB and standard power port my refrigerator is plugged into this switched circuit to the secondary battery.

79288974_10157974066896738_2655696918998417408_o.jpg

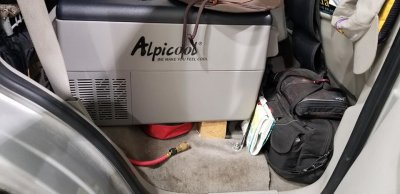
This is where you connect the black hose to fill the tires on the right side of the truck there is another chuck on the left side. . It tucks back out of the way behind the refrigerator when not in use. The two black bags are medical trauma/first aid kits the red bag below the refrigerator are my jumper cables. These items are located here for fast easy access. No sense in having this stuff if you can't find it in a hurry.

71499087_10157974066666738_5366557749406597120_o.jpg
 

HiHoeSilver

Away!
Joined
Feb 28, 2017
Posts
10,918
Reaction score
14,572
Location
Chicago
More work today, setting up my air up/down system. Everything is spread out before installation. The red hoses will hook to my CO2 air tank in the back of the Tahoe and route under the carpet one coming out by the refrigerator one beside the back seat on the left side. They will be the connection points for airing up both tires on the right or left side at once. The black hoses are connected to two tires and dumped or filled when connected to the air tank. With this system I will be able to air up or let out air from two tires at a time.

View attachment 236238
With this valve set up when it is disconnected from the red hose the air can be dumped out really fast from both tires at once. Open the valve and air will flow out close it and the gauge (not installed yet) will read air pressure on both tires. There is an outlet in this manifold for an air gauge that will be added soon. When Airing up you connect the manifold to the red air line on either side and open the valve. The tank has an adjustable regulator set at 50 psi so I will be able to open the valve and take a break while the system does all the work. Then hook it to the other side and repeat. Later if I get lazier I can add two more air lines and do all four at once.

These are the best locking air chucks I have found to date they are very positive they lock to more than one side. But they do cost a lot more.


This little square storage area is where the two black hoses go when not in use. If your Tahoe storage area does not, look this big it is because you have not sawed the original box out of there yet... What are you waiting for the storage behind there is huge. Even with the hoses in place there is a lot of room. (Room for 2 more hoses) In this photo you can see I fasten a lot of stuff under the lift up shelf in the back so there is no wasted space here. If you are looking for a good place to store snow chains just get a small blue storage bag form Cabellas and stick some rubber gloves in a side pocket to keep your hands dry when putting them on or taking them off. This bag holds chains for a set of 35x12.5x17 tires.

View attachment 236239

This is the tank hook up without the regulator installed. I also installed two power outlets back here a twin USB and standard power port my refrigerator is plugged into this switched circuit to the secondary battery.

View attachment 236243

This is where you connect the black hose to fill the tires on the right side of the truck there is another chuck on the left side. . It tucks back out of the way behind the refrigerator when not in use. The two black bags are medical trauma/first aid kits the red bag below the refrigerator are my jumper cables. These items are located here for fast easy access. No sense in having this stuff if you can't find it in a hurry.

View attachment 236244
I'm moving in, Charles.
 
OP
OP
Tozan

Tozan

Overlander
Joined
Nov 12, 2016
Posts
617
Reaction score
908
Location
Yavapai Arizona
I did a timed air down and air up with this system. This is the time it took to do two tires so total time for all four tires will simply be double the time.

Tires 35x12.5x17
Start air pressure was 55 PSI Lowered to 20 PSI Air down time 4.5 minutes

Air pressure 20 PSI filled to 55 PSI Fill time 2 minutes

Conclusion
Air down time for all four tires would be about 10 minutes.
Air up time would be about 5 minutes. I can connect the air hose and not have to mess with an ARB deflator or hold an air chuck to the tire anymore or worry about damaging my tire valves.

When I add another set of hoses so all four tires are hooked up at once those times should be.
Air down time only 4.5 minutes
Air up times 2 minutes.

Is it worth it???

How often do you go out to play in the snow, sand, mud, mountains and decided to not air down because I didn't feel like spending 5 minutes per tire to air down twenty minutes total.... Then take another 20 minutes to fill them up with my old electric air pump one tire at a time.

How many times did you not air down because it is raining or too cold out or you had to stand in the mud? Well with this system you will still get wet or cold during the 1 minute hook up time then get back inside to finish.


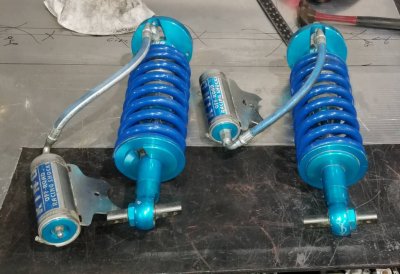
Update: I picked up a set of King 2.5 remote reservoir coil-overs today........ Not sure how long it will be before I get a chance to install them...

I am trying to decide between the Baja kits Chase UCA kit with 9 inches of travel or the Pre runner kit on it for 11 1/2 in wheel travel.

I need to see which will work best with my Rancho lift.
 
OP
OP
Tozan

Tozan

Overlander
Joined
Nov 12, 2016
Posts
617
Reaction score
908
Location
Yavapai Arizona
I should be able to get these mounted up next month... Since I have a 4 inch lift kit I will need to change the mounting or get a longer stroke out of them by lengthening the rod and cylinder. With a longer R and C I will be able to increase the wheel travel possibly out to 8 or 9 inches... It will take a lot of fitting and measuring to be sure it works out right.

king shock.jpeg
 
Last edited:
Top