4 inch Rancho lift, 34 inch tires and steel bumpers front and rear.

Disclaimer: Links on this page pointing to Amazon, eBay and other sites may include affiliate code. If you click them and make a purchase, we may earn a small commission.

OP
OP
Tozan

Tozan

Overlander
Joined
Nov 12, 2016
Posts
618
Reaction score
919
Location
Yavapai Arizona
Tozan, I’ve read your entire post start to finish, I’ve acquired the parts needed for the , work for a pharmaceutical company that “retires” their metal carts after they get degraded with bleach and alcohol dunking for new ones. Have started on building the bed.

I’ve got one ?, it may sound stupid but... how do you get out of the back of the truck when the lift gate is down? I don’t have a release button or cable to pop it open from the inside. My key fob only opens the glass and it’s been fun reaching down on the outside to get the gate to release.

Ive been using the back to sleep in during our Boy Scout Trips. Being the Scoutmaster does have its privileges! And the fact I’ve got 4 fused disks in my back.

Mine is the same way the rear only opens with the key fob so far... But, I am thinking of pulling and maybe deleting the rear plastic panel so while it is off I will take a look to see if I can install some sort of inside latch if possible..
 

5strmtrp

Full Access Member
Joined
Jul 28, 2019
Posts
365
Reaction score
384
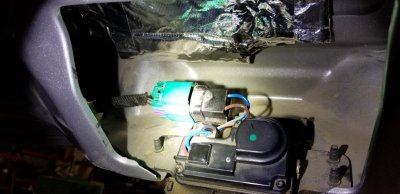
I had the panel off recently to replace the handle to open the gate. Simple 2 wires if I remember. I guess I’ll look into seeing if there’s a way to tap into the harness and make the gate work from outside or inside with another switch.

Keep all posted hopefully shortly.

Paul
5trmtpr


Mine is the same way the rear only opens with the key fob so far... But, I am thinking of pulling and maybe deleting the rear plastic panel so while it is off I will take a look to see if I can install some sort of inside latch if possible..
 
OP
OP
Tozan

Tozan

Overlander
Joined
Nov 12, 2016
Posts
618
Reaction score
919
Location
Yavapai Arizona
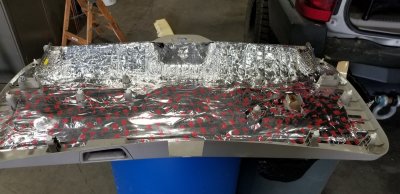
It looks like two wires going to the lock but, there are a few more wires that attach to the back also. I did not have time today to probe the wires to see what would work but it does look like it should be pretty simple to do.. I was busy putting in insulation in the rear panel today.. But I almost did it... lol I guess I will have to wait til next time I am in there...

20200521_160940.jpg

Here is the panel after adding insulation to it I also added insulation in the hatch too.. This should reduce a lot of the cold or heat coming in the rear hatch.


20200521_171649.jpg
 
Last edited:
OP
OP
Tozan

Tozan

Overlander
Joined
Nov 12, 2016
Posts
618
Reaction score
919
Location
Yavapai Arizona
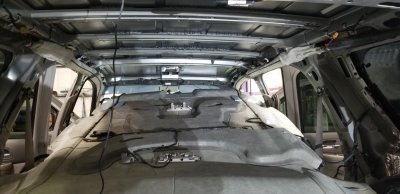
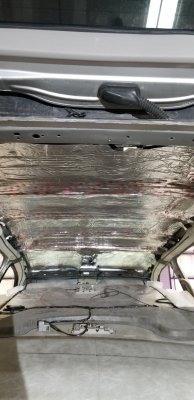
Still adding more stuff... I am completing the installation of insulation all the doors were done before and the headliner is done now also. To do this installation you have to drop the headliner unfortunately the wiring can not be disconnected so you can only drop it and work around it from either side. The headliner install took 3 hours total.
20200726_134825.jpg
The insulation is inserted between the ribs in the roof then I also put on tape to close off the holes in the ribs. Be sure to work around and behind your curtain airbags so the insulation will not interfere with the Air bag deployment. I also put more insulation behind the rear air-conditioning ducts too.

20200726_154502.jpg
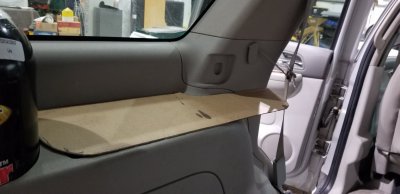
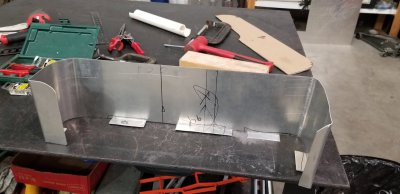
Next project is installing a shelf and bin on the left side. First step was making a template so I can cut a piece of aluminum sheeting for the base. The underside of this base will also allow access into the storage below the shelf.
20200805_172655.jpg
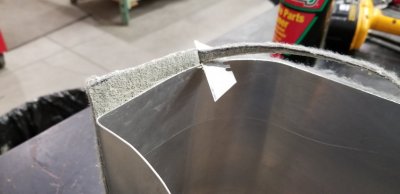
This is the wall area looking at it form where the rear window is. I cut the sides 1 inch longer so I could bend them over for mounting tabs. The base section will drop in here and be held in place with rivets.
20200805_172734.jpg
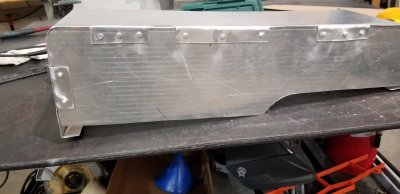
After the pop rivets are installed I took a hammer and flattened the rivets out. The flatter side of the rivets are on the inside so they will not snag on anything stored in there. So far this only weighs about a pound. I am working on building things to be lighter and easy so at all costs I will avoid wood in all of my construction.
20200805_175954.jpg
 
OP
OP
Tozan

Tozan

Overlander
Joined
Nov 12, 2016
Posts
618
Reaction score
919
Location
Yavapai Arizona
I am pre-fitting it here and everything fits perfect. Next step will be putting carpet on the outside and putting in some quick release fasteners that will hold it against the side. I will also install a 3/8 inch thick block under the bottom it will go into the factory hole to locate the shelf and help hold it in place.
20200805_180223.jpg
This is the right side before the carpet was installed on it I will include new photos when both side are done. On the right side there is room for 2 down jackets in stuff sacks and also two mid weight jackets and other things.
20191205_163335.jpg
 
OP
OP
Tozan

Tozan

Overlander
Joined
Nov 12, 2016
Posts
618
Reaction score
919
Location
Yavapai Arizona
Finished up the install today.
First step after the carpet glue dried over night was to trim it out. It only took a few minutes with a razor blade to trim it out. From there I did a few minor adjustments and marked and drilled mounting holes and installed it.. Took maybe 20 minutes... Also for those who wonder what an aluminum compartment with carpet like this weighs... About 6 pounds total...
20200806_150331.jpg
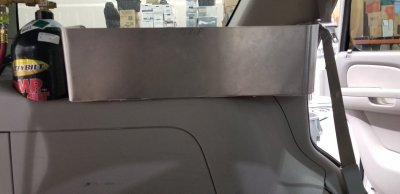
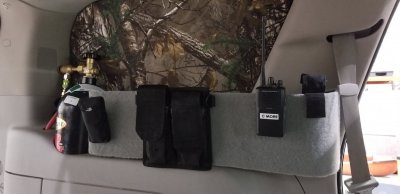
This is what it looks like mounted in place I use plastic push in fasteners they are a 1/4 inch diameter and will have no problem holding it in place. To remove it for accessing underneath storage I only need to remove three pins and lift it out of the way. With the carpet you can velcro these pouches or any other things to the sides. I will add a pouch for my cell phone since my bed is inside here. You can also see my CO2 tank here with the air line that is routed through the vehicle for fast air up/downs.20200806_164206.jpg
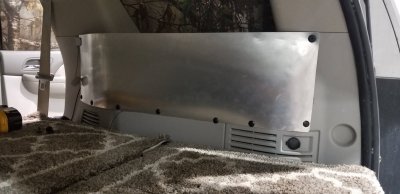
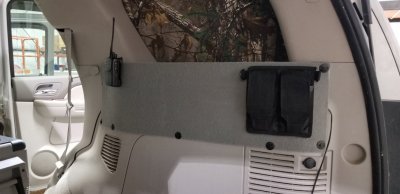
The passenger side compartment was made in the past it also has carpet on it for attaching velcro pouches for accessories. You can see the large plastic buttons used on both units to hold them in place you can find these in automotive stores or on line. They can be removed in just a few minutes if you need to get behind them. The black wire to the right is for powering my elect water pump when it is being used while camping. The pouches pictured are magazine pouches and will hold misc. things or maybe even a magazine.. This is a good place to keep our radios hers on this side mine on the other. We have commercial encrypted radios so no one else can monitor what we are saying on them they compliment the Ham radio mounted in the truck.

20200806_164148.jpg
 
Last edited:

Fosscore

Full Access Member
Joined
Apr 16, 2014
Posts
10,546
Reaction score
18,357
Nice execution on that carpeted storage compartment. Really complements the cargo area given your overlanding missions and all the off-the-grid equipment needed. Like the ingenuity.
 

Shumif1

Member
Joined
Jun 10, 2020
Posts
36
Reaction score
33
Love all the mods you have done , great job. Do you happen to use a power inverter ? I want to install one for camping purposes.
 
Top