Best way to black out tail lights?

Disclaimer: Links on this page pointing to Amazon, eBay and other sites may include affiliate code. If you click them and make a purchase, we may earn a small commission.

BlackedOutHoe

Low & Slow
Joined
Feb 1, 2010
Posts
355
Reaction score
321
Location
S. Carolina
Mine have 5 coats of VHT and 4 coats of clear. We did my buddies today, 3 coats a little thicker and 3 coats of clear.

IMG_1829.jpg
IMG_1840-2.jpg
IMG_6056.jpg
IMG_6061.jpg
 

Narco

Supporting Member
Joined
Nov 12, 2009
Posts
1,952
Reaction score
3
Location
Atlanta
killer...did you clear these out when you lightened them? if so how many coats?
 

Modded

That Guy
Joined
May 3, 2009
Posts
6,942
Reaction score
107
My Personal BlackOut Light Info:
This is all from personal experience, even with the help of tickets:emotions122:!!:Handshake:

1. VHT is the bargain way of smoking/blacking out tails. VHT looks good when the light is properly sanded, primed, coated with even coats and no more than 6 of them, wetsanded, then pretty much buffed and polished clean. The key thing here is almost nobody using VHT does all these steps, because if they purchase the VHT product in general, they obviously did not do all their research. VHT WILL ALWAYS FADE and look crappy pretty quick, ask anybody who has info on smoking tails and they will verify!! No matter if you follow all the steps above, it is inevitable!!

2. Smoked covers are alright but look bad in sunny light, and then also take a toll on the brightness of the lights. The main disadvantage about them is that either they will fall off, or get jacked eventually most of the time!

3. Quality Smoked films like Rockblocker and Lamin-X are a better alternative to VHT and plastic covers, but they have a very involved install meant to be done by car graphic installers only, to be done properly. They also take a large toll on light ouput when compared to real paint.

4. The best way to smoke lights, hands down, is real paint work done in a booth with some clear coat and some drops of colored paint, and also the normal prep/finishing work done on normal car plastic/urethrane parts. When done like this, you can have the most light output, and best looking smoked tails (short and long term) than any other option out there. The only disadvantage about this option is price, normally running atleast $110.

All this being said, you can easily get some tails, or send a set of tails to www.jonstintedtails.com or anyone else that will properly do option four above for you.
LED tails have alot more output than normal bulb type tails, so you can smoke them pretty day and the cops will not bug out because they will be visible just about as much stock/non-LED, unsmoked tails. The only issue some cops may ***** about is the fact that no matter how you smoke your tails, it takes a toll on the reflector in the taillight housing that has to be visible from normally 200 feet.
 
Last edited:
Joined
Sep 2, 2009
Posts
1,316
Reaction score
14
Location
Oklahoma
killer...did you clear these out when you lightened them? if so how many coats?

Ya on those they were so black I sanded all of it off. The clear to black ratio was really thin because I was trying to get them like you wanted. The coats were probably around 7-8. So there is alot of clear on those puppys.

When i did mine the first time like in the pic above. That was only 3 coats.
 
Last edited:
OP
OP
jdpromo33

jdpromo33

Proud Tahoe Owner
Joined
Dec 18, 2009
Posts
690
Reaction score
6
Location
Bloomfield, New Jersey
My Personal BlackOut Light Info:
This is all from personal experience, even with the help of tickets:emotions122:!!:Handshake:

1. VHT is the bargain way of smoking/blacking out tails. VHT looks good when the light is properly sanded, primed, coated with even coats and no more than 6 of them, wetsanded, then pretty much buffed and polished clean. The key thing here is almost nobody using VHT does all these steps, because if they purchase the VHT product in general, they obviously did not do all their research. VHT WILL ALWAYS FADE and look crappy pretty quick, ask anybody who has info on smoking tails and they will verify!! No matter if you follow all the steps above, it is inevitable!!

2. Smoked covers are alright but look bad in sunny light, and then also take a toll on the brightness of the lights. The main disadvantage about them is that either they will fall off, or get jacked eventually most of the time!

3. Quality Smoked films like Rockblocker and Lamin-X are a better alternative to VHT and plastic covers, but they have a very involved install meant to be done by car graphic installers only, to be done properly. They also take a large toll on light ouput when compared to real paint.

4. The best way to smoke lights, hands down, is real paint work done in a booth with some clear coat and some drops of colored paint, and also the normal prep/finishing work done on normal car plastic/urethrane parts. When done like this, you can have the most light output, and best looking smoked tails (short and long term) than any other option out there. The only disadvantage about this option is price, normally running atleast $110.

All this being said, you can easily get some tails, or send a set of tails to www.jonstintedtails.com or anyone else that will properly do option four above for you.
LED tails have alot more output than normal bulb type tails, so you can smoke them pretty day and the cops will not bug out because they will be visible just about as much stock/non-LED, unsmoked tails. The only issue some cops may ***** about is the fact that no matter how you smoke your tails, it takes a toll on the reflector in the taillight housing that has to be visible from normally 200 feet.

Thanks, This is great advise indeed
 

mech5700

Member
Joined
Nov 22, 2009
Posts
59
Reaction score
2
Location
Boca Raton, FL
i had a guy do mine at a body shop for $50...

Not sure what kind of paint he used, but did 3 coats of paint and a coat of clear. Nice and black n shiny, but the cops definately arent fans of it...
 

Attachments

  • tails.jpg
    tails.jpg
    53.4 KB · Views: 60

ZaC851

Member
Joined
Dec 6, 2009
Posts
33
Reaction score
0
My Personal BlackOut Light Info:
This is all from personal experience, even with the help of tickets:emotions122:!!:Handshake:

1. VHT is the bargain way of smoking/blacking out tails. VHT looks good when the light is properly sanded, primed, coated with even coats and no more than 6 of them, wetsanded, then pretty much buffed and polished clean. The key thing here is almost nobody using VHT does all these steps, because if they purchase the VHT product in general, they obviously did not do all their research. VHT WILL ALWAYS FADE and look crappy pretty quick, ask anybody who has info on smoking tails and they will verify!! No matter if you follow all the steps above, it is inevitable!!


I'm going to have to disagree with them looking "crappy pretty quick"

I did mine in March of 2008 and they still look exactly the same as the day that I did them. I just took my time. Probably going to re do them here again when it warms up because I think I want to do the reverse light to.

Crazy enough, I've been stopped a few times, but never for the lights...I even got stopped for my tinted license plate cover...but they never said a word about the lights..Anyway...heres the write up I did for the caddy forum almost 2 years ago...

Been wanting to do mine for awhile, but just didnt have the time. I finally ordered the stuff earlier in the week and did it yesterday. The process is very simple and the supplies will cost about 20 dollars total. The total time to complete this is about a day. The total working time is no more than 1 hour. The longest process is letting the paint dry.

This is what you will need.

VHT Nite Shades Spray Tint. (I ordered mine from Summit Racing)
Clear Coat. (I used duplicolor)
Masking Tape. (Assuming you want to keep your reverse lense clear)
2000 grit Wet sand paper.
Small razor blade.
Rubbing alcohol
Microfiber towels

Some of the supplies

pic1.jpg

You will also need some sort of rubbing compound to remove swirls and lights scratches. A buffer would also make this job much easier than by hand. I already have this because I like to detail my truck alot.

Anyway on to the process. Start by remove the tail lights. To do this you have to open the rear door and there is 2 screws that hold the lights in. Undo these 2 screws for each light and the lights come right now.. Take out the bulbs and your done.

The first thing I did was tape up the lights with the masking tape. After you tape it up, carefully cut the excess out where the tape fits the perfect shape of the reverse light.

pic2.jpg


After that take your wet sandpaper and sand over the entire light. Make sure to keep the paper wet by dipping it back in a water bucket often. Once you're done, your lights should appear slightly hazy...this process should takeno more than 5 minutes to do both lights. I know its kinda hard to tell in the pic since it was dark when I took this pic.

pic3.jpg


Once you have wet sanded both lights make sure they are completely dry, and take your rubbing alcohol and give them a good wipe down. This ensures that they are free of dust, grime and fingerprints.

The Next process is taking the Spray on tint, and painting them. I went fairly light just enough to coat them for each coat. Depending on how dark you want to go should tell you how many coats to put on. I did my taillights, and top brake light and did a total of 3 coats and used 1 full can and mine are very dark. I waited about 45 minutes in between each coat of tint. Use your own judgment. Heres a picture after the paint.

pic4.jpg

After the last coat of tint, I let them dry for about 5 hours. After that its time to wet sand again. Just the same as before keep the paper wet and sand it until the whole light is very hazy looking. Again this should take no more than 5 minutes.. After that I went ahead and peeled off the masking tape and dryed all the water off. This is what you should have now.

pic5.jpg

Now that we are done with the tint..its time to put the clear on them to protect them. I went fairly heavy on the clear. I wanted to make sure they were protected very well. Once again I waited about 30-45 minutes in between the clear coats. I did a total of 3 HEAVY coats, but not so heavy where it would not cause the paint to run. After That I let them dry over night.

This morning I went out to get them. The first thing you want to do now is lightly wet sand them again now that the clear coat is on. Once again they are going to appear slightly hazy. This is to smooth them out, and get any dust that may have settled into the paint. The process is the same as before.

pic6.jpg

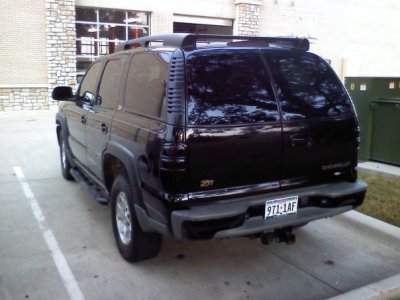
After that you will want to take your rubbing compound or polish and buff them to a brilliant shine. Having a buffer will make this process take about 3-4 minutes per light. I would imagine the process will take A LOT longer doing it by hand. And here is the finished product.

pic7.jpg.

After you have buffed them back to a shine, you will want to put a couple coats of your favorite wax on there to protect them, and then bolt them back up and heres teh finished product
DSC01232copy_1024x768.jpg
 
Last edited:

black95

Full Access Member
Joined
Aug 24, 2009
Posts
383
Reaction score
3
Location
Freeport,NY
3 krylon gloss black ,wet sand,1 coat high gloss clear , wetsand lightly, last coat high gloss clear
picture.jpg
picture.jpg
 

2LOUD4U

Full Access Member
Joined
Aug 10, 2009
Posts
138
Reaction score
0
i used vht and i do it on all the cars i work on i get 100 bucks to do it too im not complaining because at the shops there doing 180-200

---------- Post added at 07:33 PM ---------- Previous post was at 07:28 PM ----------

picture.jpg

---------- Post added at 07:33 PM ---------- Previous post was at 07:33 PM ----------

picture.jpg

---------- Post added at 07:34 PM ---------- Previous post was at 07:33 PM ----------

picture.jpg

---------- Post added at 07:35 PM ---------- Previous post was at 07:34 PM ----------

picture.jpg
 

Forum statistics

Threads
130,235
Posts
1,828,710
Members
93,776
Latest member
Tazmain
Top