Installed an Auto Start/Stop Eliminator… works great, buy one!

Disclaimer: Links on this page pointing to Amazon, eBay and other sites may include affiliate code. If you click them and make a purchase, we may earn a small commission.

UsualSuspect

Full Access Member
Joined
Feb 21, 2022
Posts
251
Reaction score
165
Location
SoCal
Saw that you put this on your Denali Ultimate. On the Denali, there seems to be a bit more leather trim on the section near the air vent to get to the 2 screws. I wasn't sure if you just have to brute force it or if there was another way. How did you get to the 2 screws near the air vent? Thanks in advance!
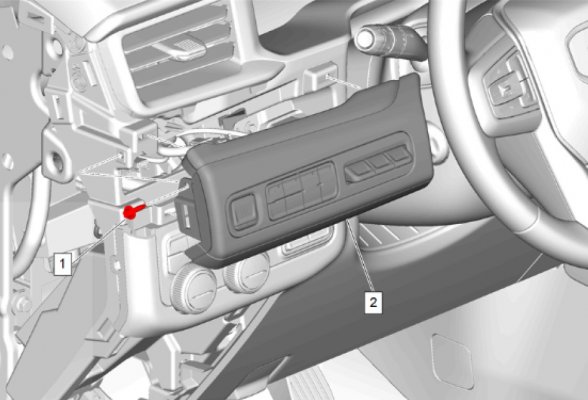
The 23 is even easier. My mechanic installed mine while I stood there. Remove the lower panel, then the side panel. There is 1 screw holding the button assembly in place, remove it. Take a trim tool and snap the switch panel out of the dash. Disconnect the switch wiring harness, plug in the new harness. Put it all back together.21 Yukon Denali Switch Panel.jpg
 

nickf84

TYF Newbie
Joined
Oct 19, 2022
Posts
7
Reaction score
3
The 23 is even easier. My mechanic installed mine while I stood there. Remove the lower panel, then the side panel. There is 1 screw holding the button assembly in place, remove it. Take a trim tool and snap the switch panel out of the dash. Disconnect the switch wiring harness, plug in the new harness. Put it all back together.View attachment 400054
You rock. Thanks!
 

steiny93

Full Access Member
Joined
Feb 17, 2021
Posts
411
Reaction score
350
I suspect most us press more than start and drive buttons ;)

I auto start my truck with 2 presses of fob button, then unlock my door with a press of handle button, then start button, then adjust seat temp (up to 3 presses) or headrest fan (up to 3 presses) and then repeat for passenger if their seatbelt is on. If cool outside then there's heated steering wheel button. I press for heat or AC on, then twist fan speed, then twist to dial in the specific temp, then maybe press button for air and temperature for rear compartment. Then depending on day I press recirculate air button or press to turn off, if foggy I press the defrost button and press the fresh air button. I use high beam while driving on 7 miles of dirt roads during daytime so first lights knob must be twisted full right to manual then flip high beam lever. Then reverse button to back out, then drive button, then press gate opener button to open then again to close. Phew, glad my fingers get good exercise :thumbsup:
My mother in-law is the same way; she also makes lists of stuff to worry about :)

I follow a different approach, auto set to 71; it'll go weeks without an adjustment.
 

GoNoGo

Full Access Member
Joined
Dec 8, 2022
Posts
216
Reaction score
188
Location
Elberton, GA
My mother in-law is the same way; she also makes lists of stuff to worry about :)

I follow a different approach, auto set to 71; it'll go weeks without an adjustment.
Ha, just a process.. reading from a list ?? OMG no :lol:
 

KMeloney

Full Access Member
Joined
May 2, 2009
Posts
2,985
Reaction score
369
The 23 is even easier. My mechanic installed mine while I stood there. Remove the lower panel, then the side panel. There is 1 screw holding the button assembly in place, remove it. Take a trim tool and snap the switch panel out of the dash. Disconnect the switch wiring harness, plug in the new harness. Put it all back together.View attachment 400054

I have a '23. So, only the switch panel itself (shown here) needs to be removed along with the lower and side panel? No other trim like in the site's installation video?
 

UsualSuspect

Full Access Member
Joined
Feb 21, 2022
Posts
251
Reaction score
165
Location
SoCal
I have a '23. So, only the switch panel itself (shown here) needs to be removed along with the lower and side panel? No other trim like in the site's installation video?
The installation is even easier than the video shows, and I used that photo for reference. To install, you will follow the video for the first 2 parts, removing the lower panel and the left side panel. After that, refer to the attached photo. There is 1 screw to remove and then the panel with the start/stop button will pull straight out. It will have 4 clips on the back like the other panels. Just go slow applying controlled pressure with your fingertips until one clip releases and then move to the next. This will allow access to the installation location.
 

KMeloney

Full Access Member
Joined
May 2, 2009
Posts
2,985
Reaction score
369
The installation is even easier than the video shows, and I used that photo for reference. To install, you will follow the video for the first 2 parts, removing the lower panel and the left side panel. After that, refer to the attached photo. There is 1 screw to remove and then the panel with the start/stop button will pull straight out. It will have 4 clips on the back like the other panels. Just go slow applying controlled pressure with your fingertips until one clip releases and then move to the next. This will allow access to the installation location.
Thank you!
 

trckrhntr

TYF Newbie
Joined
Feb 26, 2024
Posts
22
Reaction score
25
Location
Northern-Lower Michigan
23 Tahoe Premier. Install was exactly as in the video.

It's a silly thing to get worked up over, but the engine shutting down really irritated me. Lol

Product works perfectly!
 

KMeloney

Full Access Member
Joined
May 2, 2009
Posts
2,985
Reaction score
369
Regarding the clips that hold the switch plate in (on the ‘23 Yukon, anyway), could you confirm that they’re (4) of the plastic wedge-type clips with the metal clip over them? And it’s just a matter of pulling straight out to release them? Thanks!
 

Forum statistics

Threads
133,224
Posts
1,881,793
Members
98,255
Latest member
CaptPat
Top