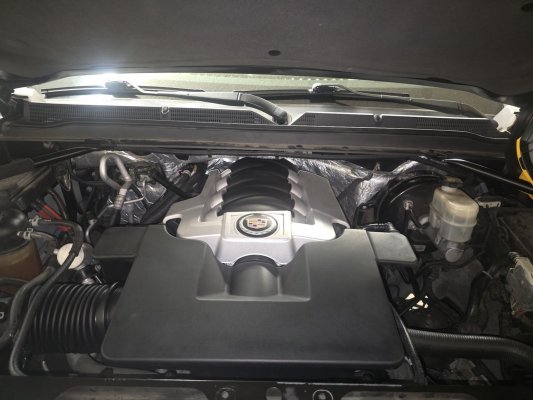
L86 gen 5 lifter kit

Disclaimer: Links on this page pointing to Amazon, eBay and other sites may include affiliate code. If you click them and make a purchase, we may earn a small commission.

mijohnst

Full Access Member
Joined
Dec 16, 2019
Posts
250
Reaction score
275
My wife's 2015 Escalade ESV started making the dreaded knocker sound. The EMU says there is a po302 code about cylinder two is misfiring. I've tried moving around the spark wire, spark plug and coil pack but it still knocks. I'm now about 98% sure it's the lifter. I will be pulling the valve covers to look at the lifter springs just to make 100% sure. I've called around and it will be between 4-6k but the worst part is the wait time to get in. I've decided there is enough information here and on YouTube to do it myself.

My question is, can anyone recommend an L86 gen5 lifter kit? I don't want to do the DOD/AFM delete because I don't want to have to pull the cam or drop the oil pan. My goal is pull he heads off and inspect the lobs on the cam and if they're good, just replace the lifters and reassemble. Any suggestions would be greatly appreciated.

Thank again!
 
OP
OP
mijohnst

mijohnst

Full Access Member
Joined
Dec 16, 2019
Posts
250
Reaction score
275
I decided to buy a kit from briantooleyracing.com because I had been reading reviews, and everything was positive. I talked to a guy there; he was very knowledgeable about my situation and put together a package for me to review. The total cost was about $1500, but that included everything I would need and a Diablo II computer to reprogram the DOD/AFM delete. I decided just to go ahead and do the delete.

The only things I need to buy now are the water pump and the high-pressure fuel pump. Since everything is out, I might as well replace it.
 

Geotrash

Dave
Supporting Member
Joined
Feb 16, 2018
Posts
6,423
Reaction score
15,916
Location
Richmond, VA
I decided to buy a kit from briantooleyracing.com because I had been reading reviews, and everything was positive. I talked to a guy there; he was very knowledgeable about my situation and put together a package for me to review. The total cost was about $1500, but that included everything I would need and a Diablo II computer to reprogram the DOD/AFM delete. I decided just to go ahead and do the delete.

The only things I need to buy now are the water pump and the high-pressure fuel pump. Since everything is out, I might as well replace it.
Thanks for the update. Please do keep us posted on your progress. I've personally done this job on the Gen IV 6.2L in my 2012, which of course is not the same as your situation but some of the same techniques and tools will still apply.

If you've been running a while with the noise, the odds of the cam being okay will diminish with time. Fingers crossed but replacing the cam isn't a big deal either.

I'm running the BTR springs, valve stem seals, and a few other items from them and they've been fine for the last 30K miles on it. If you post a link to the kit you bought, some of us might have some input for you.
 
Last edited:
OP
OP
mijohnst

mijohnst

Full Access Member
Joined
Dec 16, 2019
Posts
250
Reaction score
275
Well, I finished up last week, and it seems to be running fine. I really appreciate your support there, @Geotrash. Here are a few lessons learned that I will watch for next time.

1. Make sure your crank seal is installed correctly. After starting it, I noticed a small leak. It turns out that I put it backward. I'd also recommend the press-in seal adapter over the tap-in types. Thankfully, I only had to remove the belts and pull the balancer. At first, I thought I would have to remove much more, but replacing the seal was pretty easy. The flywheel break that goes where the starter is is a must-have.

2. Make sure that when you put the high-pressure fuel lines back in, you torque them correctly to 22 ft-lbs. When I put mine on, I didn't know that using a crowfoot on a torque wrench required that it be 90 degrees for it to be accurate. I had to pull the intake back off and found that I'd actually only tightened the connections to about 15 ft-lbs, which caused a small leak. The leak was evident due to the strong gas smell. I still smell slightly gas because of the pad over getting sprayed.

3. When putting the heads back on, ensure you have a good 1/2 torque wrench that does angle. I put mine on with a Quinn from Harbor Fright, and although I think it does the torque aspect just fine, the angle part is sketchy. I wish I had scribed each bolt head after the second pass. After I was done, I found a deal on a 1/2 Snap-on digital, and now I wish I'd found the deal beforehand because there is no comparison between the two wrenches. That Snap-on made it incredibly easy and accurate to put that crank bolt back in and turn it 125 degrees on the third pass.

4. Take the time to pull the oil pan and replace the oil pump. In the video I followed, they walked the chain off the cam, and when I attempted to do that, I didn't like the feel of it, so I decided to drop the pan. It takes a little longer, but if you do, you can clean out anything inside the pan and replace all the rubber seals. A new oil pump also means that reinstalling is very easy, rather than trying to line it all up again. I went with a Fel-pro gasket instead of the gasket maker, and it seems to be doing great, but we'll see how long that lasts. I suspect it'll be fine. I put it back on after I put the timing chain cover back on. That way, I ensured the gasket maker went well into the joints. And if you've gone that far, spend the extra $20 and replace the chain.

I'm sure there are things I forgot to add because all of this happened over about 5 weeks. I went slow and labeled everything in baggies. I also took pictures from all angles as I went, and it was helpful to go back and review and see the way wires were routed and parts that I didn't remember even taking out. I want to say that this was a pretty fun job, and I purchased some new tools that I'll use in the future. I've also got a 2001 Tahoe that I'm contemplating changing out the cam on for more HP and this job was a hug confidence booster for that future job.
 
Last edited:

Geotrash

Dave
Supporting Member
Joined
Feb 16, 2018
Posts
6,423
Reaction score
15,916
Location
Richmond, VA
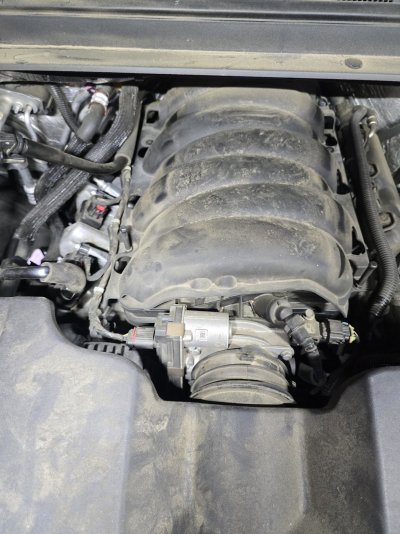
View attachment 428480
The dreaded start...

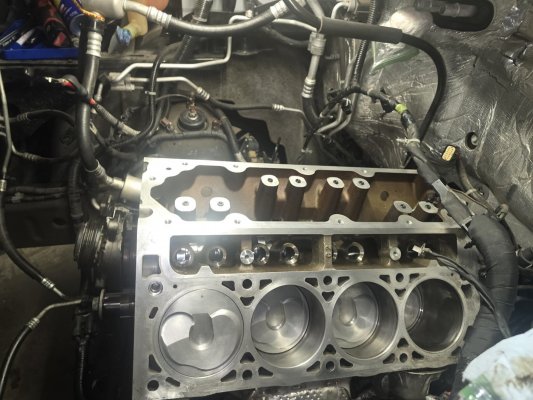
View attachment 428481
I took the time to clean off all the carbon on the piston heads.

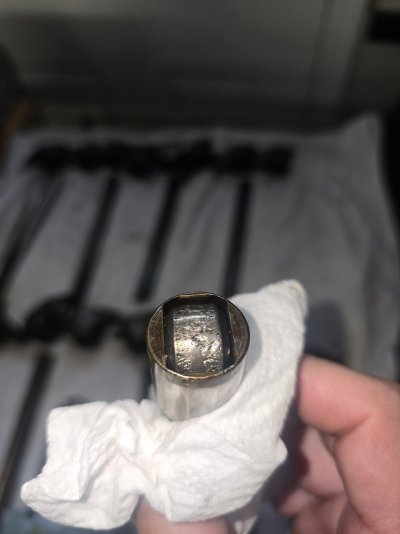
View attachment 428482
It wasn't even an AFM lifter that went bad.

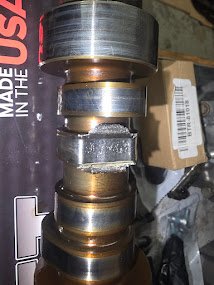
View attachment 428483
Chewed up CAM.

View attachment 428484Done!
FANTASTIC WORK!! So glad you got it all back together and it's running well. Thanks for the follow-up and lessons learned.

Also - I've never seen a cam flat-spotted like that. All I can say is wow! And now you're good to go for another 200K. Also, how's the cam? Are you happy with the performance? Which one did you choose?
 
OP
OP
mijohnst

mijohnst

Full Access Member
Joined
Dec 16, 2019
Posts
250
Reaction score
275
Thank you, Dave! I couldn't have done it without this forum and people who take the time to show how things are done on YouTube. I don't know how people did stuff before YouTube. I did buy a month subscription from alldata.com for diagrams and torque specs, and that was very, very helpful!

I ended up buying almost everything related to the cam from BTR. They compiled a list of parts I would need, including the ODBII programmer, which came out to about $1700 altogether. The other things I decided to buy along the way I purchased from Rockauto or Amazon. Add about $600 in extra tools, it was still much, much cheaper than taking it to a shop.

The performance seems to be back to what it was before, but I've told my wife (it's her car) that she need to take it easy for about 500 miles before she starts passing people on the highway like she's driving a Ferrari. We'll see if she listens. ;)
 

strutaeng

Full Access Member
Joined
Aug 10, 2023
Posts
1,176
Reaction score
2,442
Location
Dallas, Texas
Thank you, Dave! I couldn't have done it without this forum and people who take the time to show how things are done on YouTube. I don't know how people did stuff before YouTube. I did buy a month subscription from alldata.com for diagrams and torque specs, and that was very, very helpful!

I ended up buying almost everything related to the cam from BTR. They compiled a list of parts I would need, including the ODBII programmer, which came out to about $1700 altogether. The other things I decided to buy along the way I purchased from Rockauto or Amazon. Add about $600 in extra tools, it was still much, much cheaper than taking it to a shop.

The performance seems to be back to what it was before, but I've told my wife (it's her car) that she need to take it easy for about 500 miles before she starts passing people on the highway like she's driving a Ferrari. We'll see if she listens. ;)
Love
Like
...and LOL


(we need an option to select multiple emojis!)

Great job! That's awesome!
 

blackelky

Full Access Member
Joined
Oct 15, 2023
Posts
584
Reaction score
765
Thanks for the update. Please do keep us posted on your progress. I've personally done this job on the Gen IV 6.2L in my 2012, which of course is not the same as your situation but some of the same techniques and tools will still apply.

If you've been running a while with the noise, the odds of the cam being okay will diminish with time. Fingers crossed but replacing the cam isn't a big deal either.

I'm running the BTR springs, valve stem seals, and a few other items from them and they've been fine for the last 30K miles on it. If you post a link to the kit you bought, some of us might have some input for you.
You're in Virginia? Who'd you use for this service and around what price did they give you. Id like to do this next year if possible after I do a gear swap
 

Forum statistics

Threads
132,298
Posts
1,865,576
Members
96,884
Latest member
nscherr1
Top