LED Tails

Disclaimer: Links on this page pointing to Amazon, eBay and other sites may include affiliate code. If you click them and make a purchase, we may earn a small commission.

Grimes

Full Access Member
Joined
Apr 13, 2013
Posts
413
Reaction score
4
I had none of the issues you are describing. Mine were a perfect fit with no additional/noticeable gap either.

Not sure if it means anything, but yours are not smoked. Given its an ebay item, who knows if there is a make difference or not due to that :p

However, like I said, the gap really is not much, nor is it technically a problem. If you don't like it, through some silicone on it, or simply something to back it so you don't see through the edges.
 

JochenWoern

Full Access Member
Joined
Sep 29, 2011
Posts
2,427
Reaction score
18
Location
Sacramento, CA
Jochen you have the spiders?

No, mine are Sonar X3's.

---------- Post added at 03:15 PM ---------- Previous post was at 03:10 PM ----------

Not sure if it means anything, but yours are not smoked. Given its an ebay item, who knows if there is a make difference or not due to that :p

However, like I said, the gap really is not much, nor is it technically a problem. If you don't like it, through some silicone on it, or simply something to back it so you don't see through the edges.

Had the SAME LED Lights on my '06, which was charcoal grey and those were SMOKED. Bought off ebay as well (also the set currently installed on my '04 is off ebay) with the same results, no wiring issues and no gaps.

No offense, but are you sure that you installed them propelry? If I remember correctly, you need to kinda shuv them in the opening with an angle and then align them properly prior to tightening the screws.
 
Last edited:

05YukonXL

Member
Joined
Jan 16, 2014
Posts
42
Reaction score
17
Location
South Carolina
I got the 'Sonar' smoked, which i think is just the regular with a coating?

I'm going to work on them this evening before the sun goes down to see if I can close the gap..

For the wiring on passenger side, the harness just was not long enough. I tried a few tricks to 'pull it' but no doing. The drivers side was plenty long.
 

2003denali26

Member
Joined
Jun 13, 2011
Posts
77
Reaction score
0
Location
Campbell River, B.C, Canada
First impressions: they look good installed and are bright. I was concerned the might look 'ricey' - is that the term? Where as the factory lights glowed, these throw some light!

Fit/finish: they don't seem to fit as snuggly as factory tails .. the gaps between body and tails are visibly bigger. Has anyone else noticed this? I will mess with that again later but seems I shouldn't see through the gaps on the side.

Notes on install:
you'll need to keep clips from factory tails and put on your new Sonars.. Not sure why those couldn't be included with new lights but oh well. Next, the passenger side harness is in my Yukon XL is not long enough to accommodate the extra distance required for plugging in the new light (about two inches too short). Driver side was fine. So I'll be doing some splicing to extend connector sockets for turn and brake lights.

Brightness: Photo shows factory tail on driver side, new light on passenger side (not properly wired yet) for side by side comparison of 'running light'. The camera exposed for the street light, so this gives you a better idea of the comparison between the red tail lights.

I also had these taillights, but I would say thats a body work problem, I have seen some bad fits for taillights/headlights/hoods from ebay but not that bad maybe I am wrong tho???
 

YukonXL04

The Riverboat
Supporting Member
Joined
Sep 3, 2013
Posts
2,489
Reaction score
175
Location
Arlington, TX
I got the 'Sonar' smoked, which i think is just the regular with a coating?

I'm goin work on them this evening before the sun goes down to see if I can close the gap..

For the wiring on passenger side, the harness just was not long enough. I tried a few tricks to 'pull it' but no doing. The drivers side was plenty long.

There is a wire clamp under the body near the frame that secures the wire, you can open the clamp and pull a little slack out there. May work for you
 

JochenWoern

Full Access Member
Joined
Sep 29, 2011
Posts
2,427
Reaction score
18
Location
Sacramento, CA
I got the 'Sonar' smoked, which i think is just the regular with a coating?

I'm going to work on them this evening before the sun goes down to see if I can close the gap..

For the wiring on passenger side, the harness just was not long enough. I tried a few tricks to 'pull it' but no doing. The drivers side was plenty long.

Were you able to get a better fit?
 

rippinitup

Full Access Member
Joined
Feb 7, 2011
Posts
216
Reaction score
3
Location
NY.
I got the 'Sonar' smoked, which i think is just the regular with a coating?

I'm going to work on them this evening before the sun goes down to see if I can close the gap..

For the wiring on passenger side, the harness just was not long enough. I tried a few tricks to 'pull it' but no doing. The drivers side was plenty long.

mine was not long enough as well, i just got some extra wire and spliced them in, took afew minutes. id rather have some slack then having it stressed.
 

05YukonXL

Member
Joined
Jan 16, 2014
Posts
42
Reaction score
17
Location
South Carolina
Finally.... LED SONARS ARE FIT NICE AND SNUG

Okay guys… here's the latest update and conclusions...

Wiring passenger side:
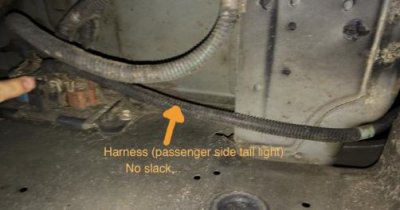
See photos for reference, In the last photo of this post... I'm pointing to where the harness plugs in ( above the exhaust pipe). As you can see there was no additional slack to be found. I bought a new three wire bulb socket from local auto supply store which had about 8 inches of wire, and spliced into harness giving me the additional length I needed. So now all the sockets fit into light fixture nice and snug.

Fitment/gaps:
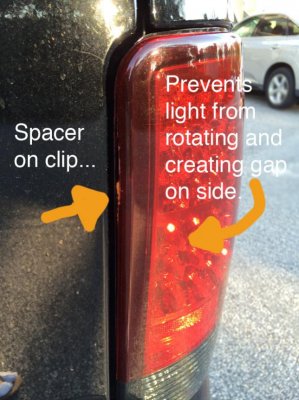
(See photo 2nd photo) I realized as I tightened the screws holding the light in place it created a yaw effect, rotating the light toward the back gate and away from the quarter panel… thus the big gap highlighted in the photo earlier in this post. (Did this on both lights). So, the easy fix was to add a spacer where the light made contact on the body panel the screws go through.

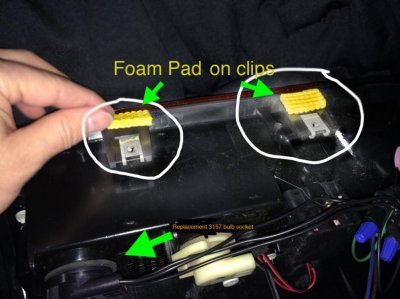
I added spacer on the screw clips (see first photo). I tried a few materials before settling on small pieces of a foam yoga matt. ( Not shown in photos is I just wrapped electrical tape around the foam to keep in place on the plastic.) I ended up using two pieces of foam on top 'clip' and one on the bottom clip.

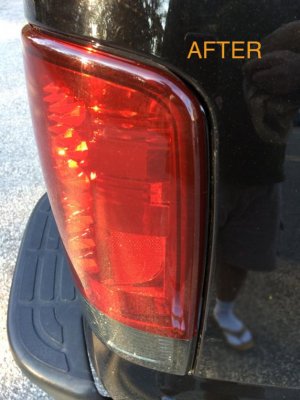
Simply set light into opening, lined up with guides into quarter panel, tightened screws and success! Notice the 'after' photo, there is NO GAP at all, where as before I could stick a pencil in the gap!

Now we are rocking! Thanks to everyone for feedback and ideas. I hope if someone else has these issues they'll find all this helpful and tell us about their experience.
 

Attachments

  • foamonclips.jpg
    foamonclips.jpg
    80.2 KB · Views: 50
  • gapspacer.jpg
    gapspacer.jpg
    89 KB · Views: 51
  • aftergap.jpg
    aftergap.jpg
    66 KB · Views: 49
  • 05yukon_tlharness.jpg
    05yukon_tlharness.jpg
    20.2 KB · Views: 49
Last edited:

Townsend

Member
Joined
Jan 2, 2014
Posts
45
Reaction score
1
Finally getting around to ordering these - quick question though - is everyone buying LED replacements for the white reverse light, or just using the factory light? Hadn't even thought about it until now!
 

Forum statistics

Threads
132,183
Posts
1,863,629
Members
96,696
Latest member
Rubeng0315
Top