Paint Prep / Body Work Tips

Disclaimer: Links on this page pointing to Amazon, eBay and other sites may include affiliate code. If you click them and make a purchase, we may earn a small commission.

OP
OP
Matthew Jeschke

Matthew Jeschke

Full Access Member
Joined
Dec 28, 2017
Posts
1,987
Reaction score
1,386
Location
Sahuarita, Arizona
Still in a holding pattern waiting to find somebody to help me spray the paint.

I found something out though that would have saved me a TON of work. Acetone takes that epoxy primer right off lol Shooooooooooot! If only I knew what I know now back then lol
 

wjburken

Supporting Member
Joined
Dec 26, 2017
Posts
9,955
Reaction score
27,553
Location
Eastern Iowa
Still in a holding pattern waiting to find somebody to help me spray the paint.

I found something out though that would have saved me a TON of work. Acetone takes that epoxy primer right off lol Shooooooooooot! If only I knew what I know now back then lol

Experience Gained!

Thanks for sharing.
 
OP
OP
Matthew Jeschke

Matthew Jeschke

Full Access Member
Joined
Dec 28, 2017
Posts
1,987
Reaction score
1,386
Location
Sahuarita, Arizona
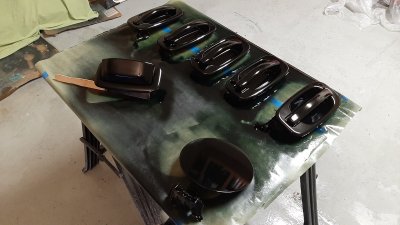
This paint job is an absolute nightmare. I've tried hiring a couple people to come to my house and help me spray. They never show up.

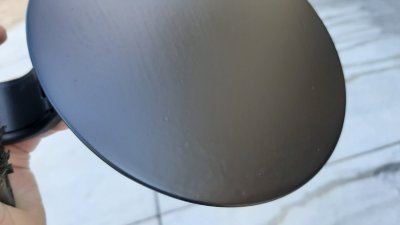
I need my truck finished for vacation in 2 weeks. So I tried painting some more on my own. No go, I got fish eyes all over the parts I practiced on.

I had cleaned the parts twice with grease and wax remover. Followed by blowing them off. Followed by spraying them. Still got nasty fish eyes :(

It was the door handles and gas cap cover. I'm going to leave the door handles as a flat finish now with just the epoxy sealer on them.

20200126_150440.jpg
 
OP
OP
Matthew Jeschke

Matthew Jeschke

Full Access Member
Joined
Dec 28, 2017
Posts
1,987
Reaction score
1,386
Location
Sahuarita, Arizona
Okay, so I made some progress!!!! I cannot believe it. I have been interviewing body shop guys... Most are more willing to share tips than take on the job. I took in my gas door with me while chatting with local body shop. He said it looked like (1) I had too much pressure on the gun which created waves in finish and (2) I didn't allow enough flash time / dry time between coats. The short flash time created solvent pop and those little bubbles.

He told me an AWESOME trick that 100+ hours of youtube hasn't taught me yet about body work... Wait for epoxy sealer to dry 1 day or so. Wet sand it with 800 grit. Pure water no soap or anything... just the water and paper.

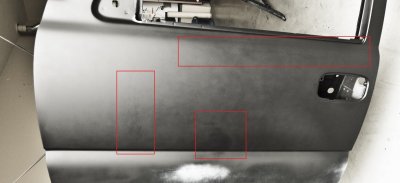
It PERFECTLY cleaned up the defects in the gas door. I then took my new found confidence and tried to seal a door. It worked! Minus one question... I'm not sure how much hiding I need to achieve before applying color. I photoshopped the picture below to bring out contrast. The finish isn't a perfect flat color / finish. Some of the work from below seems to show through yet.

It has two coats. One pretty quick / dry - sprayed vertically. The second dry to medium - sprayed horizontally with 50% overlap.

NOTE: bottom of door is getting a truck bed liner so not being painted now.

epoxy - hiding.jpg
 

Sam Harris

Supporting Member
Joined
Sep 26, 2018
Posts
7,427
Reaction score
14,911
Location
Texas
Okay, so I made some progress!!!! I cannot believe it. I have been interviewing body shop guys... Most are more willing to share tips than take on the job. I took in my gas door with me while chatting with local body shop. He said it looked like (1) I had too much pressure on the gun which created waves in finish and (2) I didn't allow enough flash time / dry time between coats. The short flash time created solvent pop and those little bubbles.

He told me an AWESOME trick that 100+ hours of youtube hasn't taught me yet about body work... Wait for epoxy sealer to dry 1 day or so. Wet sand it with 800 grit. Pure water no soap or anything... just the water and paper.

It PERFECTLY cleaned up the defects in the gas door. I then took my new found confidence and tried to seal a door. It worked! Minus one question... I'm not sure how much hiding I need to achieve before applying color. I photoshopped the picture below to bring out contrast. The finish isn't a perfect flat color / finish. Some of the work from below seems to show through yet.

It has two coats. One pretty quick / dry - sprayed vertically. The second dry to medium - sprayed horizontally with 50% overlap.

NOTE: bottom of door is getting a truck bed liner so not being painted now.

View attachment 239522
Awesome progress man!!! Sounds like the tips he gave you were spot on!
 
OP
OP
Matthew Jeschke

Matthew Jeschke

Full Access Member
Joined
Dec 28, 2017
Posts
1,987
Reaction score
1,386
Location
Sahuarita, Arizona
the imperfections in door skin seem to be flowing out as the paint dries. I may need to give front one more coat though... just not sure what is meant by hiding. also not sure if needs to be a smooth texture. some spots are a bit abrasive. Not sure if that flows out when catalyses with color and clear.

so another set of questions to ask paint shop tomorrow.

Sent from my SM-A505U using Tapatalk
 
OP
OP
Matthew Jeschke

Matthew Jeschke

Full Access Member
Joined
Dec 28, 2017
Posts
1,987
Reaction score
1,386
Location
Sahuarita, Arizona
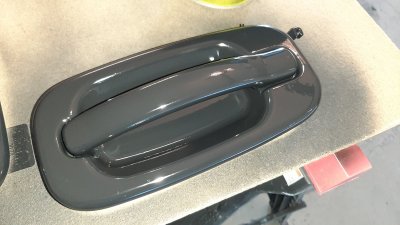
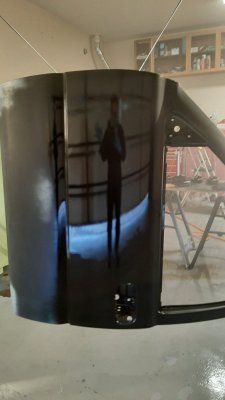
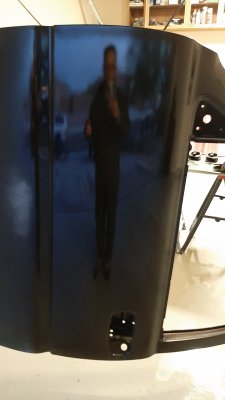
Oh wow oh wow oh wow lol My first practice door turned out AWESOME so far... I haven't done any color sanding, not for sure if I will as is an off road truck but I bought all the supplies and tools to color sand. Honestly, this is soooooooo technical and hard. I don't think there's any way to not mess this up as a newbie. You have to pay 100% attention to EVERY detail. Temperature, pot life / time, flash time, max flash time, cleanliness of parts, cleanliness of gun, remembering to remove seal vent from reservoir on gun. Those are just a few of the things I messed up so far.

- clean like 4 or 5 times prior to painting Windex, grease and wax remover, grease and wax remover again, blow off, tack cloth, then blow off with spray gun again and spray paint.

I followed up on my epoxy seal coat from 3 days ago. First I applied color coat, then my clear.

I had a spot in the color that didn't adhere properly. You could see surface below it. Unfortunately, I didn't take a pciture of it. The paint shop recommended waiting an hour for it to dry. Then wet sanding it with 400+ grit sand paper. Once removed color coat that spot again. Worked like a champ!

Then clear was a bit trickier. I messed up a bit as in, I'm not for sure why I got the amount of orange peal I did. Although The orange peal is perfectly acceptable to me. I did notice I forgot to remove the reservoir vent cap prior to applying first coat which maybe didn't let it flow out as well?

First clear coat was very orange pealie. I was honestly swearing when I saw it. However, second coat I went slower and overlapped a good 50%. It layed out nicely!

Honestly, really excited about this.

20200126_142536.jpg 20200129_172422.jpg 20200129_180757.jpg 20200129_180807.jpg 20200129_180816.jpg
 

Sam Harris

Supporting Member
Joined
Sep 26, 2018
Posts
7,427
Reaction score
14,911
Location
Texas
Oh wow oh wow oh wow lol My first practice door turned out AWESOME so far... I haven't done any color sanding, not for sure if I will as is an off road truck but I bought all the supplies and tools to color sand. Honestly, this is soooooooo technical and hard. I don't think there's any way to not mess this up as a newbie. You have to pay 100% attention to EVERY detail. Temperature, pot life / time, flash time, max flash time, cleanliness of parts, cleanliness of gun, remembering to remove seal vent from reservoir on gun. Those are just a few of the things I messed up so far.

- clean like 4 or 5 times prior to painting Windex, grease and wax remover, grease and wax remover again, blow off, tack cloth, then blow off with spray gun again and spray paint.

I followed up on my epoxy seal coat from 3 days ago. First I applied color coat, then my clear.

I had a spot in the color that didn't adhere properly. You could see surface below it. Unfortunately, I didn't take a pciture of it. The paint shop recommended waiting an hour for it to dry. Then wet sanding it with 400+ grit sand paper. Once removed color coat that spot again. Worked like a champ!

Then clear was a bit trickier. I messed up a bit as in, I'm not for sure why I got the amount of orange peal I did. Although The orange peal is perfectly acceptable to me. I did notice I forgot to remove the reservoir vent cap prior to applying first coat which maybe didn't let it flow out as well?

First clear coat was very orange pealie. I was honestly swearing when I saw it. However, second coat I went slower and overlapped a good 50%. It layed out nicely!

Honestly, really excited about this.

View attachment 239643 View attachment 239644 View attachment 239645 View attachment 239646 View attachment 239647
**** yeah man!! After all the research, buying parts / products, aggravations, effort... I’m so glad it’s coming together for you!
 
OP
OP
Matthew Jeschke

Matthew Jeschke

Full Access Member
Joined
Dec 28, 2017
Posts
1,987
Reaction score
1,386
Location
Sahuarita, Arizona
thanks, I missed a few spots lol

noticed this morning i missed edge of door as well... but heck, will look much better than before :)

Sent from my SM-A505U using Tapatalk
 

Forum statistics

Threads
132,325
Posts
1,866,019
Members
96,926
Latest member
gb24
Top