RENAMED!! The adventures of Chase and his 2006 Yukon XL Denali!! Follow along on my travels!

Disclaimer: Links on this page pointing to Amazon, eBay and other sites may include affiliate code. If you click them and make a purchase, we may earn a small commission.

OP
OP
adventurenali92

adventurenali92

Full Access Member
Joined
Feb 16, 2015
Posts
7,389
Reaction score
8,618
Location
Big Bear Lake, ca
So a week ago my drivers side HID died. Tried to fire goes pink for a split second and then nothing. Got in touch with Morimoto as the HIDs and ballasts are not quite two years old yet. Three year warranty thankfully. Had to cut the bulb off for their “field destroy” thing. That’s weird to me. They approved the warranty and said they’d send a fresh pair of bulbs out to me. Package showed up today with only one bulb and on top of that they sent me the wrong part. Doesn’t have the right pigtail to properly connect to the ballast. Super irritated and not impressed with Morimoto at this point. I get things fail sometimes but I expected at morimoto’s price point to have better longevity and to receive the correct replacement part. Now I gotta wait who knows how long for them to respond to my emails and then even at that point I don’t know if they are going to even send out the right part. Thankfully the original HID bulbs and ballasts that came with my projector retro fit kit from the guy that sells the brackets for the GMT800 Denali housing upgrade, are still operable. Had them sitting in their box in the garage. That kinda annoys me as well. He sold me the kit with the understanding that everything from projectors to HIDs and ballasts would be Morimoto. But the bulbs and ballasts ended up being cheaper Chinese stuff even though he charged the prices for the morimotos. Thankfully though they work and I have working bulbs in my projectors until Morimoto gets it together….
The ballast in the photo with the three pronged connector and pigtail is the Morimoto ballast set that I ordered the beginning of last year. And the first photo is the new bulb they sent as a warranty replacement.
 

Attachments

  • IMG_7195.jpeg
    IMG_7195.jpeg
    235.4 KB · Views: 4
  • IMG_7196.jpeg
    IMG_7196.jpeg
    220 KB · Views: 4
  • IMG_7197.jpeg
    IMG_7197.jpeg
    236.6 KB · Views: 4
Last edited:
OP
OP
adventurenali92

adventurenali92

Full Access Member
Joined
Feb 16, 2015
Posts
7,389
Reaction score
8,618
Location
Big Bear Lake, ca
Well I’m a D-U-M-B-A-S-S…… LOL. I hastily opened the new HID last night and didn’t actually put it together….. the two pronged harness doesn’t get used for my truck…. The bulb plugs into the driver and the driver connects to the ballast….. user error totally lol. On the upside the customer service rep through headlight revolution which is apparently the company that stocks and ships out the Morimoto orders was quick to respond to my emails today. He was a bit confused as he was sure he sent the correct part. He did I’m just an idiot. I emailed him back a bit ago when I realized my mistake and apologized. Gotta still make sure the new bulb works but that’ll have to wait til a bit later.
 
Last edited:

mikeyss

Full Access Member
Joined
Nov 11, 2011
Posts
1,701
Reaction score
3,245
Location
Longmont, Colorado.
Well I’m a D-U-M-B-A-S-S…… LOL. I hastily opened the new HID last night and didn’t actually put it together….. the two pronged harness doesn’t get used for my truck…. The bulb plugs into the driver and the driver connects to the ballast….. user error totally lol. On the upside the customer service rep through headlight revolution which is apparently the company that stocks and ships out the Morimoto orders was quick to depend to my emails today. He was a bit confused as he was sure he sent the correct part. He did I’m just an idiot. I emailed him back a bit ago when I realized my mistake and apologized. Gotta still make sure the new bulb works but that’ll have to wait til a bit later.
This sort of thing happens to all of us :)
 
OP
OP
adventurenali92

adventurenali92

Full Access Member
Joined
Feb 16, 2015
Posts
7,389
Reaction score
8,618
Location
Big Bear Lake, ca
Non truck related post lol. When I first started detailing…. 12 YEARS AGO!!! Wow it’s been a long time. Lol. My detail mentor recommended taking some courses at chemical guys’d detailing university. It was a great experience and I learned some great stuff. I was only 19 and had to ask my mom for permission to buy a polisher. Wow did I have some growing up to do back then… ANYWAYS…

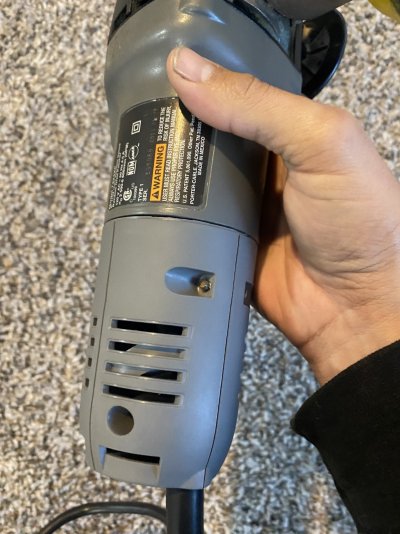
That polisher was an orbital porter cable 7424XP, that thing just won’t quit. A few years back the power cord coming out of the bottom decided it wasn’t happy. One of the guys at the local hardware store fixes tools, and he replaced the internals of the cord and it fired right back up. Well when I bought my little small
Torq DA that was a remanufactured unit through chemical guys I put the porter cable into my extra detail gear bin. It’s been sitting ever since. A couple of weeks ago I decided to clay my windows down and give them a little quick polish. I use ceramic coatings from a cmpany called Dura-Coatings. Found them on IG a couple of years ago advertising a water proof tire coating. Tried it out and fell in love with it. Then discovered they make ceramic coatings. And they’re awesome. They make a glass coating, that I like using as well. Sealed the glass on the truck up with the glass coating. In the middle of polishing the rear hatch my little torq unit died…. Spit a brush out the side. Of course working on my stuff machines and tools die…. Typical. Lol. So I grabbed the protest cable from the pin and 12 years old that darn thing just fired right up!! That little porter cable just won’t quit and I couldn’t be happier with it! Worth every penny I spent on it.

Anyways the bottom casing on the porter cable has been ratting for ever. Seems like it had some plastic inside it broken somewhere. I asked around last weekend while I wa doff the mountain and decided I was tired of asking other people for help. So I decided to do some research on porter cables service section of their website and found parts numbers for the lower casing. I was able to order the part on Amazon. It showed up today and I was able to disassemble it and replace the casing. Pretty simple. A few torx but screws to unscrew and then screw back in once the casing wa s back together ri realized I didn’t reassembled the power switch connection and the little box inside that it connects to. But I got it handled. Super stoked that I was able to tackle it myself. And I fixed the problem of the ratting lower casing. Super proud of myself for handling it. My torq machine is back up and running g a si got a new brush for it and put it back together. Though it’s making a little burning smell I noticed when I used it after replacing the brush. So not sure what is up with it but I’m not using it as a precaution. I’ll tackle that one next. Figure out what’s up with it.

First photo is the broken tabs on the old casing on the PC. And then the new casing all back together the way it’s supposed to be.
 

Attachments

  • IMG_7240.jpeg
    IMG_7240.jpeg
    307.8 KB · Views: 4
  • IMG_7243.jpeg
    IMG_7243.jpeg
    256.8 KB · Views: 2
  • IMG_7244.jpeg
    IMG_7244.jpeg
    299.5 KB · Views: 2
  • IMG_7245.jpeg
    IMG_7245.jpeg
    320.1 KB · Views: 2
OP
OP
adventurenali92

adventurenali92

Full Access Member
Joined
Feb 16, 2015
Posts
7,389
Reaction score
8,618
Location
Big Bear Lake, ca
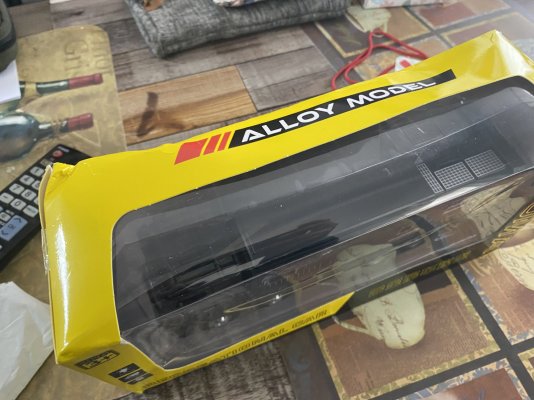
Also today when I went to the box to grab the casing for the porter cable, there was another package sitting there. I’m looking at it going “what is this?! I didn’t order anything else…..” so I opened it up to see an item I ordered over a month ago and totally forgot about it. I put the order in from another IG add I saw and never got a notification that it shipped. And I think it came out of china so of course that’s why it took over a month. Anyways decided to splurge on a new diecast model and it’s pretty damn cool. Add said 1/24 scale but it’s definitely smaller. I’d say probably 1/48 or 1/50, but all the opening doors and detail is cool. Box definitely took a beating in transit lol.
 

Attachments

  • IMG_7229.jpeg
    IMG_7229.jpeg
    321.8 KB · Views: 6
  • IMG_7230.jpeg
    IMG_7230.jpeg
    271.4 KB · Views: 6
OP
OP
adventurenali92

adventurenali92

Full Access Member
Joined
Feb 16, 2015
Posts
7,389
Reaction score
8,618
Location
Big Bear Lake, ca
Supposedly it lights up….. batteries are in the little compartment the right way according to the picture on the compartment cover and I can see the light inside that’s supposed to come on but I can’t find a button or switch….

Lots of cool little details though
 

Attachments

  • IMG_7232.jpeg
    IMG_7232.jpeg
    289.5 KB · Views: 2
  • IMG_7233.jpeg
    IMG_7233.jpeg
    306.4 KB · Views: 2
  • IMG_7231.jpeg
    IMG_7231.jpeg
    276.7 KB · Views: 2
  • IMG_7234.jpeg
    IMG_7234.jpeg
    327 KB · Views: 2
  • IMG_7235.jpeg
    IMG_7235.jpeg
    304.9 KB · Views: 2
OP
OP
adventurenali92

adventurenali92

Full Access Member
Joined
Feb 16, 2015
Posts
7,389
Reaction score
8,618
Location
Big Bear Lake, ca
The cab releasing to expose the “engine bay” area is a pretty cool little touch like real world cab over trucks.

Fun addition to my diecast collection. I’m definitely not a grown up lol. Just a kid trapped in the adult sized body….. lol.

Not gonna lie…. I could see myself having a real life one of these…. Denali on a flat trailer behind this on a road trip to see new parts of the country… With a real nice luxury type RV interior, and off road capabilities for the truck part of it…. Something to dream of for the future hahaha.
 

Attachments

  • IMG_7236.jpeg
    IMG_7236.jpeg
    330.7 KB · Views: 4
  • IMG_7237.jpeg
    IMG_7237.jpeg
    194.9 KB · Views: 4
OP
OP
adventurenali92

adventurenali92

Full Access Member
Joined
Feb 16, 2015
Posts
7,389
Reaction score
8,618
Location
Big Bear Lake, ca
Today was an interesting day. Moms new roommate is the oldest of the 4 kids that I lived above for nearly 8 years and got to be very close to over that time. Crazy to see their kids all growing up. Alli is 18 now, she’s been working full time since she was 16, and bought her first truck completely on her own and paid cash for it! She bought a 2005 ram 1500 CCSB 4x4 from family friends from our old church that I grew up in. Kid that had it I knew quite well. He put a level kit, method race wheels and general grabber A/Ts on it. Tow mirrors. Aftermarket headlights with HID projector retrofits and did some exhaust work on it. It’s a pretty nice truck. Alli bought it and took the shell off of it. She absolutely loves the thing. She called this morning while I was on my way to work and she was frustrated because it wouldn’t start. I immediately flipped around and headed for moms. Wasn’t turning over and battery was showing 12 volts. No clicks likes dead battery and gauge and lights lit up with the key on. Been there done that with all my rides and figured she needed a starter. Called my client and let him know I’d be a tad bit late as I was taking her to the parts store and then dropping her to work. Autozone had a remanufactured starter in stock but I told her it was better to have him order a new one and get it trucked up the mountain. She agreed. I dropped her to work and then headed to my clients house. Hammered out a detail on his Ducati. I watched a couple videos on YouTube and figured the job wasn't too bad and I could tackle it. Ran to moms and pulled the bad starter out pretty easily. She got the call about 3ish that the new starter made it up the hill. I was pulling pears from the tree in my front yard when she let me know. Got 4 boxes of deliciously fresh pears!
Anyways ran and grabbed Alli’s keys, picked up the new starter and dropped off the core to the parts store. But holy cow putting that new starter in absolutely SUCKED! Getting it in and out was fairly simple, only two bolts holding it to the trans bell housing, a nut holding the power wire onto the unit and a trigger wire clipped on with a plastic connector. Also a metal shield next to the starter that the guys truck in the video didn’t have. That made getting the lower of the two bolts out annoying but doable. Getting it threaded back in proper and tightened down was ridiculously difficult. Starter is mounted below the block on the drivers side behind the wheel, but the driveshaft and the down pipe with the cat completely blocked access to get ratchets in and get the bolt to turn. And the shield prevented me from actually seeing the hole to thread the bolt into. I had to unthread it and rethread it several times to get it in right and then tightening down took forever going 1/4 turns at a time cuz there just wasn't any room to turn the ratchet. Went to rehook the battery up after install and putting negative cable on made the starter engage. Like it sound like a fan running at high speed. Knew that wasn’t right. Figured out of the two posts on the new starter I bolted the power wire to the wrong one where the old starter only had one post for the power wire. Unhooked battery, took the nut off the power wire on the starter and moved it to the opposite post. In the process of putting the battery back together I dropped one of the nuts on the top post battery….. ooi… it literally vanished…. That was an easy fix though. Went and picked Alli up from work, on the way back stopped into autozone and had to guess on the size of the nut but they guy on staff is chill. He helps me out quite a bit and showed him the nut from the other side. Knew the lost one was a bit smaller and he was able to get me a pack of the right ones. We get back to moms, get the battery cables hooked back up and BAM! Truck fired right up! Alli was so happy that her truck is back up and running so even though it was a long ass afternoon I got I handled and it felt good. My mom was super impressed that I was able to get it fixed up. She’s like dang you can work on more than just your Denali….. I’m like…. DUH! Lol
All in all interesting adventure of a day…
 

Attachments

  • IMG_7279.jpeg
    IMG_7279.jpeg
    258.4 KB · Views: 4
  • IMG_7280.jpeg
    IMG_7280.jpeg
    218.2 KB · Views: 4
  • IMG_7278.jpeg
    IMG_7278.jpeg
    416.7 KB · Views: 4
Last edited:

Forum statistics

Threads
132,364
Posts
1,866,744
Members
96,985
Latest member
LeanMachine
Top