Restoring/Upgrading 2011 Tahoe PPV

Disclaimer: Links on this page pointing to Amazon, eBay and other sites may include affiliate code. If you click them and make a purchase, we may earn a small commission.

OP
OP
T

techbiker

Full Access Member
Joined
Nov 12, 2017
Posts
114
Reaction score
86
Sometimes its not lifter tick but piston slap...
Anything's possible (don't want to jinx myself), however everything sounds fairly normal to me. The faint ticking is coming from the top end around the injectors. Compared to a 1991 Honda, 1999 Caravan, my 1993 300zx, and a 2006 Scion, this engine is pretty quiet.
 
OP
OP
T

techbiker

Full Access Member
Joined
Nov 12, 2017
Posts
114
Reaction score
86
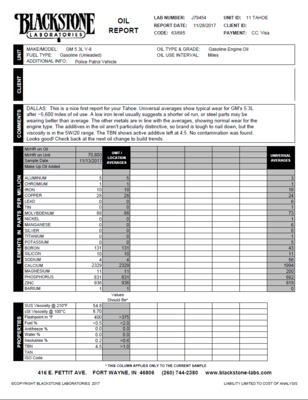
The Blackstone oil report just came in for the year-old oil we drained from the Tahoe after picking it up from auction. Good news!

P.S. I know that there is very little fuel present in the oil, but I wonder why the viscosity is so low? Perhaps this is an indication of a leaking fuel injector?

Edit: From Landline mag-

"A typical sample will not show positive fuel in the oil unless it is excessive, such as 4 percent or more. So, some fuel can lower the viscosity but not alert the fuel in the oil parameter and show the sample is normal. I recommend taking the engine in and checking the injectors when you first notice the drop in viscosity instead of waiting for the sample to show positive fuel. By then your viscosity is really low and causing harm to the engine."

Edit 2: I just placed an order for new AC Delco fuel injectors.

http://www.landlinemag.com/Magazine/2010/May/BottomLine/Oil-analysis.aspx

tahoeoil11-28-17.png
 
Last edited:

CrashTestDummy

Full Access Member
Joined
Feb 18, 2014
Posts
901
Reaction score
342
Location
Pearland, Texas
<SNIP>Rear toe is wild. Do you know if there is anything I can purchase to add rear toe adjustability?<SNIP>

A torch. Seriously, but you really need to remove the diff from the truck and get it supported by the center section. Then you heat up the side of the axle tube you want to shrink until it is red hot with an oxy-acetelyne torch. Let it cool, measure, wash, rinse, repeat. It's an old racer's trick to camber a live axle differential. It does work, but you have to go slow.

You may also be able to achieve similar results on a frame machine, but I'm not sure a body shop with one would want to do that. I would definitely check where the axle tubes go into the center section of the differential to make sure the welds aren't broken there. It sounds like your truck may have been 'off-roaded' a bit.
 
OP
OP
T

techbiker

Full Access Member
Joined
Nov 12, 2017
Posts
114
Reaction score
86
A torch. Seriously, but you really need to remove the diff from the truck and get it supported by the center section. Then you heat up the side of the axle tube you want to shrink until it is red hot with an oxy-acetelyne torch. Let it cool, measure, wash, rinse, repeat. It's an old racer's trick to camber a live axle differential. It does work, but you have to go slow.

You may also be able to achieve similar results on a frame machine, but I'm not sure a body shop with one would want to do that. I would definitely check where the axle tubes go into the center section of the differential to make sure the welds aren't broken there. It sounds like your truck may have been 'off-roaded' a bit.

Do you think this toe is excessive enough to cause accelerated tire wear? I will check the welds at the diff again- I didn't see anything odd under there when I serviced it.

Could I just try installing new control and trailing arms? Maybe an arm is bent? There are some nice aftermarket Delrin-bushing arms available.
 
Last edited:

iLikeEggs

Potato!
Joined
Sep 4, 2015
Posts
809
Reaction score
284
Location
Oregon, USA
I bought my 2011 SSV with about 119k on it. 155k on it now. Just had the transfer case and rear end rebuilt. Not sure though if it was because of all the original cop miles or the miles I put on it since i got it....lol. I was really expecting the engine and tranny to go out first but they are still going strong. Had the tranny serviced at 153k and I have been running Mobile 1 in it since I got it. McLovin' it!
 

2011SSVHOE

I'm an egual oportunity offender
Joined
Dec 2, 2016
Posts
1,402
Reaction score
1,006
Location
The Heart of The Triad, North Carolina
I bought my 2011 SSV with about 119k on it. 155k on it now. Just had the transfer case and rear end rebuilt. Not sure though if it was because of all the original cop miles or the miles I put on it since i got it....lol. I was really expecting the engine and tranny to go out first but they are still going strong. Had the tranny serviced at 153k and I have been running Mobile 1 in it since I got it. McLovin' it!

I just had my oil changed last week at 80k and the mechanic (not the Service Advisor) said that I should change the rear end fluid, as it costs about a grand to rebuild it. He said that I would notice a difference, by the way he has a 07 Tahoe so I may do that in the spring.
 
OP
OP
T

techbiker

Full Access Member
Joined
Nov 12, 2017
Posts
114
Reaction score
86
Mr. Techbiker great job on this write up and information tread:happy160:


Thanks. It continues.

After finishing the fluid flushes and suspension work, I moved to the engine mechanicals:

-Cleaned MAF with MAF cleaner
-Cleaned throttle body with carb cleaner
-Replaced the serpentine belt, tensioner and idler, cleaned the other pulleys with carb cleaner and a soft wire brush. Even at 71k miles, grit had gotten into the idler bearing and the tensioner had developed play.
-Replaced the upper and lower radiator hoses. The old upper hose had bulged out about 5mm. I couldn't even remove the engine outlet clamp.
-Replaced 7/8 spark plugs with OEM Acdelco 41-110 Iridiums. The gaps had expanded to .043" on cylinders 3, 4, 5, 6. Replaced the wires too.
-Installed a MIT
-Replaced all of the fuel injectors with new OEMs. Unfortunately the new injectors did not cure my rough idle issue. I purchased a smoke machine and will perform a vacuum test this week.

I will take the SUV in to the shop for the #8 spark plug and AC stretch belt change.

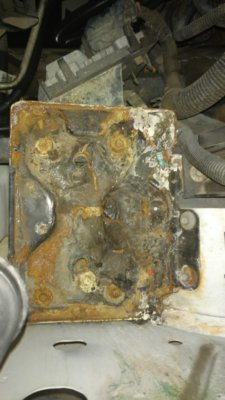
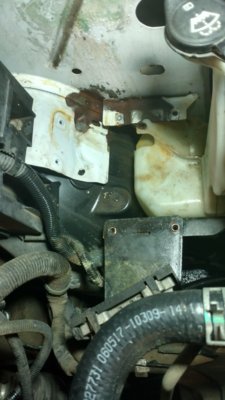
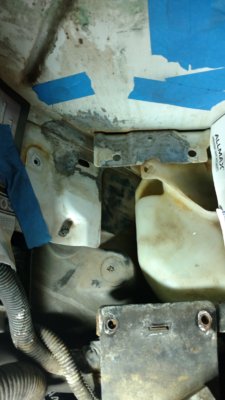
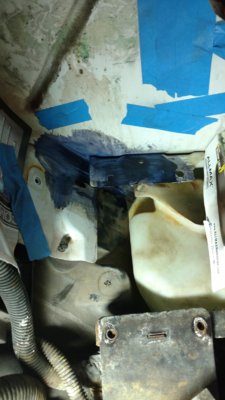
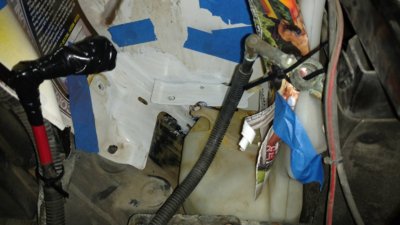
The last few days I shifted to the rusted auxiliary battery tray repair. Here is how I cleaned up 95% of the rust.

1. Remove and discard old battery tray and hardware.
2. Neutralize the area with baking soda.
3. Order replacement parts.
4. Grind down rust on the battery tray support with a Dremel. I recommend starting with a grinding stone and moving to an 80 grit flap wheel.
5. Any rust unreachable with a Dremel can be removed with a scotch-brite pad.
6. Apply Loctite's rust converter according to the directions on the bottle. I used a small chip brush and disposable Tupperware container.
7. Wait 24 hours before applying a top coat of OEM-matching paint. I know my paint job stinks. My goal was to rust-proof the metal though. Most of the paint will not be visible from the engine bay once the aux battery is reinstalled.
8. Reinstall new tray and hardware sourced from the dealer.

Today:

I picked up a sweet cloth 2nd row seat and 2 2nd row door panels for $150. I opened up my wallet and ponied up $390 plus shipping for a like-new console/jump seat. Finally, I installed a new bowtie on the front bumper.

Soon:

-Take the Tahoe to the body shop to get the front windshield replaced and body holes filled.
-Move to the interior work.


Thanks for everyone's help.

IMG_20171202_235235018.jpg IMG_20171203_003854857_HDR.jpg IMG_20171203_173624796.jpg IMG_20171203_180843583.jpg IMG_20171205_010108659.jpg
 
OP
OP
T

techbiker

Full Access Member
Joined
Nov 12, 2017
Posts
114
Reaction score
86
Some more pictures attached. See the bulging old upper radiator hose. I also wound up parking next to 2 different 2015+ white Tahoes today. Pretty funny that my 2011 is at least 2 inches shorter.

IMG_20171202_184937539.jpg IMG_20171203_235952338.jpg IMG_20171205_010849572.jpg whitetahoes.jpg
 
Last edited:

Forum statistics

Threads
133,295
Posts
1,883,065
Members
98,360
Latest member
ezmoney1981
Top