Thank you.
You are using an out of date browser. It may not display this or other websites correctly.
You should upgrade or use an alternative browser.
You should upgrade or use an alternative browser.
What did you do to your NBS GMT800 Tahoe/Yukon Today?
- Thread starter vwbeaner
- Start date
Disclaimer: Links on this page pointing to Amazon, eBay and other sites may include affiliate code. If you click them and make a purchase, we may earn a small commission.
n50bd
TYF Newbie
I had a 2000 suburban with that problem. Removed the 4 wheel drive button assembly, took it apart and resolder e verthing. No more problems!!I have a 01 yuk 4x4, and a few days after I bought her, the svc 4wd light started coming on every once in a while. Didn't do it everyday and at times wouldn't come on for weeks at a time. Did some research and learned that it was possibly the 4wd selector switch. I ordered one off of ebay and put it on Saturday. Keeping my fingers crossed that I won't see the light anymore. Replaced it because it started coming on more frequently.
Also tried to remove my rear fog lights but the bolts are so rusted had to stop because it got too dark. Will try to finish it this weekend.
Tonyrodz
Resident Resident
Had the same issue with mine. Lmk if the oil doesn't work.I believe in the power of prayer, positive thinking and lots of penetrating oil!
I have faith that I will be able to get the safety latch on my spare tire carrier to set itself free.
Maybe not today... Maybe not next week... But, dang-it! I know, eventually, my tire will come down without cutting something off!
I am willing to wait patiently for the oil to work its magic, so I do not have to spend money on a new spare tire carrier.
Cable looks like new. It was just the safety mechanism that was all crusty. Ok, so the spare tire rim is also a little crusty, but the tire is like new!
View attachment 378114
@RAMurphy Do you have a link or part number for that?Mark, I also ended up buying a o-ring/seal kit. Not that expensive and I was glad to have it.
@Rocket Man Mark, I'm sorry I don't, but I know I got the kit from RockAuto. You want both the o-ring and seal kit. There are a difference between the two. I would also get a small bottle of "freon oil" to lubricate the o-rings and seals when you replace/install them. Bob@RAMurphy Do you have a link or part number for that?
HiHoeSilver
Away!
This project occupied my entire past week, but she's finally checked off the big list. Stainless brake lines (the hard ones) are installed!
A few things I learned:
1. Unbolting the 6 body mounts on the driver's side and lifting it off the frame a little is worth it. A couple inches can go a long way (or so I've been told).
2. The Dorman stainless kit is quite nice. I used #919-154 for trucks w/JL4. I would have typically chosen Inline or Classic Tube (not really a Dorman fan), but the idea that they use unions on some of the longer, hard to install lines didn't sit well with me. Pleased with my choice.
3. You can bleed these puppies from scratch without a scan tool quite successfully. I've bled the corners when I did the caliper/rotor/braided upgrade, but I thought for sure the full line redo was going to be my excuse for a Tech2, or at least calling in a favor from a buddy. Nope.
The install is pretty straightforward, but getting the lines routed was not easy. There are a couple of tricky spots where things cross over/under wire looms or each other that require going in a certain order. I took my sweet time, made it a puzzle game, and didn't force anything too hard.
Once my hands and forearms had been sufficiently bled getting all the lines into their homes, it was their turn to bleed. And what sweet revenge it was! A solid win for me on this one:
I started by filling the reservoir, cracking the 2 output lines each a few times with the pedal down to at least get the MC primed. I found that this method is actually in my GM Service Manual, as well. Then I just did an old school gravity bleed all the way around. 4 jack stands with all the wheels off and a patient assistant helps get fluid through 17 miles of brake lines. I did use the patented @iamdub "2X4 on the floor and cycle the key a bit while pumping" method.
Next, since I hadn't removed the MC to bench it and was now at the front drivers wheel anyways, I bled the MC for real by running a line from the caliper bleeder up into the reservoir and pumping the pedal until I had a full closed loop going. Worked like a charm!
The pedal was getting there by this point, but not firm by any means. I knew it had to be the ABS module now. Of course a scan tool does this, and we've all heard the "slam on the brakes on a gravel road and then bleed it all again" method. Yuck. I opted for the "Well, it's already on jack stands..." line of thought.
THIS IS NOT A RECOMMENDATION, BUT RATHER SIMPLY AN ACCOUNT OF WHAT I DID!
I put that baby in 4WD, got her up to about 20 mph and "activated" the ABS really well a few times. I did get a front left wheel speed sensor code doing this and I have a couple of ideas why, but I just cleared it when I was done and it never came back.
I then did another trip around the truck by the usual means and got quite a bit more air from each spot (along with all nice new clear fluid). Pedal firmed up at least as well as it was before I started this whole thing. I will likely see if there is any more to bleed in 5k ish next time I rotate tires just for grins.
I DID:
Be my usual self and go a little overboard on a couple of OCD items like sleeving polyurethane tube over the lines in some spots where they crossed or could possibly contact the frame or other metal, including each other. I also added a few of my own 2-line routing clips that we use in the shop on 1/4" refrigeration lines where I felt the factory support was lacking or worn.
Take my time, enjoy my music, complain alot, work hard, and do a job that I can sleep well with in the end.
I DIDN'T:
Do the jounce hoses or the two hard lines along the rear axle. I know, I know, all this and then didn't do the last 4 pieces! But before (or after) you all give me a hard time, I did have a reason. I was very busy leading up to this job and forgot to hound Goodridge for my "fixit" washers after emailing them to no avail. Is there a tried and method to obtain these? Should I just call them? This will also give me another reason to do a sway bar upgrade and clean some other stuff up back there.
Okay, here's some mandatory pics...
The Old and the New:
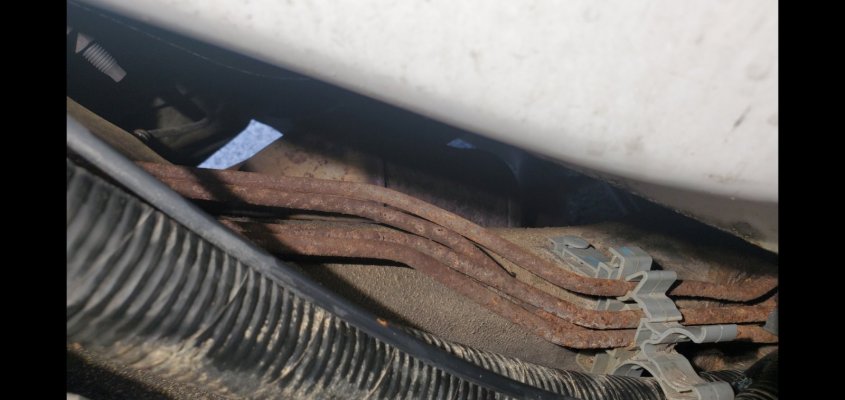
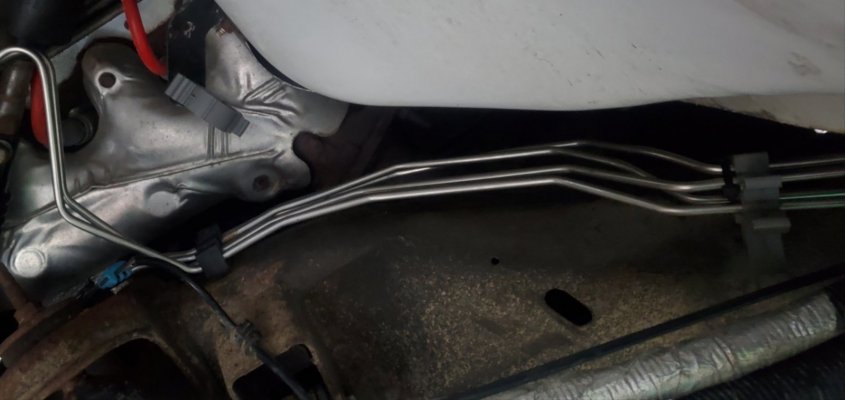
Before and After:
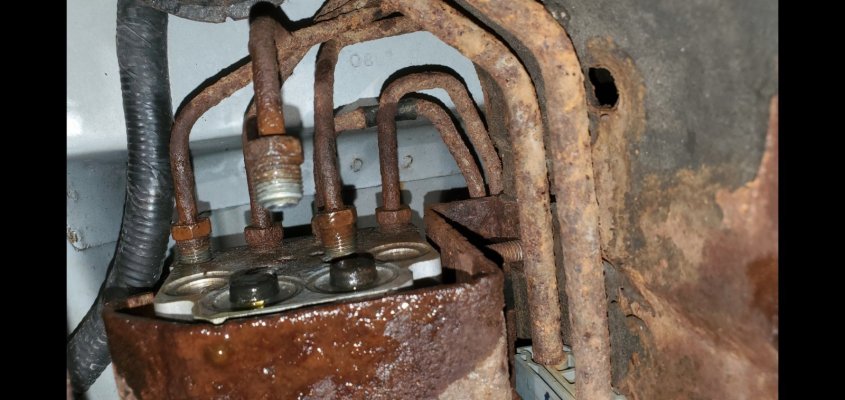
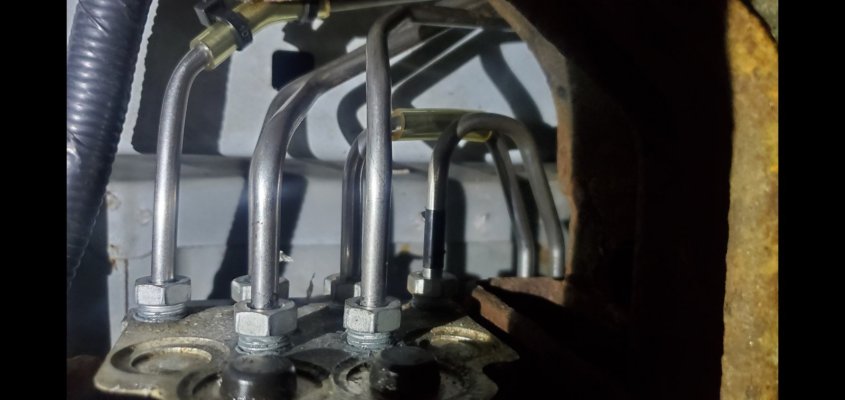
They're in!
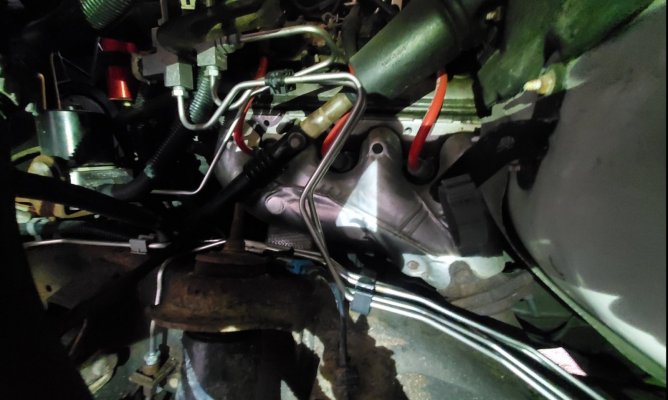
Well, that's about it, I think! A job I knew was inevitable and avoided until it forced itself upon me! Feels good to have it (mostly) done!
A few things I learned:
1. Unbolting the 6 body mounts on the driver's side and lifting it off the frame a little is worth it. A couple inches can go a long way (or so I've been told).
2. The Dorman stainless kit is quite nice. I used #919-154 for trucks w/JL4. I would have typically chosen Inline or Classic Tube (not really a Dorman fan), but the idea that they use unions on some of the longer, hard to install lines didn't sit well with me. Pleased with my choice.
3. You can bleed these puppies from scratch without a scan tool quite successfully. I've bled the corners when I did the caliper/rotor/braided upgrade, but I thought for sure the full line redo was going to be my excuse for a Tech2, or at least calling in a favor from a buddy. Nope.
The install is pretty straightforward, but getting the lines routed was not easy. There are a couple of tricky spots where things cross over/under wire looms or each other that require going in a certain order. I took my sweet time, made it a puzzle game, and didn't force anything too hard.
Once my hands and forearms had been sufficiently bled getting all the lines into their homes, it was their turn to bleed. And what sweet revenge it was! A solid win for me on this one:
I started by filling the reservoir, cracking the 2 output lines each a few times with the pedal down to at least get the MC primed. I found that this method is actually in my GM Service Manual, as well. Then I just did an old school gravity bleed all the way around. 4 jack stands with all the wheels off and a patient assistant helps get fluid through 17 miles of brake lines. I did use the patented @iamdub "2X4 on the floor and cycle the key a bit while pumping" method.
Next, since I hadn't removed the MC to bench it and was now at the front drivers wheel anyways, I bled the MC for real by running a line from the caliper bleeder up into the reservoir and pumping the pedal until I had a full closed loop going. Worked like a charm!
The pedal was getting there by this point, but not firm by any means. I knew it had to be the ABS module now. Of course a scan tool does this, and we've all heard the "slam on the brakes on a gravel road and then bleed it all again" method. Yuck. I opted for the "Well, it's already on jack stands..." line of thought.
THIS IS NOT A RECOMMENDATION, BUT RATHER SIMPLY AN ACCOUNT OF WHAT I DID!
I put that baby in 4WD, got her up to about 20 mph and "activated" the ABS really well a few times. I did get a front left wheel speed sensor code doing this and I have a couple of ideas why, but I just cleared it when I was done and it never came back.
I then did another trip around the truck by the usual means and got quite a bit more air from each spot (along with all nice new clear fluid). Pedal firmed up at least as well as it was before I started this whole thing. I will likely see if there is any more to bleed in 5k ish next time I rotate tires just for grins.
I DID:
Be my usual self and go a little overboard on a couple of OCD items like sleeving polyurethane tube over the lines in some spots where they crossed or could possibly contact the frame or other metal, including each other. I also added a few of my own 2-line routing clips that we use in the shop on 1/4" refrigeration lines where I felt the factory support was lacking or worn.
Take my time, enjoy my music, complain alot, work hard, and do a job that I can sleep well with in the end.
I DIDN'T:
Do the jounce hoses or the two hard lines along the rear axle. I know, I know, all this and then didn't do the last 4 pieces! But before (or after) you all give me a hard time, I did have a reason. I was very busy leading up to this job and forgot to hound Goodridge for my "fixit" washers after emailing them to no avail. Is there a tried and method to obtain these? Should I just call them? This will also give me another reason to do a sway bar upgrade and clean some other stuff up back there.
Okay, here's some mandatory pics...
The Old and the New:


Before and After:


They're in!

Well, that's about it, I think! A job I knew was inevitable and avoided until it forced itself upon me! Feels good to have it (mostly) done!
Last edited:
Ok, I ordered a set off Amazon. RA had them but it would be longer shipping. The rest of my stuff from RA will be here Thursday, and Amazon will deliver the seals and l-rings on Friday. I’ll probably have the system evacuated on Friday, maybe work on it starting Monday. I need the truck this weekend. Thanks.@Rocket Man Mark, I'm sorry I don't, but I know I got the kit from RockAuto. You want both the o-ring and seal kit. There are a difference between the two. I would also get a small bottle of "freon oil" to lubricate the o-rings and seals when you replace/install them. Bob
Nice work Nate!This project occupied my entire past week, but she's finally checked off the big list. Stainless brake lines (the hard ones) are installed!
A few things I learned:
1. Unbolting the 6 body mounts on the driver's side and lifting it off the frame a little is worth it. A couple inches can go a long way (or so I've been told).
2. The Dorman stainless kit is quite nice. I would have typically chosen Inline or Classic Tube (not really a Dorman fan), but the idea that they use unions on some of the longer, hard to install lines didn't sit well with me. Pleased with my choice.
3. You can bleed these puppies from scratch without a scan tool quite successfully. I've bled the corners when I did the caliper/rotor/braided upgrade, but I thought for sure the full line redo was going to be my excuse for a Tech2, or at least calling in a favor from a buddy. Nope.
The install is pretty straightforward, but getting the lines routed was not easy. There are a couple of tricky spots where things cross over/under wire looms or each other that require going in a certain order. I took my sweet time, made it a puzzle game, and didn't force anything too hard.
Once my hands and forearms had been sufficiently bled getting all the lines into their homes, it was their turn to bleed. And what sweet revenge it was! A solid win for me on this one:
I started by filling the reservoir, cracking the 2 output lines each a few times with the pedal down to at least get the MC primed. I found that this method is actually in my GM Service Manual, as well. Then I just did an old school gravity bleed all the way around. 4 jack stands with all the wheels off and a patient assistant helps get fluid through 17 miles of brake lines. I did use the patented @iamdub "2X4 on the floor and cycle the key a bit while pumping" method.
Next, since I hadn't removed the MC to bench it and was now at the front drivers wheel anyways, I bled the MC for real by running a line from the caliper bleeder up into the reservoir and pumping the pedal until I had a full closed loop going. Worked like a charm!
The pedal was getting there by this point, but not firm by any means. I knew it had to be the ABS module now. Of course a scan tool does this, and we've all heard the "slam on the brakes on a gravel road and then bleed it all again" method. Yuck. I opted for the "Well, it's already on jack stands..." line of thought.
THIS IS NOT A RECOMMENDATION, BUT RATHER SIMPLY AN ACCOUNT OF WHAT I DID!
I put that baby in 4WD, got her up to about 20 mph and "activated" the ABS really well a few times. I did get a front left wheel speed sensor code doing this and I have a couple of ideas why, but I just cleared it when I was done and it never came back.
I then did another trip around the truck by the usual means and got quite a bit more air from each spot (along with all nice new clear fluid). Pedal firmed up at least as well as it was before I started this whole thing. I will likely see if there is any more to bleed in 5k ish next time I rotate tires just for grins.
I DID:
Be my usual self and go a little overboard on a couple of OCD items like sleeving polyurethane tube over the lines in some spots where they crossed or could possibly contact the frame or other metal, including each other. I also added a few of my own 2-line routing clips that we use in the shop on 1/4" refrigeration lines where I felt the factory support was lacking or worn.
Take my time, enjoy my music, complain alot, work hard, and do a job that I can sleep well with in the end.
I DIDN'T:
Do the jounce hoses or the two hard lines along the rear axle. I know, I know, all this and then didn't do the last 4 pieces! But before (or after) you all give me a hard time, I did have a reason. I was very busy leading up to this job and forgot to hound Goodridge for my "fixit" washers after emailing them to no avail. Is there a tried and method to obtain these? Should I just call them? This will also give me another reason to do a sway bar upgrade and clean some other stuff up back there.
Okay, here's some mandatory pics...
The Old and the New:
View attachment 378173
View attachment 378174
Before and After:
View attachment 378175
View attachment 378176
They're in!
View attachment 378180
Well, that's about it, I think! A job I knew was inevitable and avoided until it forced itself upon me! Feels good to have it (mostly) done!
Fantastic! I see the rust. As rusted as those lines are, I am surprised that the lines are not twisted inside the fittings after breaking loose. Love them line wrench tools of any kind. Thankfully I don't have to deal with that. This brake line swap is one of the next items in my line of things to do but have had an impossible time finding a kit for the traction control rigs. Any suggestions from anyone? Be aware, if you are not already aware, I do not want just any hard line kit, I want quality for this time consuming job. Cheapest is not always best for me.
HiHoeSilver
Away!
Fantastic! I see the rust. As rusted as those lines are, I am surprised that the lines are not twisted inside the fittings after breaking loose. Love them line wrench tools of any kind. Thankfully I don't have to deal with that. This brake line swap is one of the next items in my line of things to do but have had an impossible time finding a kit for the traction control rigs. Any suggestions from anyone? Be aware, if you are not already aware, I do not want just any hard line kit, I want quality for this time consuming job. Cheapest is not always best for me.
The kit I used was Dorman 919-154. It is for the JL4 trucks. I was pleasantly surprised with its quality.
Similar threads
- Replies
- 2
- Views
- 574
- Replies
- 6
- Views
- 402
Forum statistics
Latest posts
-
-
-
-
-
Out there question for the gurus that know GMT800s inside and out
- Latest: adventurenali92
