What did you do to your NNBS GMT900 Tahoe/Yukon Today?

Disclaimer: Links on this page pointing to Amazon, eBay and other sites may include affiliate code. If you click them and make a purchase, we may earn a small commission.

alpha_omega

Full Access Member
Joined
Mar 15, 2017
Posts
704
Reaction score
1,347
Location
Michigan
Got a volt meter? Start checking for voltage starting at the window motor, then the switch, then wherever the switch gets it's power from?
x2 on the volt meter. It’s hard to diagnose from here without knowing what readings your getting from the aforementioned locations (you could also check the Tech2 and see if you’re getting any faults for those items).

What was the update on the fill cap?
*Check
X2, and can we see a pic?

1st Design
(Labeled SAE 5W30)
- ACDelco FC208

2nd Design
(Labeled dexos SAE 5W-30)
- ACDelco FC244 (GM 12643759)

Update was a slightly different design, much cleaner feeling overall than the original version. Seems to seat nicer, whereas the original version sometimes felt like you were going to unscrew the entire fill tube when you tried removing the cap. Plus an updated o-ring and a change to the text/logo as mentioned above.


E9B36421-B9E2-47EC-A8DD-5F0532E28B6A.jpeg

EBF1D654-305B-44A7-A9A9-2CE06122D27B.jpegB2C5B308-C13A-4C00-AC08-A37CAC7D9976.jpeg
 
Last edited:

alpha_omega

Full Access Member
Joined
Mar 15, 2017
Posts
704
Reaction score
1,347
Location
Michigan
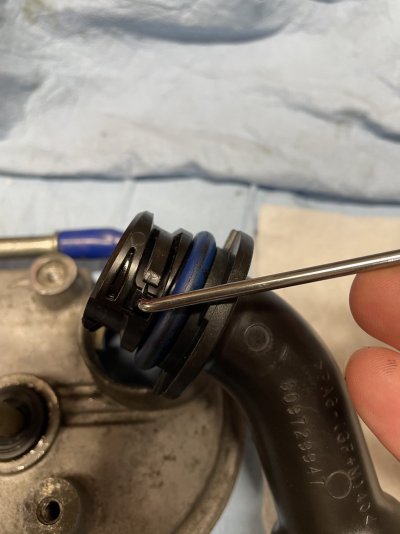
For those who have not done an engine oil filler tube replacement or the engine oil filler tube gasket/o-ring, here are some photos showing why you need to remove it only AFTER removing the valve cover, otherwise you will damage the plastic cam portion of the tube and potentially mar or mangle up the gasket.

Also, here is a quick way to remove the o-rings (any o-ring for that matter) without damaging it or the part you are removing it from. The key is to get under it from above and then gently apply slight pressure upwards while rolling your pick or small flathead around the ring. Leaning your tool on the lip of the part it’s being removed from ensures your don’t slip and gouge the part or ding/scratch/tear the o-ring. Unless you no longer need it, in which case a pair of electronic snips works just fine.

*note that I put the gasket/o-ring back in place after removing the filler tube from the valve cover. In order to remove the oil filler tube you must first remove the valve cover, then the o-ring, then twist CCW to line up the cam release slot and in order to remove the tube. Installation is the reverse procedure.

7B0D7D57-0736-470E-B34D-53DA0657ADF4.jpegF46FE0A4-405D-4B7A-AE40-E5921C4E58EF.jpegA1E0051B-6525-4224-98ED-D6E5141C9267.jpeg86955BA5-F44B-4D97-9068-67D7F9A9A21B.jpeg
 

Attachments

  • 99F0AC7A-3171-4A68-8D94-8A56960CCDA3.jpeg
    99F0AC7A-3171-4A68-8D94-8A56960CCDA3.jpeg
    183.5 KB · Views: 2
Joined
Apr 11, 2018
Posts
7,124
Reaction score
14,364
Location
St. Louis
x2 on the volt meter. It’s hard to diagnose from here without knowing what readings your getting from the aforementioned locations (you could also check the Tech2 and see if you’re getting any faults for those items).

What was the update on the fill cap?
*Check


1st Design
(Labeled SAE 5W30)
- ACDelco FC208

2nd Design
(Labeled dexos SAE 5W-30)
- ACDelco FC244 (GM 12643759)

Update was a slightly different design, much cleaner feeling overall than the original version. Seems to seat nicer, whereas the original version sometimes felt like you were going to unscrew the entire fill tube when you tried removing the cap. Plus an updated o-ring and a change to the text/logo as mentioned above.


View attachment 347503

View attachment 347508View attachment 347509
Was this for your '02, because my 2012 cap looks like this updated version?
 

89Suburban

Bull in the china shop
Supporting Member
Joined
Jan 10, 2013
Posts
15,087
Reaction score
41,763
Location
SE PA
For those who have not done an engine oil filler tube replacement or the engine oil filler tube gasket/o-ring, here are some photos showing why you need to remove it only AFTER removing the valve cover, otherwise you will damage the plastic cam portion of the tube and potentially mar or mangle up the gasket.

Also, here is a quick way to remove the o-rings (any o-ring for that matter) without damaging it or the part you are removing it from. The key is to get under it from above and then gently apply slight pressure upwards while rolling your pick or small flathead around the ring. Leaning your tool on the lip of the part it’s being removed from ensures your don’t slip and gouge the part or ding/scratch/tear the o-ring. Unless you no longer need it, in which case a pair of electronic snips works just fine.

*note that I put the gasket/o-ring back in place after removing the filler tube from the valve cover. In order to remove the oil filler tube you must first remove the valve cover, then the o-ring, then twist CCW to line up the cam release slot and in order to remove the tube. Installation is the reverse procedure.

View attachment 347510View attachment 347512View attachment 347513View attachment 347514


Look at the difference in our locking tabs on the valve covers. You have 2 at 3 and 9 o'clock and I only have one at 6 o'clock. Mine sucks trying to find the right filler tube to fit snug.

IMG_3065.JPGIMG_3066.JPG
 

89Suburban

Bull in the china shop
Supporting Member
Joined
Jan 10, 2013
Posts
15,087
Reaction score
41,763
Location
SE PA
Got a volt meter? Start checking for voltage starting at the window motor, then the switch, then wherever the switch gets it's power from?
Yes this is next. Anybody have a wire diagram so I know what wires and circuits to trace and test?
 

Rocket Man

Mark
Supporting Member
Joined
Dec 25, 2014
Posts
26,004
Reaction score
50,862
Location
Oregon
For those who have not done an engine oil filler tube replacement or the engine oil filler tube gasket/o-ring, here are some photos showing why you need to remove it only AFTER removing the valve cover, otherwise you will damage the plastic cam portion of the tube and potentially mar or mangle up the gasket.

Also, here is a quick way to remove the o-rings (any o-ring for that matter) without damaging it or the part you are removing it from. The key is to get under it from above and then gently apply slight pressure upwards while rolling your pick or small flathead around the ring. Leaning your tool on the lip of the part it’s being removed from ensures your don’t slip and gouge the part or ding/scratch/tear the o-ring. Unless you no longer need it, in which case a pair of electronic snips works just fine.

*note that I put the gasket/o-ring back in place after removing the filler tube from the valve cover. In order to remove the oil filler tube you must first remove the valve cover, then the o-ring, then twist CCW to line up the cam release slot and in order to remove the tube. Installation is the reverse procedure.

View attachment 347510View attachment 347512View attachment 347513View attachment 347514
Interesting. I have removed mine from above by pushing down hard to compress the o-ring and then twisting counterclockwise until it releases. But that’s on my 02. I notice the SM states to replace it with a new one if you remove it., nothing about what you’re saying. I notice it says the same for my 08. They designed it as a one time use part I guess.
 

Just Fishing

Can't fix stupid
Joined
Aug 30, 2020
Posts
3,926
Reaction score
8,503
Location
Utah
Look at the difference in our locking tabs on the valve covers. You have 2 at 3 and 9 o'clock and I only have one at 6 o'clock. Mine sucks trying to find the right filler tube to fit snug.

View attachment 347530View attachment 347531

I should have gotten some pictures of what i did.
But a combination of painting the valve covers, and making sure i coated down in the hole a good 3/4 of an inch, and adding an extra o-ring made my fill tube extra tight.

It was something that just sorta happened when i put it together.
But i ordered a few multi size quality oring kits off of amazon since i hate never having orings on hand when i need them.

One of the larger sized, yet thinner orings from one of the kits was perfect to tighten up the fitment.

If you still need it, i can grab the oring kit i used.
 

Just Fishing

Can't fix stupid
Joined
Aug 30, 2020
Posts
3,926
Reaction score
8,503
Location
Utah
Interesting. I have removed mine from above by pushing down hard to compress the o-ring and then twisting counterclockwise until it releases. But that’s on my 02. I notice the SM states to replace it with a new one if you remove it., nothing about what you’re saying. I notice it says the same for my 08. They designed it as a one time use part I guess.

When i originally removed mine back in like December, i was greeted by the breaking tab.

The replacement i received was not as tight.
Second time around i took my time and used a pick to remove it.

Luckily i still had my old one, it took some careful precision to find and lift the tab.
Not totally straight forward unless you know where that locking tab sits.

Or maybe the lighting just sucked.
 

Rocket Man

Mark
Supporting Member
Joined
Dec 25, 2014
Posts
26,004
Reaction score
50,862
Location
Oregon
For those who have not done an engine oil filler tube replacement or the engine oil filler tube gasket/o-ring, here are some photos showing why you need to remove it only AFTER removing the valve cover, otherwise you will damage the plastic cam portion of the tube and potentially mar or mangle up the gasket.

Also, here is a quick way to remove the o-rings (any o-ring for that matter) without damaging it or the part you are removing it from. The key is to get under it from above and then gently apply slight pressure upwards while rolling your pick or small flathead around the ring. Leaning your tool on the lip of the part it’s being removed from ensures your don’t slip and gouge the part or ding/scratch/tear the o-ring. Unless you no longer need it, in which case a pair of electronic snips works just fine.

*note that I put the gasket/o-ring back in place after removing the filler tube from the valve cover. In order to remove the oil filler tube you must first remove the valve cover, then the o-ring, then twist CCW to line up the cam release slot and in order to remove the tube. Installation is the reverse procedure.

View attachment 347510View attachment 347512View attachment 347513View attachment 347514

Interesting. I have removed mine from above by pushing down hard to compress the o-ring and then twisting counterclockwise until it releases. But that’s on my 02. I notice the SM states to replace it with a new one if you remove it., nothing about what you’re saying. I notice it says the same for my 08. They designed it as a one time use part I guess.

When i originally removed mine back in like December, i was greeted by the breaking tab.

The replacement i received was not as tight.
Second time around i took my time and used a pick to remove it.

Luckily i still had my old one, it took some careful precision to find and lift the tab.
Not totally straight forward unless you know where that locking tab sits.

Or maybe the lighting just sucked.
And I should have known after reading all this and the SM. I just went and checked and mine's all crooked. So I ordered an OEM one. I swear when I installed it, it was tight and straight.
 
Top