2-Channel Dash Cam Install

Disclaimer: Links on this page pointing to Amazon, eBay and other sites may include affiliate code. If you click them and make a purchase, we may earn a small commission.

Lloyd Bonafide

TYF Newbie
Joined
Nov 28, 2022
Posts
1
Reaction score
2
Thanks a million! I followed your instructions and competed the install in 90 minutes. The most difficult part was fishing the wire through the door rubber conduit.

-Lloyd Bonafide
 

Salty821

TYF Newbie
Joined
Oct 5, 2022
Posts
2
Reaction score
0
Did anyone have trouble pushing the 2nd wire into the top of the windshield?
 

Chad G 1979

Full Access Member
Joined
May 6, 2022
Posts
521
Reaction score
322
This was a great help to me when i added my dash cam last weekend. Took about an hour and half, but i was taking my time.

And yes i did have sone trouble with the 2nd wire going from front cam back to the side under the front edge of headliner. I just did the best i could and there is nothing showing unless you climb in and really look for it.

Thanks for the write-up.
 

WilFresco

TYF Newbie
Joined
May 1, 2024
Posts
4
Reaction score
1
Hey all,
Didn’t see any information on installing a dash cam in a 2021+ Tahoe/Yukon so figured I would share some info from my install for others.

Dash Cam is a VIOFO A129 Pro Duo that I picked up on a Black Friday sale. I also got the CPL filter and 3-wire hardwire kit.
View attachment 360023

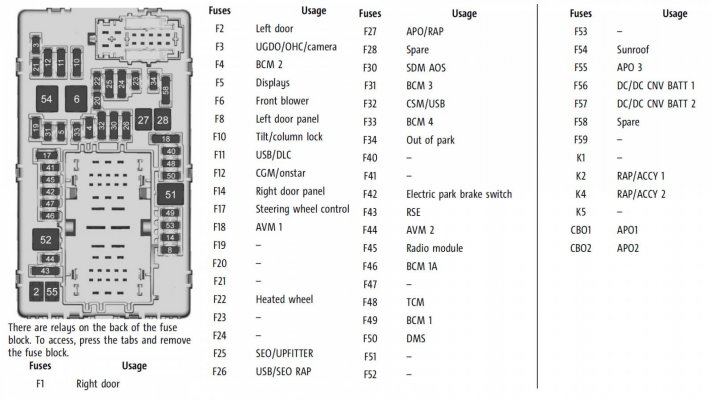
Another thread stated F26 was a switched power fuse, this is on the passenger side dash . I checked all fuses and came to the same conclusion so I used F26 for accessory power and F44 for constant power.
A Micro2 fuse tap was used for F44 with a 5A fuse. I couldn’t fit a Micro3 fuse tap on F26 so just wrapped the wire around one of the fused legs of the existing 10A fuse (ie not the center leg).
View attachment 360020
View attachment 360021

Next I disconnected the + battery terminal so I could remove the A-pillar cover and not risk the air bag going off. To disconnect the battery, pop off the cover, loosen the nut with a 10mm socket, and pull the plastic tabs on the side of the batter to allow the entire fuse block assembly off the battery.
View attachment 360028

(Continued in next post)
Your walkthrough is great. I'm currently doing the same on my '23 Yukon and had a quick question. Are you saying you can use a micro 2 fuse tap on the f26 fuse since the power is supplied on the middle prong then the 3rd prong on f26 stays empty and wont cause no problems? i know this post was a little while ago but hoping to get some clarification
 
OP
OP
B

badreau

Member
Joined
Nov 4, 2021
Posts
41
Reaction score
39
Location
Alberta, Canada
Your walkthrough is great. I'm currently doing the same on my '23 Yukon and had a quick question. Are you saying you can use a micro 2 fuse tap on the f26 fuse since the power is supplied on the middle prong then the 3rd prong on f26 stays empty and wont cause no problems? i know this post was a little while ago but hoping to get some clarification
No, you would need a Micro 3 fuse tap for F26, to retain the stock fuse functionality.
 

WilFresco

TYF Newbie
Joined
May 1, 2024
Posts
4
Reaction score
1
No, you would need a Micro 3 fuse tap for F26, to retain the stock fuse functionality.
1 last question, on f44 for bat power, how u got the fuse tap in there? On mine the hot side is on the right prong so I’d have to put it the opposite way you did yours right?
No, you would need a Micro 3 fuse tap for F26, to retain the stock fuse functionality.
1 last question. On f44 mine was empty but has constant power like yours, but in mine the hot side is on the left side, I’m assuming yours is the same, how u get the fuse tap on there, if I put it like you did, I don’t get power. What am I missing?
 

Attachments

  • IMG_1421.jpeg
    IMG_1421.jpeg
    364.8 KB · Views: 14
  • IMG_1422.jpeg
    IMG_1422.jpeg
    316.8 KB · Views: 14
OP
OP
B

badreau

Member
Joined
Nov 4, 2021
Posts
41
Reaction score
39
Location
Alberta, Canada
1 last question, on f44 for bat power, how u got the fuse tap in there? On mine the hot side is on the right prong so I’d have to put it the opposite way you did yours right?

1 last question. On f44 mine was empty but has constant power like yours, but in mine the hot side is on the left side, I’m assuming yours is the same, how u get the fuse tap on there, if I put it like you did, I don’t get power. What am I missing?
Hey there. You had me scratching my head for a bit there figuring out what I did, but got it figured out.
Put a fuse of equal or larger size in the main/primary slot on the fuse tap. In my case I have a 5A fuse on the new circuit, and a 10A fuse on the primary circuit. The fuses operate in series, not parallel as intended.
What it is doing is passing power from the hot side, through the 10A fuse, to the load side, which then goes through the 5A fuse on your new circuit and you’ll have power.
 

fondupot

Member
Joined
Oct 31, 2024
Posts
95
Reaction score
127
Location
South Carolina
This thread was helpful. I got my BlackVue 590X 2ch dash cam installed over the last two days. It’s not the newest dash cam. But it works flawlessly with a power magic kit so it’s set it and forget it. I had it installed on my previous GMC Canyon for several years.

The front cam is easy. I used a Blendmount to attach the camera to the rear view mirror. It just clamps on and Allen cap screws hold it all together.

Then I ran all my cables thru the headliner down the passenger side A pillar. Took off that a-pillar trim and ran my wires behind the airbag. Down to the fuse panel area in the passenger side door jamb.

I used F44 for switched power, and a couple fuses up was a “not used” fuse for constant power. Seems to work nicely with the fuse taps I have.

Then I ran my rear camera cable down along the door sills all the way back to the trunk area. It’s easy to pop the sills off and tuck the wire in as you go. I didn’t have to buy and extension cable to get it back because the original BlackVue one was too short. I found one on Amazon, China special.

Once I got the cable to the trunk area I took out the rear floor storage compartment it’s held in with two plastic screw turns and lifts right out. Then I popped out the household outlet and the D-pillar trim and fished my wire up to the hatch. I used one of the accordion grommets to run my wires just like OP.

The only thing that’s annoying when the back glass is opened the wire for the cam gets pulled out. I left a loop on it under the trim so it pulls out easy. And it’s just as easy to tuck it back in.

All in all. A pretty clean install. Here’s a link to some photos.


Forum statistics

Threads
132,779
Posts
1,874,141
Members
97,613
Latest member
Salman saeed
Top