2003 console in obs install (pic heavy)

Disclaimer: Links on this page pointing to Amazon, eBay and other sites may include affiliate code. If you click them and make a purchase, we may earn a small commission.

DallasTahoe

Full Access Member
Joined
Aug 17, 2012
Posts
711
Reaction score
214
After going through hundreds of posts on multiple Chevy/gmc forums I found little to no info, so I guess I'll do a full write up on how I'm doing mine so here goes!
Here's what I'm starting with, a console from an 03 Avalanche, now none of the Bose stuff is staying, it and the a/c vent tubes are coming out, not so much because I'm not going to use it but it makes it lighter when test fitting.12165750a720c46d0e0829c4a012b4d5.jpg
b9c069869f63274ba1bbec0357949894.jpg

First off you'll need to test fit before you do anything so you can see if you want to even tackle this install because of the fabrication involved

be7e6a6a05401360474e0bbfd9117e77.jpg50d7f12aba89ff3c57d1780b59654945.jpg

Problem with this particular console is that it's not a direct bolt in, there is some work to be done.
First thing I did was trim the upper left corner to get the console to fit tighter and have less gap between it and the dash panel, STOP!!!! This is what I did but in hindsight I would not have given the chance again. I wanted the least amount of gaps all the way around
You'll need to check the fit vertically on both sides, I actually trimmed the side panels down to allow a better fit
ac26a1631ea6dca0bd81fa5d56bab506.jpgeb24db84815ee57c25108d95549866cd.jpg
988564a916e91602b56a88d68ea4946b.jpg
The blue tape in the pic is actually there to mark a cut line, yes a cut line into the dash panel. Again this is how I did it, those dash pieces aren't hard to find or expensive. Here's how it looks after its cutd896b20db743a52a77ab1b3dd42cb2ce.jpg13c26abc44e96e60dcdd77a61fdec1ae.jpg


Sent from my iPhone using Tapatalk
 
OP
OP
DallasTahoe

DallasTahoe

Full Access Member
Joined
Aug 17, 2012
Posts
711
Reaction score
214
When you cut this panel the gap only needs to be about 2 1/2-3 inches, if you do it like I did you keep all your mounting locations. Time to test fit again
Als cut the two black boxes off of the back side of the console946311243ee3f5cbdbfdc6a7bc17d057.jpg
15b452ed50e829b9fd38a6c6f312c7a2.jpg473ad293fa5f36f441c6d1bad372fa6d.jpg
Passenger side still has a considerable gap0c6022ec57270fdb0be9b329f4c6b8cc.jpg
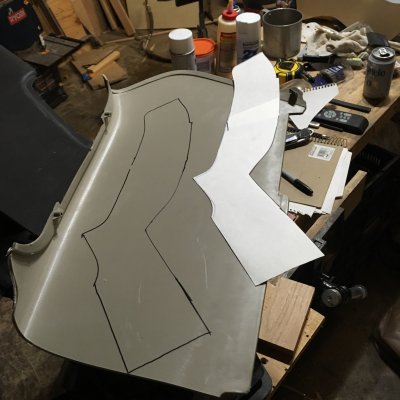
Using cardboard I made a template for a filler piece
c8cf4f46201875048b1215e7edc1d0d5.jpg
Using the template I made a panel from a sheet of 1/8in fiberglass panelb2f64fb60e8afa13da87fdcef8222dce.jpg5a008750d578c3a5d78a84b21c4dcd68.jpg
I epoxied it in and used rivets to hold it, I've used epoxy on this kind of plastic before and it doesn't always work so great, hence the rivets which can always be removed later. For the filler piece that goes on the top that takes some time, lots of shaping on my drill press with a sanding drum attachmenta96452c2d8be203d4998deb59d01173d.jpg
Once you get it fit use the scrap plastic from trimming the bottom of the console panels and superglue them in to hold it in place. Once that's done do some smoothing and sanding then another test fit4087885690d83ea878e56b3771c5f663.jpg0b6094ecb74459045410f244e9efca93.jpg60944c4a87ab3642e5e63df0ececc716.jpg26f87c3b599a5e44a573d3a0f8302970.jpg16720a2271f976f4e8fae19ebf90636e.jpg4b69ede434372c588f41242a9fa8d6e6.jpg
I'll put more on this once I get off work to tackle the fiberglassing


Sent from my iPhone using Tapatalk
 
OP
OP
DallasTahoe

DallasTahoe

Full Access Member
Joined
Aug 17, 2012
Posts
711
Reaction score
214
Damn good fabbing!!

Hey thanks man! It's not done yet once I get home from work I'll be doing some Glassing on it to get everything as tight as I can


Sent from my iPhone using Tapatalk
 
OP
OP
DallasTahoe

DallasTahoe

Full Access Member
Joined
Aug 17, 2012
Posts
711
Reaction score
214
Ok so now that the epoxy has dried I can fit my fill piece for the fiberglass panels. I went to the junkyard and took a flat piece from another console and cut it to fit and trimmed it in and epoxied it to the fiberglass panels. I also drilled out the rivets and filled the holes with epoxy. If you wait until the epoxy is kind of gummy you can cut off the excess and touch it and knead it with your fingers on the panel and it gives it a similar texture to the original panels and once painted you can't really see the patches or holes052895aff061b402cdc64bc968d31242.jpgdccc82c23ef6d457c924bd5cfe14c67a.jpg771014a7f555e1d295a62e32cff62835.jpgca0d78b7737d65e5cdd203d047b2438b.jpg


Sent from my iPhone using Tapatalk
 
OP
OP
DallasTahoe

DallasTahoe

Full Access Member
Joined
Aug 17, 2012
Posts
711
Reaction score
214
16f7e3344beb113e806409183db87c46.jpg
aef517356c758beee6c318882d91d71b.jpg
Now it's time to fit the mounting bracket. The original rear bracket can be used, just take it off and reverse it and put about a 3/4in spacer underneath and screw the old bracket to the new one. For the front part you can use the existing mounting holed2e0e89070428e8d95f453276217ccbe.jpg4d9df3b8eb055c6ee3dcd4614c5ffc81.jpg


Sent from my iPhone using Tapatalk
 
OP
OP
DallasTahoe

DallasTahoe

Full Access Member
Joined
Aug 17, 2012
Posts
711
Reaction score
214
By the way way don't laugh at the nasty carpet, that's going to get redone real soon


Sent from my iPhone using Tapatalk
 

Tonyrodz

Resident Resident
Joined
Feb 16, 2012
Posts
31,606
Reaction score
47,108
Location
Central Jersey
I can't wait to see what it's going to look like once it's done. Painting it the same light gray as the rest of your interior?
 

Forum statistics

Threads
132,327
Posts
1,866,115
Members
96,940
Latest member
harrlo
Top