StevenFromTexas
Mr. Negative
I purchased a Console Safe by Lock'er Down from Mobile Security Plus ( http://www.mobilesecurityplusstore.com/ ) for my 2010 Tahoe. The model number is LD2011A. The Console Safe does not block the USB port or 12-volt power port in the factory console, which is what kept me from buying a competitor's product previously. I added the Abloy High Security Lock option to the Console Safe.
The Console Safe was received on 06-20-12, and I installed it that same day. Being Mr. Negative, I'll get to the only minor complaint I would have, and it is one which I have read about a competitor's product: I wish the interior dimensions were just a little wider, but I can understand the reasoning behind the manufacturing process. O.K., with that out of the way, the product is fantastic and serves my main purpose, which is to be able to lock up a full-size 9mm pistol when I don't want the pistol with me when outside the vehicle. Plus, I can toss in other stuff like a checkbook, iPod touch, etc. to keep it safer from those pesky smash and grab thieves.
I may purchase a Chevrolet truck or a second Tahoe when the 2014 models come out, provided the 2014 Chevrolet trucks looks better than the current models or the 2014 Tahoe isn't sissified. If I do make a new vehicle addition at that time, and a Console Safe by Lock'er Down is available, that'll be the first modification I'll make to the new vehicle. I like the product.
My comments on the five pictures below:
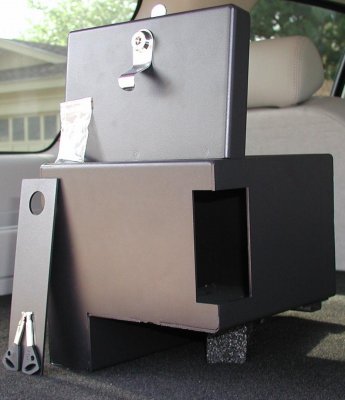
Picture 1: Side view of the actual Console Safe with the two attachment screws in the plastic bag toward the upper left side of the picture, the two keys that came with the lock I ordered, the cover plate with the finger hole that covers the inside lower portion of the Console Safe and which can be used to keep some small items out of view inside the Console Safe, and the cutout portion of the Console Safe that allows access to the USB port or 12-volt power port in the factory console.
Picture 2: The cover plate that fits over the top of the Console Safe.
Picture 3: The Console Safe screwed down inside the factory console, and the underside of the cover plate that fits over the top of the Console Safe. There are four bolts on the underside of the cover plate that fit through openings on the top of the Console Safe. It isn't necessary to add a locknut to each bolt from inside the Console Safe if you wish to use the supplied sticky tape, but if you wish to use locknuts, do as I did and go to Home Depot or Lowe's and buy four 8-32 stainless steel nylon insert locknuts. (TIP: Attach the locknuts after you set the cover plate into position on top of the Console Safe when everything is outside of the factory console. You'll be glad you did. I wish I had done so before screwing down the Console Safe and then attaching the cover plate and locknuts. Things would have been much easier!) In my picture, you'll see one 8-32 stainless steel nylon insert locknut on the lower left underside bolt of the cover plate. I was just testing to be sure I had the right size locknut, and forgot to remove it before I took the picture.
Picture 4: Cover plate in posiiton, and you can see where the two included screws were used to secure the Console Safe to the floorboard. Prior to inserting the Console Safe, I had removed two screws that GM had used to help secure the factory console. Those holes were then used to secure the Console Safe.
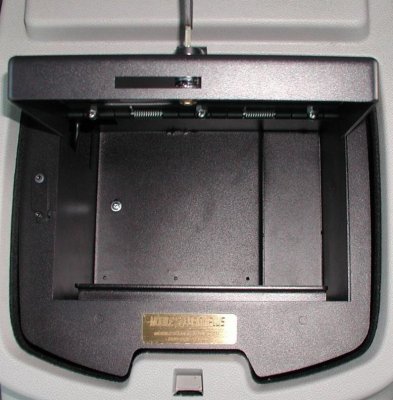
Picture 5: The cover plate with the finger hole (which isn't visible in the picture due to the angle I was in trying to take a picture from above without falling into the second row ) that covers the inside lower portion of the Console Safe where you can hide some small items if you wish.
The Console Safe was received on 06-20-12, and I installed it that same day. Being Mr. Negative, I'll get to the only minor complaint I would have, and it is one which I have read about a competitor's product: I wish the interior dimensions were just a little wider, but I can understand the reasoning behind the manufacturing process. O.K., with that out of the way, the product is fantastic and serves my main purpose, which is to be able to lock up a full-size 9mm pistol when I don't want the pistol with me when outside the vehicle. Plus, I can toss in other stuff like a checkbook, iPod touch, etc. to keep it safer from those pesky smash and grab thieves.
I may purchase a Chevrolet truck or a second Tahoe when the 2014 models come out, provided the 2014 Chevrolet trucks looks better than the current models or the 2014 Tahoe isn't sissified. If I do make a new vehicle addition at that time, and a Console Safe by Lock'er Down is available, that'll be the first modification I'll make to the new vehicle. I like the product.
My comments on the five pictures below:
Picture 1: Side view of the actual Console Safe with the two attachment screws in the plastic bag toward the upper left side of the picture, the two keys that came with the lock I ordered, the cover plate with the finger hole that covers the inside lower portion of the Console Safe and which can be used to keep some small items out of view inside the Console Safe, and the cutout portion of the Console Safe that allows access to the USB port or 12-volt power port in the factory console.
Picture 2: The cover plate that fits over the top of the Console Safe.
Picture 3: The Console Safe screwed down inside the factory console, and the underside of the cover plate that fits over the top of the Console Safe. There are four bolts on the underside of the cover plate that fit through openings on the top of the Console Safe. It isn't necessary to add a locknut to each bolt from inside the Console Safe if you wish to use the supplied sticky tape, but if you wish to use locknuts, do as I did and go to Home Depot or Lowe's and buy four 8-32 stainless steel nylon insert locknuts. (TIP: Attach the locknuts after you set the cover plate into position on top of the Console Safe when everything is outside of the factory console. You'll be glad you did. I wish I had done so before screwing down the Console Safe and then attaching the cover plate and locknuts. Things would have been much easier!) In my picture, you'll see one 8-32 stainless steel nylon insert locknut on the lower left underside bolt of the cover plate. I was just testing to be sure I had the right size locknut, and forgot to remove it before I took the picture.
Picture 4: Cover plate in posiiton, and you can see where the two included screws were used to secure the Console Safe to the floorboard. Prior to inserting the Console Safe, I had removed two screws that GM had used to help secure the factory console. Those holes were then used to secure the Console Safe.
Picture 5: The cover plate with the finger hole (which isn't visible in the picture due to the angle I was in trying to take a picture from above without falling into the second row
 ) that covers the inside lower portion of the Console Safe where you can hide some small items if you wish.
Attachments
-
 Console Safe installation 06-20-12 -- Picture 1 of 6.jpg94.2 KB · Views: 332
 -
 Console Safe installation 06-20-12 -- Picture 2 of 6.jpg90.1 KB · Views: 326
 -
 Console Safe installation 06-20-12 -- Picture 3 of 6.jpg97.4 KB · Views: 318
 -
 Console Safe installation 06-20-12 -- Picture 4 of 6.jpg94.5 KB · Views: 322
 -
 Console Safe installation 06-20-12 -- Picture 5 of 6.jpg95.1 KB · Views: 290
Last edited:


