Engine Swap to stroked 6.0 (408) and general vehicle refurbishment

Disclaimer: Links on this page pointing to Amazon, eBay and other sites may include affiliate code. If you click them and make a purchase, we may earn a small commission.

OP
OP
Chooko

Chooko

Full Access Member
Joined
Feb 24, 2013
Posts
102
Reaction score
204
Location
The Great State of Texas
There is one more thing that bears mentioning, and I am putting it in its own post so that it stands out...

I purchased a TCI flexplate 399757. It is marked "this side must be toward engine". I installed it the other day as marked, but thought it didn't look quite right. Today I installed the starter and the gear on the starter was engaged with the flex plate teeth even when the starter gear was fully retracted. Again I looked over the flex plate and felt that it just didn't seem right. I could see that if I flipped it around the spacing with the starter gear would be better, and in addition the pads where the torque converter will mount looked wrong. I called TCI support and as soon as I gave the guy the part number and said that I had it installed as marked but that I thought it looked backwards, he cut in and said that they had a batch go out with the "this side must be toward engine" marking on the WRONG side of the flex plates. Of course I flipped it around, and now all is well. However, I think this would have been nearly catastrophic had I not caught the mistake. I guess I might have figured it out when I tried to get the transmssion and torque converter installed but by then I'd have probably had to pull the transmission back out, etc, and I would not have been happy. Hopefully this will turn up in the search function if anyone else runs across this issue in the future.
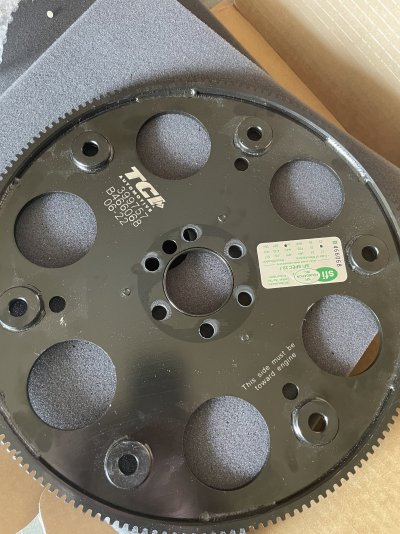
IMG_4590.jpg
 

iamdub

Full Access Member
Joined
Apr 23, 2016
Posts
20,821
Reaction score
44,943
Location
Li'l Weezyana
I had a lot of work to get the engine ready to go into the Tahoe. In particular, the front and rear covers and seals, as well as the windage tray, oil pickup, and oil pan needed to be installed. I bought a Milodon 31507 low profile oil pan, which I like because is has kick outs on the sides for extra capacity, and internal trap doors to ensure that the pickup always has oil even in a turn or under hard acceleration or deceleration. What I don't' care for is that the back of the oil pan is very different from stock, and lacks the bolt holes for the lower transmission bellhousing bolts. In addition, the two rear bolts that go into the rear cover need to be much shorter than the stock bolts, but the pan does not come with them. I had an ARP bolt kit, but had to find replacements for those two bolts which I found frustrating. You also have to use a Milodon oil pickup with the oil pan, but I didn't necessarily mind that because the Milodon pickup has two bolt holes where it attaches to the oil pump, and I made sure to put two bolts in it, vice the stock single bolt. Of course I put a new O-ring on the pickup, and lubricated and sealed it with SuperLube silicone O-ring grease. For the windage tray, I purchased a Mast motorsports 401-015 stroker windage tray, which gives plenty of clearance for my stroked engine. Here are the oil pickup and windage tray installed:
View attachment 365627

And here is a view of the gap between the windage tray and the crank weights and rod caps and bolts:
View attachment 365628
I turned the engine over by putting a breaker bar on the harmonic dampener bolt just to be sure.

I got a used but cleaned and repainted (I think) GM front cover, and ordered a new rear cover. Of course, new gaskets and seals were included as appropriate. Here is the back of the block with everything installed:
View attachment 365629

In addition, you might notice that the steam crossover in this picture on the back of the heads. The old heads had tapped bolt holes but eh water passages were blocked off. The water passages on the new engien are open. I decided that instead of blocking them off I'd install this flexible crossover, and then plumb it tothe front portion of the system. More to come on that once the engine is installed.

Did TSP include a barbell? OEM or billet?
 
OP
OP
Chooko

Chooko

Full Access Member
Joined
Feb 24, 2013
Posts
102
Reaction score
204
Location
The Great State of Texas
Alright, time for another update on the progress with this project. I got the engine into the bay back on the 16th. I didn't get started that day until kind of late, and then had to wait for help, but eventually my wife came out to the garage, and it didn't take us to long to get the engine sitting on its mounts. We spun it in , just the opposite of how it came out. I thought it would go in with the water pump and mounts installed, but I eventually had to take those things off. They probably would have been OK, but I had the AC compressor and power steering pump still connected, and held out of the way with bungees, and they would not clear the water pump and mounts. It was dark by the time I got the bolts in, so photographs were a bit lacking.
IMG_4596.jpg
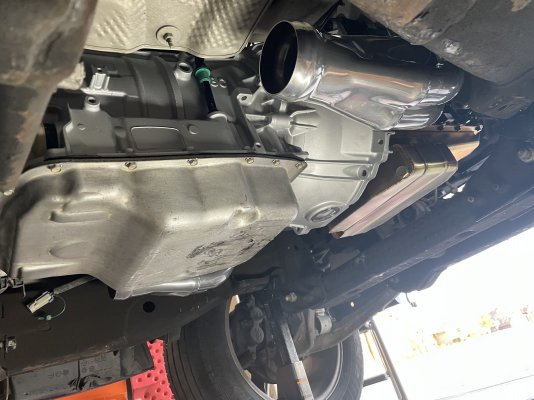
The big project for the next day was to get the transmission in the car. I thought I had a friend lined up to help, but he wasn't able to come over, so I did most of the work myself, although my wife did an admirable job of running the jack for me. Matching the angle of the back of the block with the front of the transmission was a challenge while laying on my back, but eventually I was able to get the dowel pins aligned, and got the bolts in.
IMG_4603.jpg
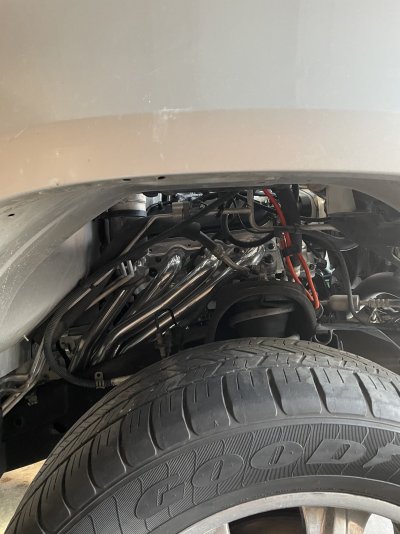
I am pretty happy with these headers overall. Like all headers, they are constantly in the way, but honestly they aren't as bad as I was afraid they would be. Here is a pic through the wheel well just because it looks badass.
IMG_4606.jpg
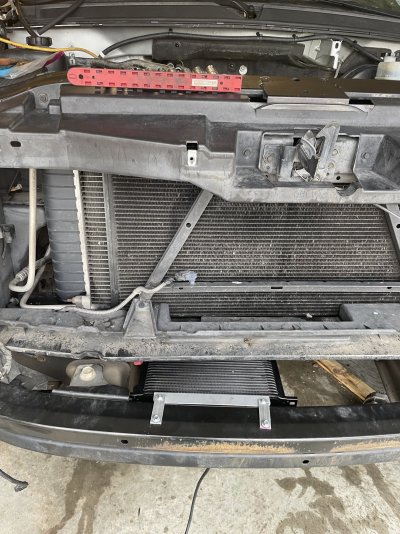
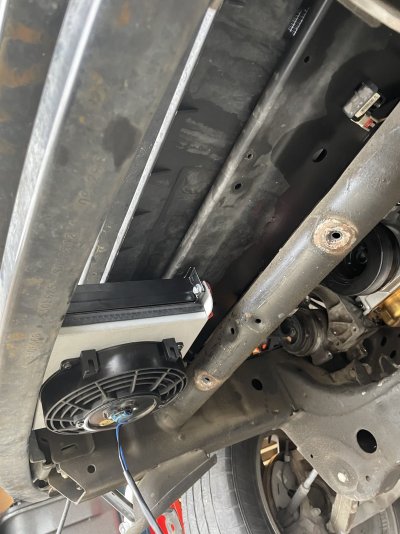
I purchased a Derale remote cooler for the transmission, and after looking around various places on the Tahoe finally settled on this:
IMG_4608.jpgIMG_4609.jpg
It fits in there perfectly, almost like it was meant to go there. I made aluminum straps and used self tapping screws (with drilled pilot holes) for the front mounts, and the rear ones use the same self-tappers, but go up into the core support from underneath. I made sure that they weren't long enough to go all the way through and into the radiator before I screwed them in. I am using -6AN stainless braided lines to get the fluid from the transmission to the cooler and back. Derale makes an identically sized unit with -8AN fittings, and I believe there is room here to mount it next to the transmission cooler for use as an oil cooler, and I am planning to do that in the future. For now, I am going to bypass the stock transmission cooler, but I think I will plumb it into the loop in the future. I need to wire the fan up tomorrow. It has a 180 degree thermostat that turns the fan on and off. Anyone know what would be a good source for switched 12v under the hood?
 
Last edited:
OP
OP
Chooko

Chooko

Full Access Member
Joined
Feb 24, 2013
Posts
102
Reaction score
204
Location
The Great State of Texas
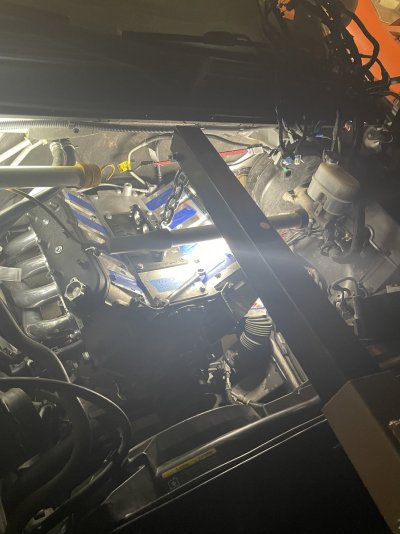
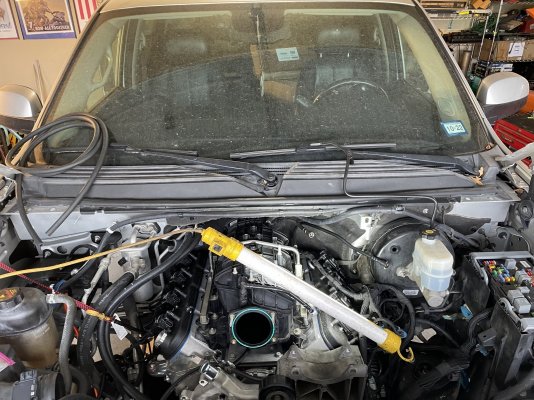
Here is a shot from today, once I got the intake manifold on.
IMG_4610.jpg
After that picture was taken I installed the alternator, all of the radiator hoses, and my AirRaid CAI. I have to say I was a little disappointing with the AirRaid kit. First, some of the fasteners they sent were the wrong thread to mate up with their own parts. Fortunately I had bolts (ARP no less!) that were correct and so I was able to overcome that problem. The second problem is that I did not get the ring that joins the tube to the throttle body, so I am going to have to come up with something tomorrow. Hopefully Autozone or O'Reilly have something that will work. I also installed the throttle body, the coil wiring, and finished up routing all of my engine harness bundles and connectors. That went pretty well except that I have two questions for the forum...

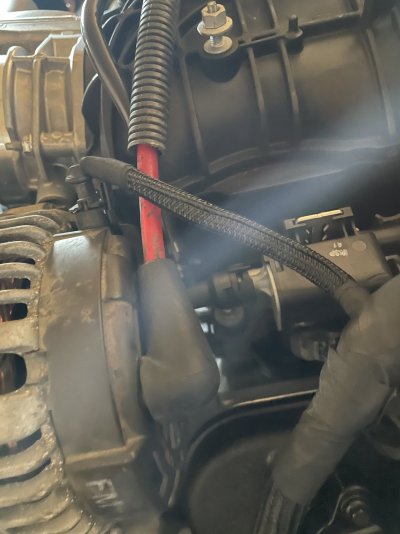
1. Does this look right?
IMG_4611.jpg
That red cable was bungeed all the way in the passenger fender area from when I pulled the engine, and was unlabeled. But in the checklist I made as I was pulling things apart I noted a red cable on the back of the alternator, and the length of this one seemed perfect. It starts on the positive battery connector. Assuming that it is correct, how is it routed on stock vehicles? You can't see it in the picture, but I have it going over the intake manifold, and it just doesn't seem right.

2. How many connectors should there be for the starter? Right now I have a red cable from the battery, and a line coming out of the wiring harness. I have a MSD starter that is different than stock which is why I am confused. I think i have the correct wires and cables, but want to make sure I am not missing something.

The last thing I did this evening was to put the battery in, plug in my MPVI2 to my laptop and download the stock tune files which have been sent tot he tuner I decided to use for initial tune.

Things that I will be doing tomorrow include torquing the torque converter bolts, final install of the starter once the torque converter is torqued, finishing the AN lines for the transmission cooler (I only have to put 90 degree ends on the hoses at the transmission, and attach them), wiring the transmission cooler fan, installing the idler and belts, figuring out how to mate the AirRaid tube to the intake manifold, modifying the PCV tube to work with my aftermarket valve covers, filling fluids, a final inspection for routing of wires, cables, and lines & hoses, especially around the headers, and hopefully, IF everything goes well, and IF I get the tune file back, starting this beast up for initial break in.
 

Geotrash

Dave
Supporting Member
Joined
Feb 16, 2018
Posts
6,423
Reaction score
15,916
Location
Richmond, VA
Alright, time for another update on the progress with this project. I got the engine into the bay back on the 16th. I didn't get started that day until kind of late, and then had to wait for help, but eventually my wife came out to the garage, and it didn't take us to long to get the engine sitting on its mounts. We spun it in , just the opposite of how it came out. I thought it would go in with the water pump and mounts installed, but I eventually had to take those things off. They probably would have been OK, but I had the AC compressor and power steering pump still connected, and held out of the way with bungees, and they would not clear the water pump and mounts. It was dark by the time I got the bolts in, so photographs were a bit lacking.
View attachment 366248
The big project for the next day was to get the transmission in the car. I thought I had a friend lined up to help, but he wasn't able to come over, so I did most of the work myself, although my wife did an admirable job of running the jack for me. Matching the angle of the back of the block with the front of the transmission was a challenge while laying on my back, but eventually I was able to get the dowel pins aligned, and got the bolts in.
View attachment 366249
I am pretty happy with these headers overall. Like all headers, they are constantly in the way, but honestly they aren't as bad as I was afraid they would be. Here is a pic through the wheel well just because it looks badass.
View attachment 366250
I purchased a Derale remote cooler for the transmission, and after looking around various places on the Tahoe finally settled on this:
View attachment 366251View attachment 366252
It fits in there perfectly, almost like it was meant to go there. I made aluminum straps and used self tapping screws (with drilled pilot holes) for the front mounts, and the rear ones use the same self-tappers, but go up into the core support from underneath. I made sure that they weren't long enough to go all the way through and into the radiator before I screwed them in. I am using -6AN stainless braided lines to get the fluid from the transmission to the cooler and back. Derale makes an identically sized unit with -8AN fittings, and I believe there is room here to mount it next to the transmission cooler for use as an oil cooler, and I am planning to do that in the future. For now, I am going to bypass the stock transmission cooler, but I think I will plumb it into the loop in the future. I need to wire the fan up tomorrow. It has a 180 degree thermostat that turns the fan on and off. Anyone know what would be a good source for switched 12v under the hood?
I wired it into the under-hood fuse block, fuse #34 (S/Roof - Roof Beacon Relay (TRW), Sun- roof Module (CF5)) which is an 'always on' circuit typically used by police vehicles for the light bar. I used a $5 fuse tap from autozone to add an additional fuse for the fan. If you keep the thermo-switch on your install, the fan will only run for a minute or two when cooling down anyway and I haven't had any problems with battery drain since installing it last year. I would rather have it on a circuit that's switched on with the ignition but couldn't find one under the hood. Problem is that every switched circuit I tried had no power unless its accompanying relay was also switched on. For example, the rear window defogger fuse wouldn't power up until I turned the rear defogger on. There is an up fitters box under the dash with power options, so that may be an option as well.
 

Geotrash

Dave
Supporting Member
Joined
Feb 16, 2018
Posts
6,423
Reaction score
15,916
Location
Richmond, VA
1. Does this look right?
View attachment 366254
That red cable was bungeed all the way in the passenger fender area from when I pulled the engine, and was unlabeled. But in the checklist I made as I was pulling things apart I noted a red cable on the back of the alternator, and the length of this one seemed perfect. It starts on the positive battery connector. Assuming that it is correct, how is it routed on stock vehicles? You can't see it in the picture, but I have it going over the intake manifold, and it just doesn't seem right.
Yes, that's the correct routing for that red cable.
 
OP
OP
Chooko

Chooko

Full Access Member
Joined
Feb 24, 2013
Posts
102
Reaction score
204
Location
The Great State of Texas
Well, good news and bad news...

I got the car started today. Its LOUD. Maybe too loud. Although I just have the y-pipe clamped together at the moment. But I think the sound is coming from the front, not necessarily the exhaust, so I'm not sure that getting the permanent Y-pipe is going to help all that much. I'm not sure that these headers were a great idea, and if I can't get this thing quieted down I am likely going to be going back to stock intake manifolds.

I ran it up to temperature per the instructions that I got from Texas Speed this morning, then changed the oil and put everything back together. I lowered it down today, and pulled it out of the garage under its own power for the first time in months, which was a victory.

But the bad...

There is a BAD oil leak coming from the area of the rear main seal. Could be the seal, could be the rear cover. I don't know. I can see oil on the flex plate, and it is an unacceptable amount of oil on the ground after just short runs. So I guess the transmission is coming back out one way or the other.

Also, my fans are not coming on. They just aren't coming on at all. So naturally she gets hot, and I have to shut her down before I am really ready. I am going to do some searching on this issue this evening, but if anyone wants to hook me up with some troubleshooting tips or procedures I'd be eternally grateful.
 

1badjimmy

Member
Joined
Oct 8, 2020
Posts
59
Reaction score
44
For the fans did you try turning on the AC? It might not be recommended for the initial break in but that should turn them on. First checks after that would be fuses, relays, did the fans get hooked back up? I’ve done it multiple times. Temp sensor installed and hooked up?

One last possibility could be the tune. I can’t remember off the top of my head if you’ve had another tune put in for initial start up but maybe the fans got “adjusted” improperly.

Congratulations on getting it back together and running even with the initial “bugs”
 

Just Fishing

Can't fix stupid
Joined
Aug 30, 2020
Posts
3,926
Reaction score
8,502
Location
Utah
Well, good news and bad news...

I got the car started today. Its LOUD. Maybe too loud. Although I just have the y-pipe clamped together at the moment. But I think the sound is coming from the front, not necessarily the exhaust, so I'm not sure that getting the permanent Y-pipe is going to help all that much. I'm not sure that these headers were a great idea, and if I can't get this thing quieted down I am likely going to be going back to stock intake manifolds.

I ran it up to temperature per the instructions that I got from Texas Speed this morning, then changed the oil and put everything back together. I lowered it down today, and pulled it out of the garage under its own power for the first time in months, which was a victory.

But the bad...

There is a BAD oil leak coming from the area of the rear main seal. Could be the seal, could be the rear cover. I don't know. I can see oil on the flex plate, and it is an unacceptable amount of oil on the ground after just short runs. So I guess the transmission is coming back out one way or the other.

Also, my fans are not coming on. They just aren't coming on at all. So naturally she gets hot, and I have to shut her down before I am really ready. I am going to do some searching on this issue this evening, but if anyone wants to hook me up with some troubleshooting tips or procedures I'd be eternally grateful.

If you have a tech 2, see if you can command the fans on.

Then for the oil leak,
I had a valve cover leak on my passenger side.
Since i installed the heads and valve covers in the vehicle, i managed to get the valve covers slightly crooked.

Leaked down the side of the block, and then in the bell housing via starter.

Crossing fingers for you that it's that easy.
 

Forum statistics

Threads
132,295
Posts
1,865,503
Members
96,878
Latest member
Jman2
Top