What did you do to your NNBS GMT900 Tahoe/Yukon Today?

Disclaimer: Links on this page pointing to Amazon, eBay and other sites may include affiliate code. If you click them and make a purchase, we may earn a small commission.

Just Fishing

Can't fix stupid
Joined
Aug 30, 2020
Posts
3,975
Reaction score
8,629
Location
Utah
Cannot believe you’re doing this while it’s still in the truck. Lol


Yeah, it's easier when on the stand for sure. :jester:

I'm planning to do this once more with a new crank.
If i'm lucky i'll get some use of the hoe during the winter...
Springtime would be best.

I have to remember to not let the garage heater kill me...
Doing this later would be much safer.

:yaoface2:
 

Just Fishing

Can't fix stupid
Joined
Aug 30, 2020
Posts
3,975
Reaction score
8,629
Location
Utah
Rods all torqued.
I just set the thrust bearing.
the spec is a little looser, but still within the specified spec
1640390514783.png

I got about .0045 (I have to double check the number once more but i know it was under .007)...
(Using a dial indicator)
 

alpha_omega

Full Access Member
Joined
Mar 15, 2017
Posts
704
Reaction score
1,347
Location
Michigan
Before I forget to say it…Merry Christmas!

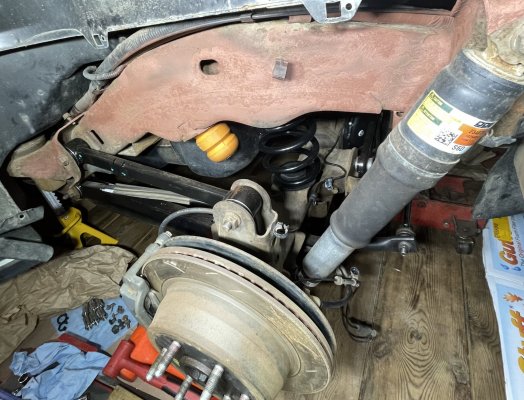
Last night into this morning I finished up installing the following new rear end parts:
Rear Springs
Upper/Lower Spring Insulators
Upper/Lower Control Arms
Jounce Bumpers
Stabilizer Shaft Link
7EC48C33-BD4F-4052-89C8-E62599D41857.jpeg
Now I need to pull the rear bumper cover, then clean and prep the bumper itself before putting another coat of rust preventer and a coat of primer on the body. After it dries I’ll hit it with a couple coats of underbody coating. If I’m not too high on paint fumes by that point, I’ll get the surface rust cleaned off those rotors. Too many days spent hugging and sweating all over the hubs. It shouldn’t take much more than a scotch pad or a piece of extra fine steel wool and a can of extra flammable brake cleaner.
Shoot! Hold that thought, I need to hook up the electrical connectors at the main fuse block so I can actually open the rear Liftgate (without drilling a hole in it to gain access to the release). Grrr!

Happy “Presents Day” to the forum. Enjoy unwrapping all those gifts you filthy animals!
 
Last edited:

pwtr02ss

Full Access Member
Joined
Apr 1, 2013
Posts
11,863
Reaction score
25,536
Location
Tennessee
Before I forget to say it…Merry Christmas!

Last night into this morning I finished up installing the following new rear end parts:
Rear Springs
Upper/Lower Spring Insulators
Upper/Lower Control Arms
Jounce Bumpers
Stabilizer Shaft Link
View attachment 358844
Now I need to pull the rear bumper cover, then clean and prep the bumper itself before putting another coat of rust preventer and a coat of primer on the body. After it dries I’ll hit it with a couple coats of underbody coating. If I’m not too high on paint fumes by that point, I’ll get the surface rust cleaned off those rotors. Too many days spent hugging and sweating all over the hubs. It shouldn’t take much more than a scotch pad or a piece of extra fine steel wool and a can of extra flammable brake cleaner.
Shoot! Hold that thought, I need to hook up the electrical connectors at the main fuse block so I can actually open the rear Liftgate (without drilling a hole in it to gain access to the release). Grrr!

Happy “Presents Day” to the forum. Enjoy unwrapping all those gifts you filthy animals!
Looks great under there. Love the look of new, shiny parts!

Merry Christmas to you!
 

iamdub

Full Access Member
Joined
Apr 23, 2016
Posts
20,821
Reaction score
44,950
Location
Li'l Weezyana
I can't see this crack from the driver's position, even when I lean forward over the steering wheel, only from outside looking down through the glass. It might've been there for a few months, but I just noticed it. It doesn't rattle yet. I'm sure it will get bigger though.

You can epoxy it to fill it and keep it from spreading. Stuff a folded towel under the center area to support it to reduce the stresses on that part and the front left corner of the passenger side airbag cutout. That'll be the next to crack.

I used J-B Weld Plastic Bonder. It's available in Black. You mix it 50/50 and the color is a near-perfect match for the Ebony dash. If it bothers you, adjust the mix ratio to a hair to make it a perfect match.
 

StrkAliteN

Full Access Member
Joined
Jan 4, 2017
Posts
103
Reaction score
239
Merry Christmas everyone !

I own a 2007 GMC Yukon SLT - had since new ( has around 70K miles )
I am looking for a drivers side original factory OEM floor mat ( carpeted - kinda yellowish tan color )

All the rest other mats still look like new - just need the driver side front. Sources ? Having not much luck online search thus far.

I may consider one of those all weather sets ( rubberish ) for front if factory OEM is not available.

Any info on either is much appreciated - thank you in advance
 

Rocket Man

Mark
Supporting Member
Joined
Dec 25, 2014
Posts
26,005
Reaction score
50,865
Location
Oregon
Merry Christmas everyone !

I own a 2007 GMC Yukon SLT - had since new ( has around 70K miles )
I am looking for a drivers side original factory OEM floor mat ( carpeted - kinda yellowish tan color )

All the rest other mats still look like new - just need the driver side front. Sources ? Having not much luck online search thus far.

I may consider one of those all weather sets ( rubberish ) for front if factory OEM is not available.

Any info on either is much appreciated - thank you in advance
You won’t find a single mat, might try www.stockinteriors.com to buy a set. They will send you color samples for free to match up.
 

Forum statistics

Threads
132,688
Posts
1,872,580
Members
97,499
Latest member
jester8798
Top