I suspect BCM... thoughts?

Disclaimer: Links on this page pointing to Amazon, eBay and other sites may include affiliate code. If you click them and make a purchase, we may earn a small commission.

OP
OP
T

TrybalRage

Member
Joined
Jun 13, 2009
Posts
94
Reaction score
76
Alright fellas, new alternator on it's way. While I wait, I've pulled the main fuse box to check for corrosion (nope) and started pulling connectors on other modules to check them as well. Going to put a light coat of dielectric grease on them just for peace of mind, following this tsb.

I am a little concerned about a few codes that popped, still. The seat control going to ground (which according to alldata could also be just low voltage).
The fact that I cannot connect to the amp (is it disconnected? Malfunctioning? Replaced but never coded? Is the amp coded in these?) even when fully charged up.
Checked high and low for any type of fleet tracking device per alldata. Looking for corroded/rubbed wire while I'm at it.
 
OP
OP
T

TrybalRage

Member
Joined
Jun 13, 2009
Posts
94
Reaction score
76
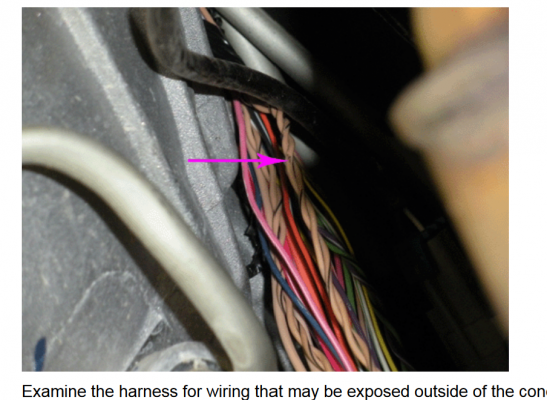
New alternator should be here any time now (thanks Amazon!). As I said, while I'm waiting I've been inspecting/dielectric greasing all the connectors mentioned in that TSB. I found something that looks... suspicious.

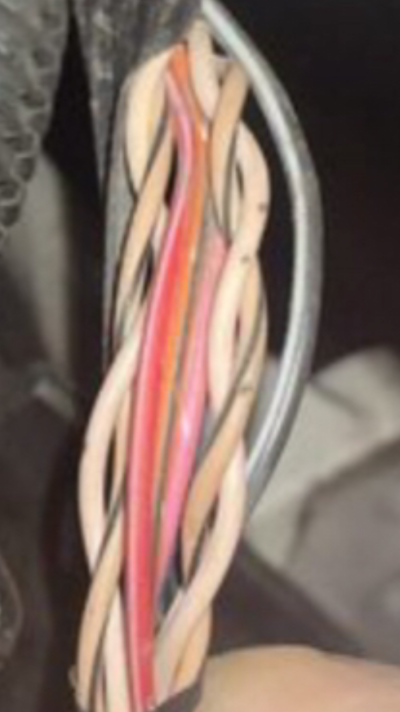
The first item mentioned is a metal wire clip on the transmission. Lo and behold, my plastic split loom is crumbling at that location. I pull it apart and I'm seeing... marks? On the high speed wiring.

My wires:

It looks awfully similar to the types of marks pointed out in another portion of the TSB.

1662067826418.png


I guess the question is... do we have a small short happening here?

I don't see exposed copper, so I don't think I need to cut/splice anything here, right? Just wrap it up better to protect it?
 

Jimmyy

Full Access Member
Joined
Oct 27, 2020
Posts
548
Reaction score
1,124
Location
Minnesota
I would wrap it. It's a twisted pair like network wire. Maybe some brush on liquid tape then wrap the bundle.
 

Fless

Staff member
Super Moderator
Joined
Apr 2, 2017
Posts
11,894
Reaction score
24,218
Location
Elev 5,280
What does the TSB say to do if those marks are found?
 

Rocket Man

Mark
Supporting Member
Joined
Dec 25, 2014
Posts
26,004
Reaction score
50,862
Location
Oregon
New alternator should be here any time now (thanks Amazon!). As I said, while I'm waiting I've been inspecting/dielectric greasing all the connectors mentioned in that TSB. I found something that looks... suspicious.

The first item mentioned is a metal wire clip on the transmission. Lo and behold, my plastic split loom is crumbling at that location. I pull it apart and I'm seeing... marks? On the high speed wiring.

My wires:

It looks awfully similar to the types of marks pointed out in another portion of the TSB.

View attachment 379708


I guess the question is... do we have a small short happening here?

I don't see exposed copper, so I don't think I need to cut/splice anything here, right? Just wrap it up better to protect it?
Yours doesn’t look like the insulation is open like that TSB picture so I say just wrap it up better and put some new split loom on it. I don’t think there’s a problem there.
 
OP
OP
T

TrybalRage

Member
Joined
Jun 13, 2009
Posts
94
Reaction score
76
What does the TSB say to do if those marks are found?

It just says "repair wire as needed" and references the manual. The manual only has instructions for exposed copper, so I guess I'll just wrap it up.
 
OP
OP
T

TrybalRage

Member
Joined
Jun 13, 2009
Posts
94
Reaction score
76
Yours doesn’t look like the insulation is open like that TSB picture so I say just wrap it up better and put some new split loom on it. I don’t think there’s a problem there.

They do catch a fingernail so it's like a slight indentation, but I don't see exposed copper there.
 

petethepug

Michael
Joined
May 4, 2016
Posts
3,020
Reaction score
3,274
Location
SoCal
It looks like GM caught that their employees were yanking the harnesses through the plugs and firewalls so hard it creased the insulation and left residual metal behind from the unpainted pathways.

FE500069-1A46-45FD-9BB8-3F13A0F99DB0.png
Typically this is where a wire would be stretched and give a lifetime of grief when heat cycles raise and lowers the conductivity. This doesn’t look stretched, just bruised.

Can you make a list of everything you’ve replaced to date? Ten pages came up quickly and others chimed in with similar issues remedied on their truck.
 
OP
OP
T

TrybalRage

Member
Joined
Jun 13, 2009
Posts
94
Reaction score
76
Battery, alternator, and BCM have been replaced to date.

Wire harness repaired where it was damaged at the three-way split on the top of the intake manifold (separate thread, separate problem, evap issue, now resolved).

I have been going through all of the electrical connectors and checking for corrosion per the TSB previously mentioned, and lightly coating them with dielectric grease as I go just for good measure. No corrosion found.

Today, I was sitting with my tech2 and I'm getting repeating errors for a drivers seat memory module shorting to ground (B3920 code 2). I'm also getting an error powering VCIM/Onstar issue that won't go away.

For the memory seat module, alldata gives this guide to check:
B3920 01 or B3920 02
1. Ignition OFF, disconnect the X1 harness connector at the MSM.
2. Ignition ON, verify that a test lamp does not illuminate between the control circuits listed below and ground:

* Front vertical motor terminal 12
* Front vertical motor terminal 13
* Rear vertical motor terminal 15
* Rear vertical motor terminal 16
* Seat horizontal motor terminal 9
* Seat horizontal motor terminal 10

♦ If the test lamp illuminates, test the control circuit for a short to voltage.

3. Test for infinite resistance between the control circuits listed below and ground:

* Front vertical motor terminal 12
* Front vertical motor terminal 13
* Rear vertical motor terminal 15
* Rear vertical motor terminal 16
* Seat horizontal motor terminal 9
* Seat horizontal motor terminal 10

♦ If not the specified value, test the control circuit for a short to ground.

4. Ignition OFF, disconnect the X4 harness connector at the MSM.
5. Ignition ON, verify that a test lamp does not illuminate between the control circuits listed below and ground:

* Lumbar horizontal motor terminal 12
* Lumbar horizontal motor terminal 13
* Seat recline motor terminal 15
* Seat recline motor terminal 16
* Adjustable pedal actuator terminal 9
* Adjustable pedal actuator terminal 10

♦ If the test lamp illuminates, test the control circuit for a short to voltage.

6. Test for infinite resistance between the control circuits listed below and ground:

* Lumbar horizontal motor terminal 12
* Lumbar horizontal motor terminal 13
* Seat recline motor terminal 15
* Seat recline motor terminal 16
* Adjustable pedal actuator terminal 9
* Adjustable pedal actuator terminal 10

♦ If not the specified value, test the control circuit for a short to ground.

7. If all circuits test normal, replace the MSM.

I am not getting any illumination on my test light, nor are the circuits grounding out. So new MSM time?
 

petethepug

Michael
Joined
May 4, 2016
Posts
3,020
Reaction score
3,274
Location
SoCal
Thanks Man!

At the end of this year GM is yanking all of our 2G (07-14) OnStar / VCIM connectivity. Until I can see if I can get a 3G (15-20) working in our Gen, diagnosing it is moot. It’s likely the antenna that’s taken a dump from water intrusion. The OnStar modules themselves don’t usually die. They are killed by its internal (one time) battery dying from key left on in accessory position and battery disconnected.

The seat can be tricky. ISS automotive has refurb parts for the switching assemblies if that the fault. The gearing can also deteriorate and cause the motors to self destruct. The fix is to find a replacement and swap your seat guts into it.

Depending on your M/Y you may have a MSM close to a place rain falls on it through an open window.
 

Forum statistics

Threads
132,361
Posts
1,866,706
Members
96,984
Latest member
Scpori
Top